Jhokalups – Field Operation Action Report – 9
Jhokalups – Field Operation Action Report – 9
Bakunin vs Varuna Immediate Reaction Division
150 Recon+ – Sweep and Clear
A new week and it’s back to the local game store to throw some dice. One of our local Warcor’s lived the dream of having a birthday on the local game night. Several people showed up for his Showdown Birthday Bash. I was planning on joining them, unfortunately my duties as a Pundit meant that I couldn’t participate, I had to roll dice for a different game. After my games were done, I was able to finally get a real game of Infinity against the person who got me into the game. We selected Recon+ so we could set up a table and finish quickly. I choose a repeat list, and my opponent built a brand new Varuna Immediate Reaction Division (VIRD) list. There was a lot of excitement and the Recon+ rules for list building were briefly forgotten. Patsy is not a valid choice, and had to be pulled off the table. With that done we got to the game.
Wip Roll
Bakunin – 4
Varuna Immediate Reaction Division – 15
Decision: Bakunin
Deployment: Varuna
Initiative: Bakunin
1st Turn: Bakunin
1st Deploy: Bakunin
Varuna Immediate Reaction Division List:
Varuna Immediate Reaction Division
──────────────────────────────────────────────────
6 1
MACHINIST (Varuna Div.) (CH: Mimetism, Stealth, Aquatic Terrain) Combi Rifle, D-Charges / Pistol, Knife. (0 | 17)
KAMAU Paramedic (MediKit) Combi Rifle / Pistol, Knife. (0 | 22)
KAMAU Heavy Rocket Launcher, Submachine Gun / Pistol, Knife. (1.5 | 23)
TRAUMA-DOC Combi Rifle / Pistol, Knife. (0 | 14)
HELOT MILITIAMAN Submachine Gun, Light Rocket Launcher / Pistol, Knife. (0.5 | 9)
CROC MAN Hacker (Assault Hacking Device) Combi Rifle, Antipersonnel Mines / Pistol, Knife. (0.5 | 36)
ZULU-COBRA Lieutenant (Sensor) Combi Rifle, Jammer / Assault Pistol, Knife. (0 | 29)
2.5 SWC | 150 Points
Bakunin List:
Riot GRRL Recon+
──────────────────────────────────────────────────
8
RIOT GRRL (Specialist Operative) Combi Rifle, Blitzen, Stun Grenades / Pistol, Knife. (0 | 30)
RIOT GRRL Spitfire / Pistol, Knife. (2 | 34)
MODERATOR Lieutenant Combi Rifle / Pistol, Electric Pulse. (0 | 9)
MODERATOR Combi Rifle / Pistol, Electric Pulse. (0 | 9)
ZERO (Forward Observer) Combi Rifle, Antipersonnel Mines / Pistol, Knife. (0 | 19)
ZERO Hacker (Assault Hacking Device) Combi Rifle, Antipersonnel Mines / Pistol, Knife. (0.5 | 24)
TRANSDUCTOR ZOND Flash Pulse, Sniffer / Electric Pulse. (0 | 8)
STEMPLER ZOND Combi Rifle, Sniffer / Electric Pulse. (0 | 17)
2.5 SWC | 150 Points
Open in Infinity Army
The table we had set up had several high spots with lanes across each side of the table. The middle had a giant obnoxious building that meant no shooting corner to corner and no single sniper dominance.
Deployment:
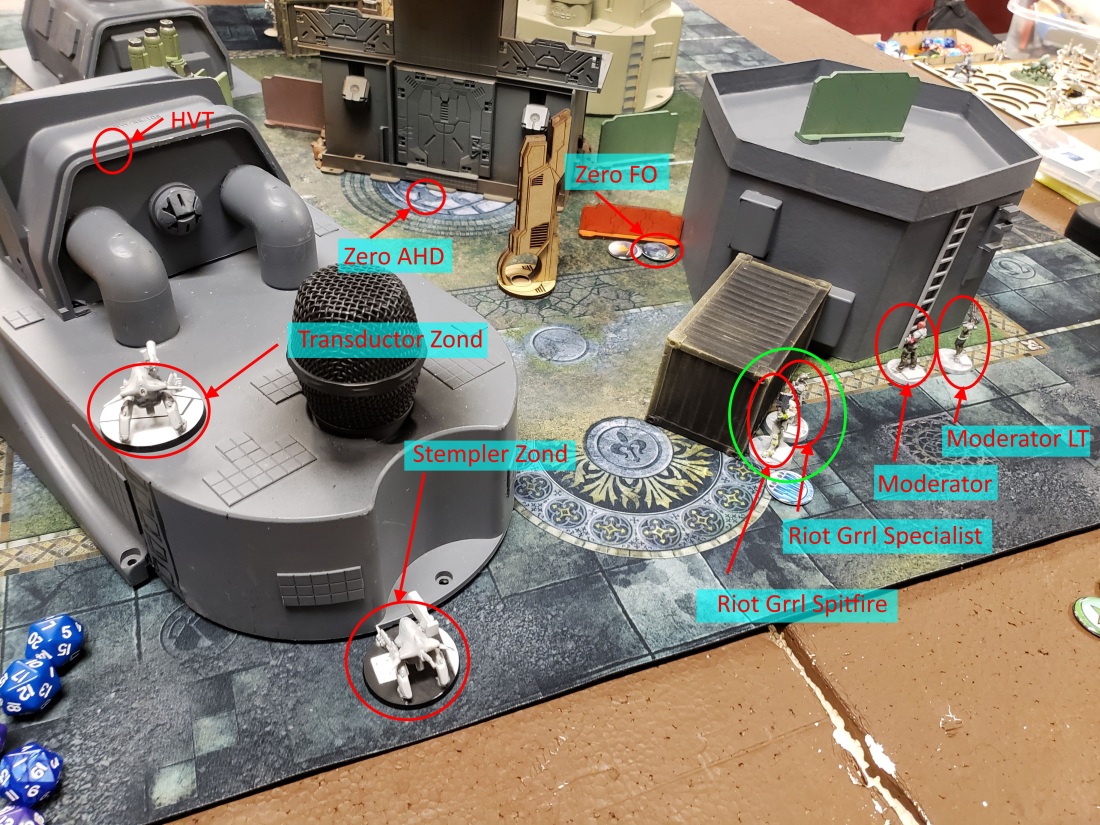
I set my moderators close together on my right, behind a building and hopefully out of site. The Riot Grrl link covered was to the left, ready to make a bee line for the close console. Transductor Zond was on the roof of a building on my left, the Stempler on the ground behind it. I had my FO zero prone in camo up to the right of the console, and held my AHD zero in reserve.

The VIRD commander had a camo marker on top of a building on his left. A Trauma doc nestled between a building and a trash can. The Kamau link (with Machinist) settled in behind some buildings at the middle. And a Helot Decoy set up across the roof of those buildings. Then I was asked to leave the table as a hidden deployment Croc Man hacker was placed up on my left.
Top of 1: Bakunin
First thing I wanted to do was figure out which Helot was the real one, and what equipment it had. I had the transductor expose itself and trigger some AROs. The kamau took a shot, the Helot didn’t. My zond flash pulsed the Kamau for a face to face. But the Kamau passed BTS. Next the Grrls walked out to get up to the close console. The Helot revealed itself and fired a light rocket launcher. Fortunately the Helot missed. Not wanting to take another LRL I had my AHD Zero sneak up in camo to the corner, then take a Surprise shot at the Helot, who went down in a hail of bullets. Since the Zero was already revealed I decided to have it make things more difficult and lay down some mines. As he advanced up, a Croc Man AHD revealed itself to try and Carbonite my Zero. The Zero decided to send some frozen programming back at the Croc Man. The Zero got a critical in the face to face and froze up the Croc Man.

The Grrls then walked up and around the console, taking a shot at the Croc Man, successfully securing the console. Unfortunately the Croc Man passed armor and went prone, also successfully resetting itself. With a coordinated order I got the Grrls out of hacking range and up towards the passage on my right. My Zero as the spearhead, layed down a mine. That done, I passed my turn.
Bottom of 1: VIRD
The Varuna commander had concerns about the mine, there were several high value pieces that would trigger the mine. The camo marker revealed to be a Zulu-Cobra who attempted, and failed, to reveal the mine with three orders (it was late and sensor was missed). After the mine was discovered and destroyed, the HRL Kamau came up and did mean things to my AHD zero, who responded by dropping another mine. The Zero died for his efforts, but trading a zero for 5 regular orders seems like a really good trade. In order to deal with the mine, the Trauma doc climbed over the container to tank the blast, successfully dodging the blast (this was technically illegal, climbing for the trauma doc is an entire order). With the mine dealt with the Zulu-Cobra used it’s Lieutenant order to re-camo itself.
I used the console to score 3 of the zones at the end of turn 1.
Score at End of 1: 1 – 0 Bakunin Favor
Top of 2: Bakunin
Well, I know who the Varuna lieutenant is, and the Riot Grrls have MSV1… So I decide that this will be the best plan. I use a command token to re-link the Riot Grrls, then have the Spitfire Grrl walk over and attempt to discover the Zulu-Cobra, and fail. The Specialist Grrl tries next and succeeds in the discover. And a third order puts the Zulu Cobra into the ground. Next task is taking out the pesky HRL Kamau, which they do with the next order, also dropping the trauma doc. More orders put the trauma doctor into the ground and brings the Grrls close to the far console. With that done I pass turn.
Bottom of 2: VIRD
Starting in Loss of lieutenant and down 3 of the 6 remaining troopers, The Varuna Commander first attempts to have a Kamau heal a Kamau, but in true Pan-O fashion kills off the Kamau. The engineer ambles up a bit and the Croc Man goes around a corner towards my HVT. A new lieutenant is appointed and the turn is passed.
With models in 3 of the 4 zones and a connected console, I get 2 points for round 2.
Score at End of 2: 3 – 0 Bakunin Favor
Top of 3: Bakunin
The only thing I really need to do is capture another console, so I have the Grrls walk up to it. And then fail to hit the button 5 times. I take a break from that to kill the Kamau paramedic. Then proceed to fail to hit the button a 6th time. I pass my turn.
Bottom of 3: VIRD
The Varuna commander has two orders left and a whole lot to do. The Croc man walks over towards my Transductor Zond and completes a classified objective. Then passes turn.
With my console and Grrls still dominating zones, I score 3, and another 1 for connecting to a console.
Final Score: 7 – 2 Bakunin Total Victory
Lessons Learned:
- This was my first time playing with Decoy, I thought I had a good plan with the Transductor, I just didn’t see that a Kamau also had the same fire lane.
- The Zero AHD was an MVP this game. His mines and surprise shot let the Riot Grrls walk around uninhibited.
- Heavy Infantry are mean in Recon+, there are not as many tools to deal with them.
- Sensor give a bonus to discover rolls. It shouldn’t have taken all the order to get rid of the mine.