Mission 015 Report: Mise en Place
November is always a busy month with the lead in to the holiday season, especially in the US with the Thanksgiving Holiday. While we didn’t get any responses this time, we’ll briefly go over some example deployments with some notes.
Example 1 – Unmasking
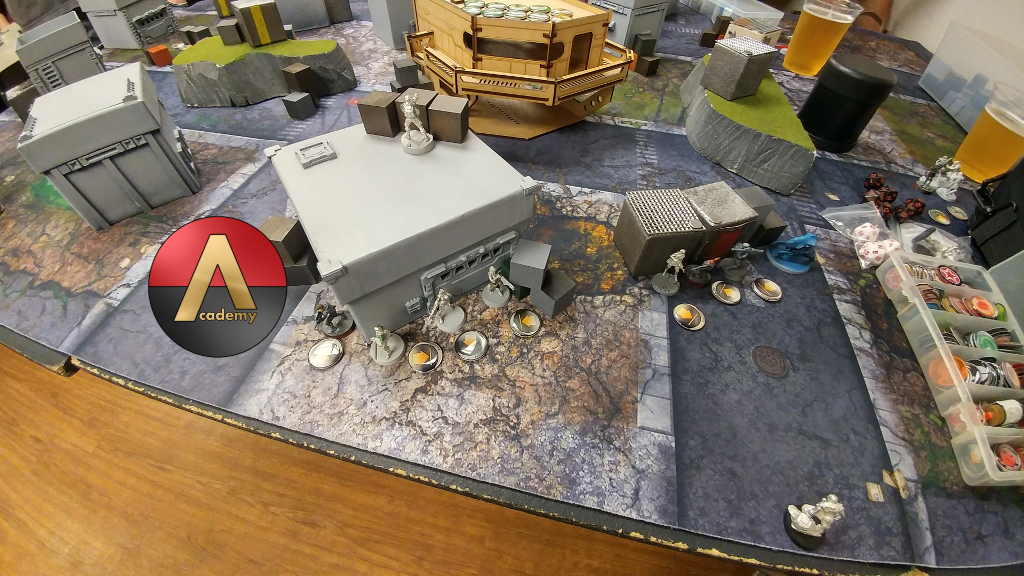
This is an example from “There’s Always a Hole,” a game of Unmasking, Ariadna versus USARF.
I won the rolloff and elected to go first. The sides weren’t terribly skewed (I threw together the table out of terrain scrap in about 5 minutes) so Justin gave me the side I was already standing on thanks to “gamer inertia” as he put it.
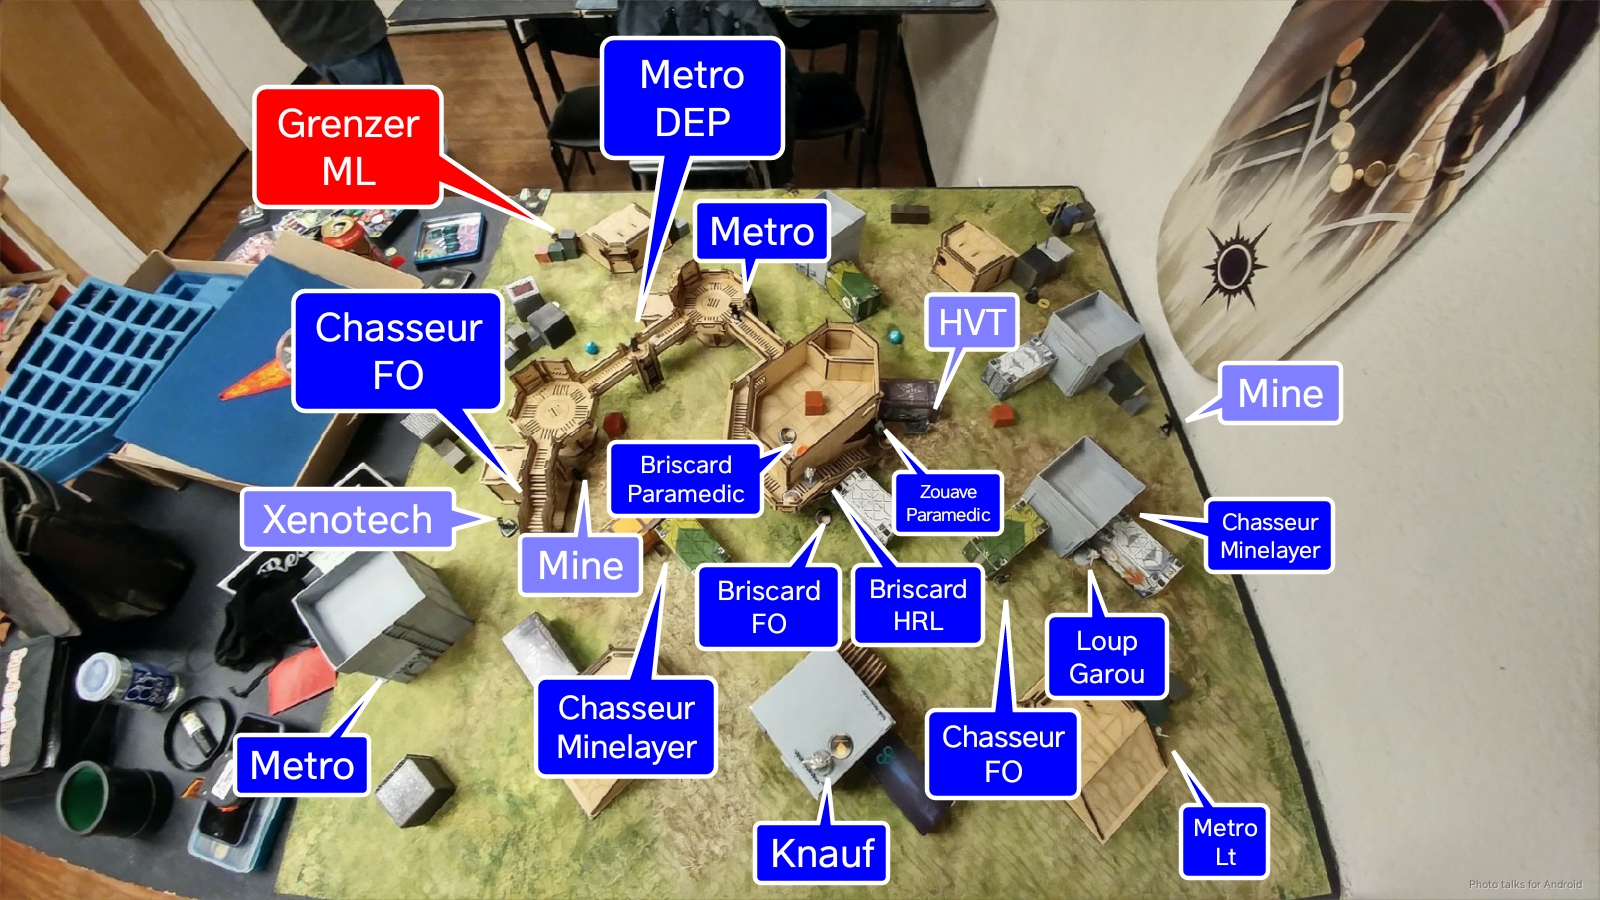
I put my HVTs down straight across the table, with the real one all the way on the right, then protected them with Chasseurs and their mines. I put the Foxtrots on either side in a place that would be hard for Justin to get to, and then gambled on Justin’s real HVTs being on the left by putting the Zouave LGL over there.
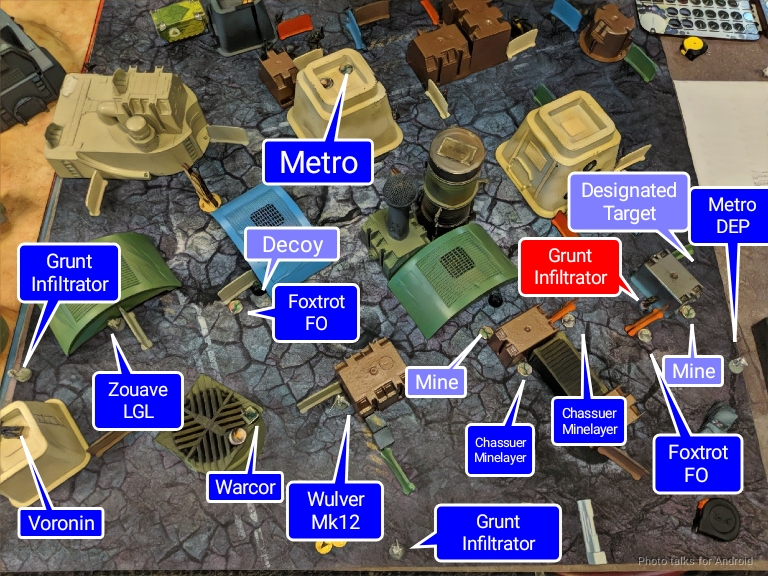
Voronin set up his lawn chair on the only building with a lip on the roof and settled in to enjoy some reading material and a cigar, occasionally barking orders over his radio. I put my Warcor on a building to delay Justin, and then started attempting to land inferior infiltrators.
My first Metro DEP failed, so he went on my right table edge. The second passed and hung out on a roof just outside Justin’s deployment zone. The two Grunt sadly failed, so they became Van Zant guards, and then I put my Wulver watching the back table edge too, just for good measure.
Then it was Justin’s turn to deploy. He make quite the deployment puzzle for me to unpack. His grunts were watching the back table edge pretty effectively, with Foxtrots right up against the exclusion zone, ready to push up and do some butt(on) touching. Justin didn’t fall into the trap of using his forward deployment unnecessarily and instead elected to keep his Grunt snipers at long range and build a web of interlocking AROs in his deployment zone.
He too had Grunt Infiltrators, one of which made it near my Chasseurs (and more importantly, my Designated Target), and one failed, so that guarded his right table edge.
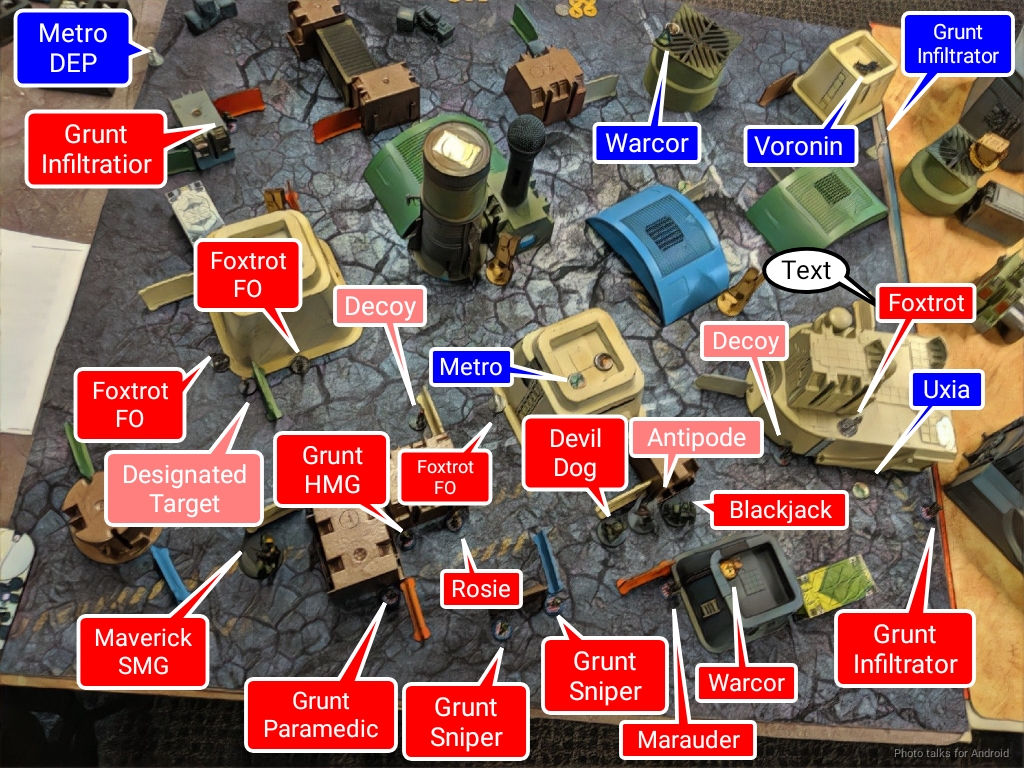
He then put down a Devil Dog and a Blackjack, all in a nice line for me to shotgun behind some barricades. Another one of our locals swung by to have a look and encouraged him to fix that bit of his deployment, but Justin was happy with it and decided to leave it. In all honesty, given my list composition, it was probably fine. Justin already assumed Duroc and Margot were going to make an appearance (and mentioned this to me), so he understood that there were going to be templates.
Given that the Devil Dog and Antipode buddy are great at dodging and the Blackjack has great ARM, it’s actually a bit of a tough nut to crack with DAM 13 or 14 weapons. I could go after it with Uxia or Duroc, but there are enough AROs there to make it not worth my while. I’m not sure if Justin had arrived at the same conclusion as me, but I decided to NOT try and punish that deployment because it would be too order intensive and risky–I’d only get one shot at it, thanks to the Grunt standing there with his flamethrower.
In any case, it was my turn to bring something out of reserve, which was Uxia. I had briefly considered putting Uxia on the table early and then responding to Justin’s deployment with Margot as a DataTracker, but given no information about his deployment when I had to decide, I elected to just keep Margot circling overhead, ready to make the jump.
I did some quick math and found that there wasn’t enough SWC missing for a Foxtrot to be the Lt, so that meant the Lieutenant was unquestionably the Marauder. I did some careful analysis of his deployment zone and found a hole where Uxia could go. She’d start right on the edge of his deployment zone and be a 4-4 MOV away from total cover from everything. Perfect. I’m pretty sure Justin’s reserve was his Maverick, which went on the left.
Example 2 – Supplies
Here’s another example from “Avalance Trigger,” a game of Supplies, JSA versus HB.
Okay! On to the game. Erik put his Muyibs on the right, mixed in with some Mutts and Leila. Of note is that his Muyib HRL is pretty much right at 8″ away from Leila, which would be relevant later. His Muyib LGL Lt (a profile I myself have been looking at) went on the right too, presumably as a backup link team member. A pair of bots went in the middle of his deployment zone with a Mutt in front. Like you do. Erik’s midfield presence was three Yasbirs and a Farzan CoC guy on the plateau near one of the objectives. The icing on the Hassassins cake was a Lasiq sniper on the left, behind a box, and a Warcor deployed on the highest thing in Erik’s deployment zone.
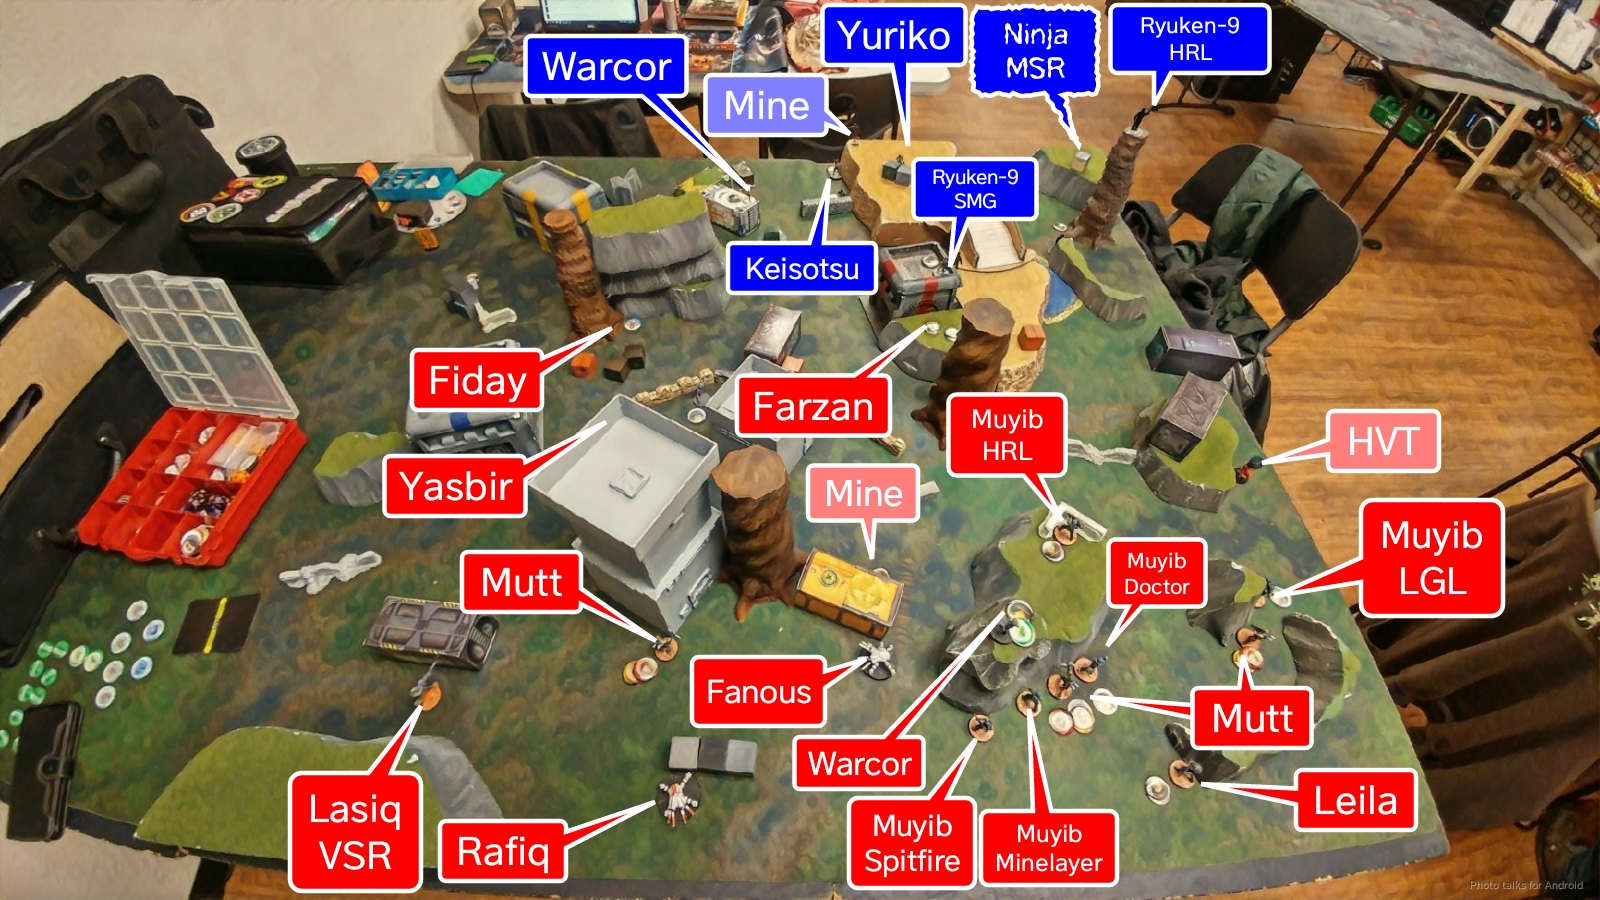
The way Erik had deployed his two Mutts on the left meant that I would get an HRL template onto members of his Muyib link if I deployed my Ryuken-9 HRL on top of a big tree… thingy. I opted to do so, putting his mine at the base of his tree to protect my vulnerable left flank from Mutt foot traffic. This, I think, was a minor mistake. Not because I put the HRL up there–it’s actually got a pretty commanding position, and I planned to put my Ninja MSR behind it to provide a similar set of potential AROs, which would really make things difficult for Erik.
The reason I think it was a mistake was because it set me up with a mental note in my head to use the Ryuken-9 HRL to shoot at juicy targets of opportunity, and because I set it up with the expectation for Erik to make a mistake. I don’t control Erik, and I can’t expect him to do any particular thing. I can try to force misplays, but if anything, I know I can expect consistently good decisions from Erik.

So, in short, I put the Ryuken-9 up there for the wrong reasons. In and of itself, the position wasn’t necessarily bad, but the bad reasons made me use the piece poorly later on. As for the Ryuken-9 SMGs, I felt pretty comfortable and confident with their placement and continue to feel the same even as I write this.
However, the rest of my deployment was troublesome. After getting greedy with the Ryuken-9, I was way too conservative with the rest of my deployment, which led to other problems. Fearing a Fiday (this goes back to my most recent report, which discusses psychological and other pressures), I got really anxious and over-compensated by incorrectly trying to reduce my cognitive load. I reduced my deployment to 1) AHH! A Fiday! Defense in depth! All the things! and 2) set up some cheeky AROs like I did with the Ryuken-9.
I think I did a great job of doing these two things. I set up a great ARO for Erik making a dumb mistake with his Mutts and set up a pretty decent anti-Fiday zone. I put mines in the right places, set up overlapping fields of fire with various members of my link, put sacrificial Keisotsu out on the flanks to attempt discovers or force a reveal, and even set up Yojimbo in a bad place for Yojimbo, but a good place for his Koalas.
All in all, the over-reaction over the Fiday created two major weaknesses in my deployment. The first was the link being too spread out to adequately support one another if I needed to change the link leader, especially if I needed to utilize things on the periphery, like Yuriko or the HMG. If you’ve been following my thoughts online for any reasonable length of time, you know that I’m not the biggest fan of links. In my mind, they constrain movement and therefore positioning, which is I think one of the most powerful problem solving tools in Infinity. So, even knowing that, I let myself fall into the trap!
The second major weakness was Yojimbo’s placement. I was quite pleased with my anti-Fiday Koala deployment, which while not impenetrable, was a very good deterrent. However, this great Koala placement meant that Yojimbo was pinned in place. If I moved him at all, his Koalas would generate AROs for the Muyib HRL. Even if Yojimbo wasn’t visible, I was putting the rest of my forces at risk of getting templated on my active turn. My plan at the time to overcome this was to just kill the Muyib HRL. I had several tools in position or planned to be in position to accomplish this goal, so I felt reasonably confident that I could unstick Yojimbo during my first turn and therefore made this concession knowingly. I still think that this was a reasonable concession given previous choices, but feel bad about it.
Erik read the room and wisely placed his Fiday away from my deployment zone, converting it to more of a soft power midfield piece than an DZ attack tool. This was definitely the right call on his part. I had held my Ninja in reserve, and placed it in a position covering the Muyib HRL. I think since I was already committed to using the Ninja to target the Muyib HRL, I should’ve held Yojimbo in reserve. He’s too useful a toolbox to be tied up on unnecessary defense duty, and I think that’s the real travesty of my deployment choices. In isolation, all of these decisions were mostly okay. As we’ll see, I actually got what I wanted: 1) cheeky AROs and 2) no Fiday in my DZ.
So what’s the problem? Well, I’ve written hundreds of words explaining and justifying my deployment decisions, but guess what: none of them have anything to with the mission at hand. I lied. There were three major deployment weaknesses. The third weakness is I didn’t have anything better than a reactionary plan or any significant pieces in positions to recover supply boxes, i.e. let Erik get the box and then go kill his box carrier and take it.
Example 3 – Acquistion
I won the rolloff and decided I wanted to go second, which is so important for Acquisition, so I took deployment. Nate set up his Perseus link on the left, screened by a Heckler KHD. He put down a Grenzer ML Haris on the right to make things difficult for me, and then screened them with a Heckler BSG and a Puppeteer, with everything covered by a warcor on his back table edge.
I saw some vulnerabilities, so I did my best to exploit them. The Grenzer Spitfire in the Perseus link was left out, and within 8″ of the centerline, so I put a Chasseur’s mine there with the actual Chasseur nearby. I covered the approach to the left objective with the other Chasseur Minelayer and their mine, and then put the FOs on either side, hoping to get some work out of them.
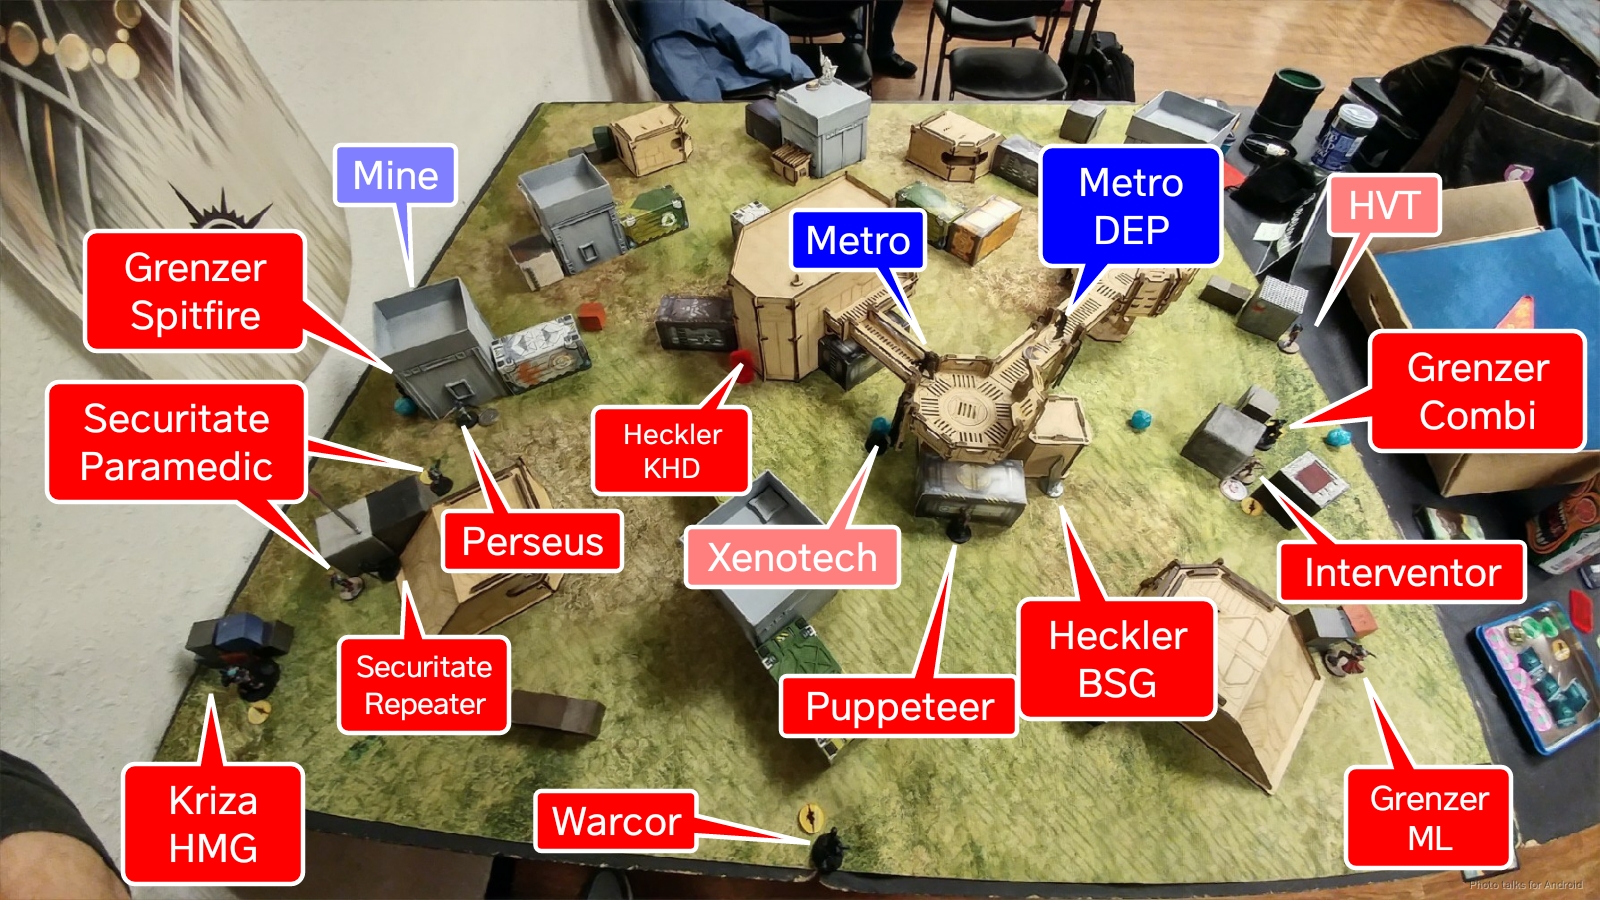
The Grenzer ML was too far away from the rest of the Haris to ever become the Haris leader, so I managed to land a Metro DEP prone watching it, and then managed to land the other Metro watching the Perseus link as well.My Briscards clustered up near the central objective, with the HRL watching Perseus and one of the Securitate. The FO Briscard was on the ground level, and the Paramedic was inside the second floor of the Comanche Barracks, where we put the objective. I wasn’t sure where to put the one Loup Garou, so I just stuck him on the Perseus side because viral is good against NWI. I thought that Nate would probably move his Grenzer Haris to fix his deployment issues, so I elected to bring on my parachutist behind them after that happened. Nate dropped his Kriza to backstop his Securitate link, and then I plunked Knauf on a roof go after anything that Nate left out at the bottom of 1.
One other irritating thing is that there really isn’t a good place to put your HVT in this scenario. 4″ out of your deployment zone is basically on the centerline, so anything controlling any of the objectives is likely to just secure your HVT. I decided to go all in on the central objective, given my Briscards’ position, but Nate played it smarter and put his HVT on the board edge. I think there are a few options here, and most are valid, but you have to be aware of the tradeoff.
I felt like I had set up a flimsy ARO net to stall out Nate’s Tunguska as he advanced, but it was pretty fragile. Chasseurs are strongest when you can force interactions within ZoC, but I wasn’t really thinking about it. Metros are NOT the strongest ARO threat either, and I didn’t want to risk Knauf against the Grenzer ML or the Kriza. So really, I was looking at exploiting some relatively minor deployment mistakes with Nate’s Grenzers. With everything on the table, my delicate deployment “souffle” went into the oven…
And that’s it! Good Hunting, Bromads!