Bringing the Krits!
By Jordan B – Obyiscus
Overview
- Mission: Supplies
- Forces: O-12 vs Varuna Immediate Reaction Division (300)
- Deploy First: O-12
- First Turn: O-12
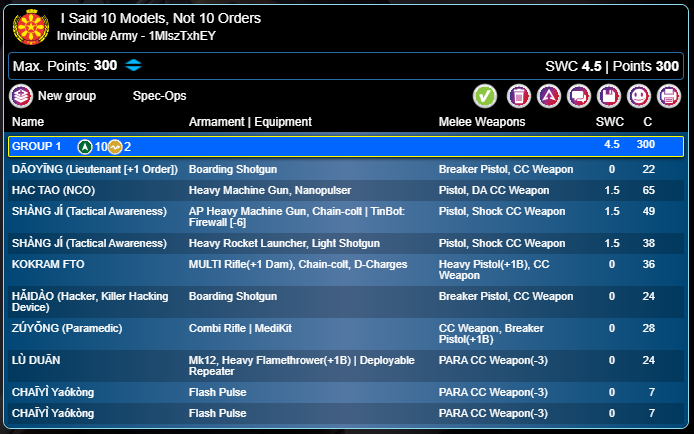
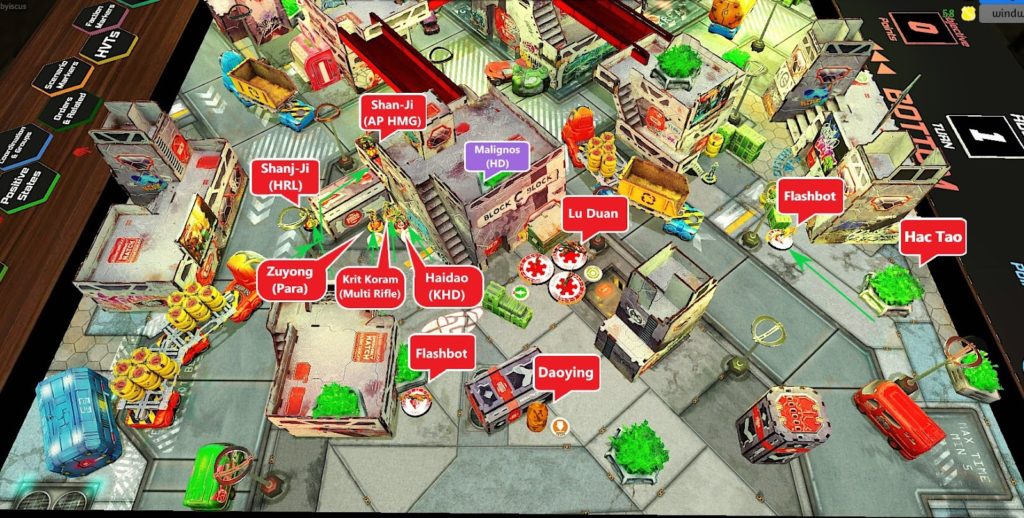
Lists
Deployment
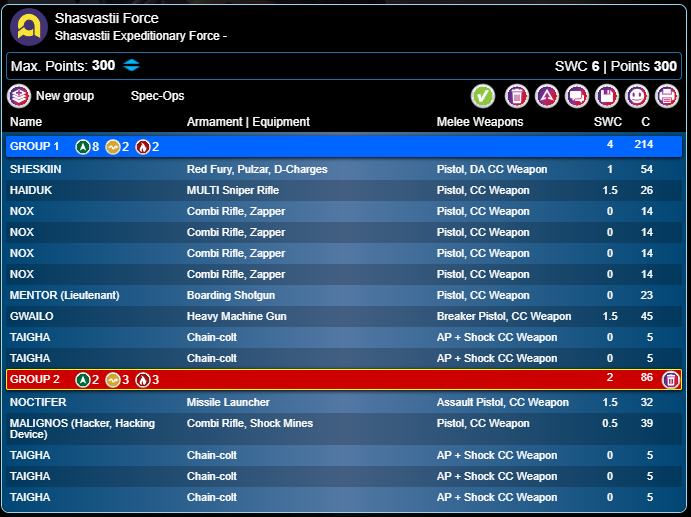
Shasvastii Deployment
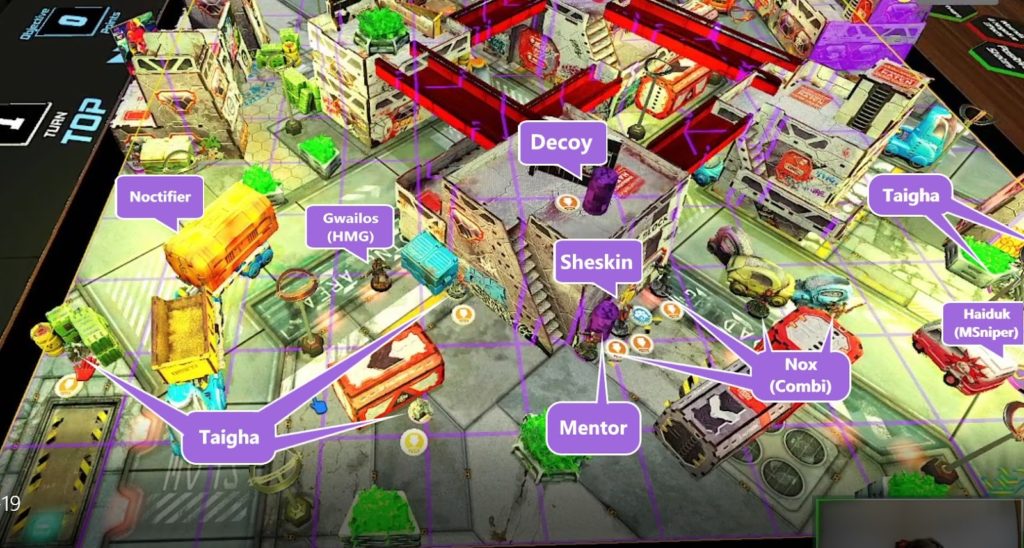
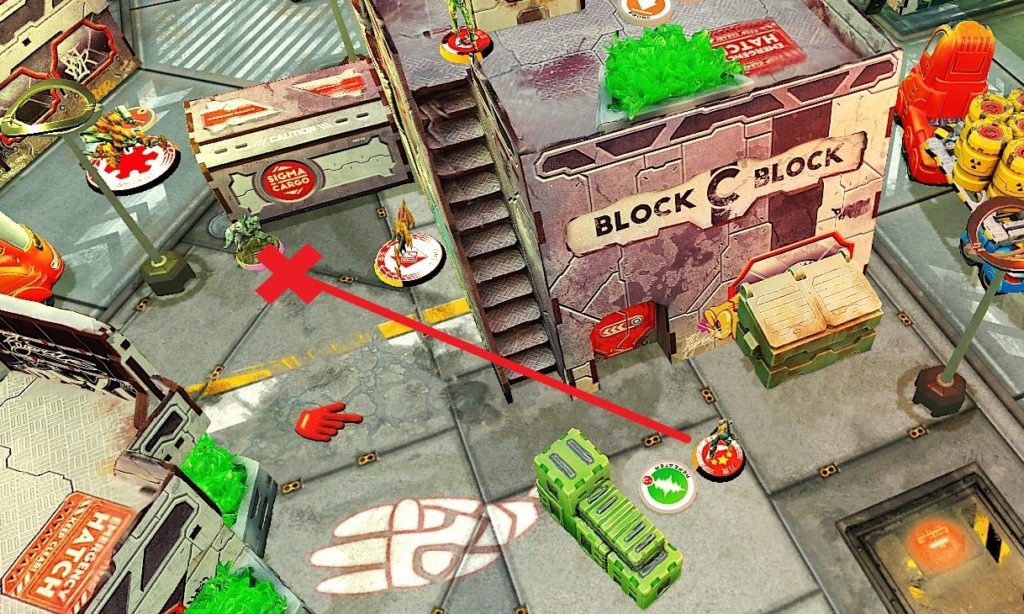
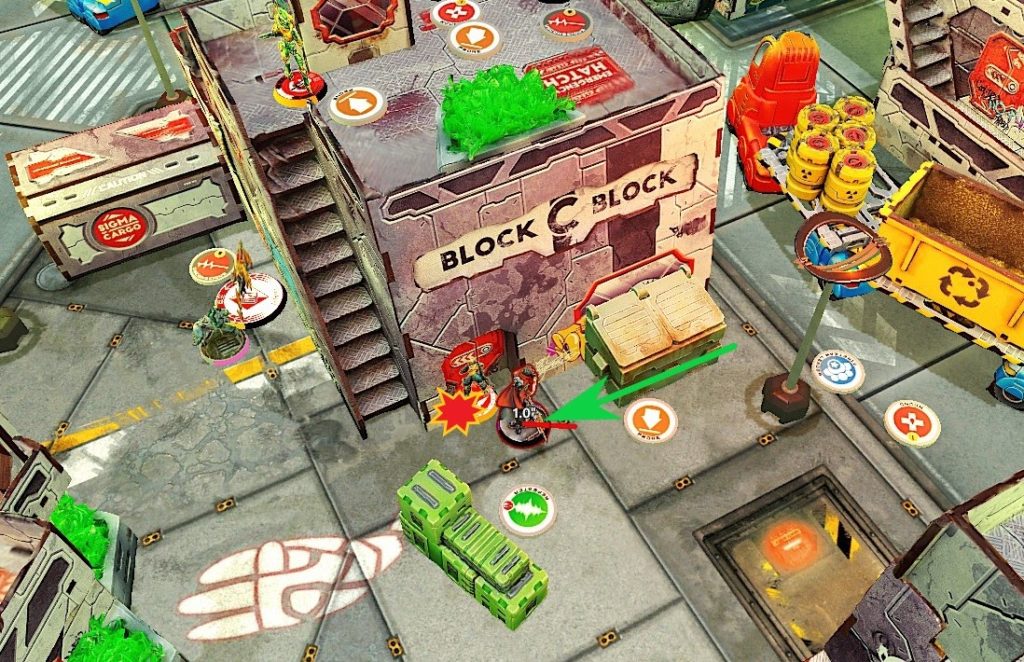
My opponent began by over infiltrating his Malignos hacker onto a large building just outside the centre of my deployment zone, and unfortunately for me succeeded. Knowing Shas I knew it had to be a Malignos (because it was hidden) and assumed it was a hacker because that would be the only profile I’d consider over infiltrating against IA. He then deployed his Haiduk Sniper in sapper state looking down the long road firelane that crossed the board diagonally.
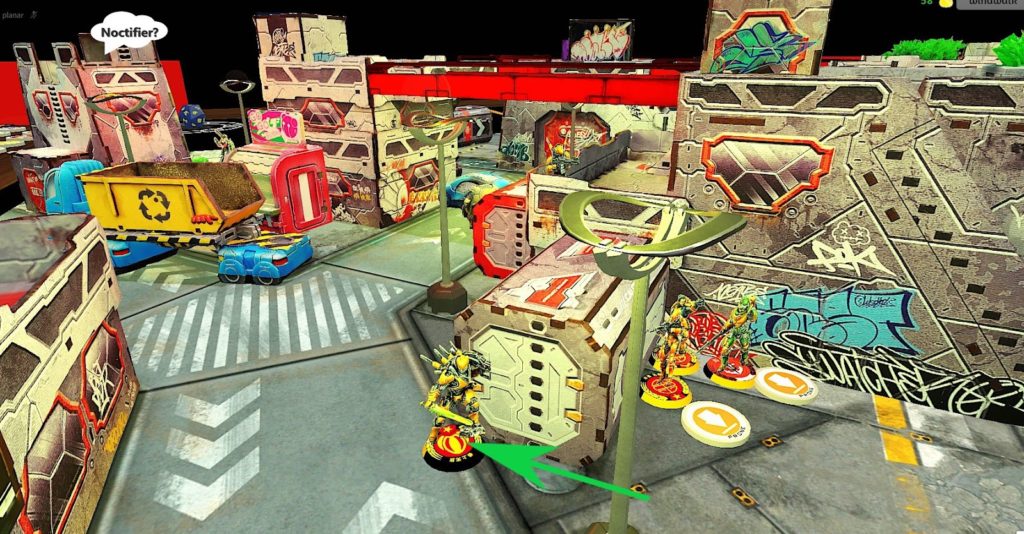
My opponent deployed his Sheskin lead fireteam centrally behind a wall and some cars. He left two Nox kind of watching some approaches not wanting to give me run of the board. As this was an IGL mentoring game I pointed out that he may want to adjust the position of Sheskin a bit, as she was within blast range of one of the Nox watching a bit longer of a lane (and I knew I had a HRL capable of getting a line on that Nox). The Noctifier was secretly deployed on top of a container on my opponents left flank (choosing not to deploy on the sniper tower on his right flank (which I think was the right call because I still had to play respecting that the Noctifier could be on the sniper tower.
Finally, he sprinkled some Taigha across his deployment where they could hide until they wanted to advance, and placed his Gwailos HMG to support his left flank as his holdback. At first he deployed the Gwailos wide in the open (not worrying about cover due to nanoscreen), however I suggested that he consider placing the Gwailos in a location where he could choose to fail guts into total cover. He adjusted the Gwailos so it was a bit closer to a dumpster he may have been able to guts behind.
Invincible Army Deployment
I expected that a Malignos hacker was deployed on the large building outside my DZ, but didn’t have a good place to place the fireteam aside from near it. I decided to just take the risk, and deployed my team prone in a line behind the buildings (knowing I’d move up) with the AP HMG Shang-ji on the left behind a truck ready to advance.
I deployed my flashbots and Daoying back planning to use a command token to move them into my near band on my last turn. I then deployed my Hac Tao hidden on the right flank, ready to move up and along the building on the right to flank the enemy forces.
I then placed my Lu Duan as my holdback in a central location, planning to suppress it near the end of my turn to deter an enemy dashing up the lane covered by the Haiduk.
Turn 1
Top of 1 – Invincible Army: Pushing up and setting up a defense
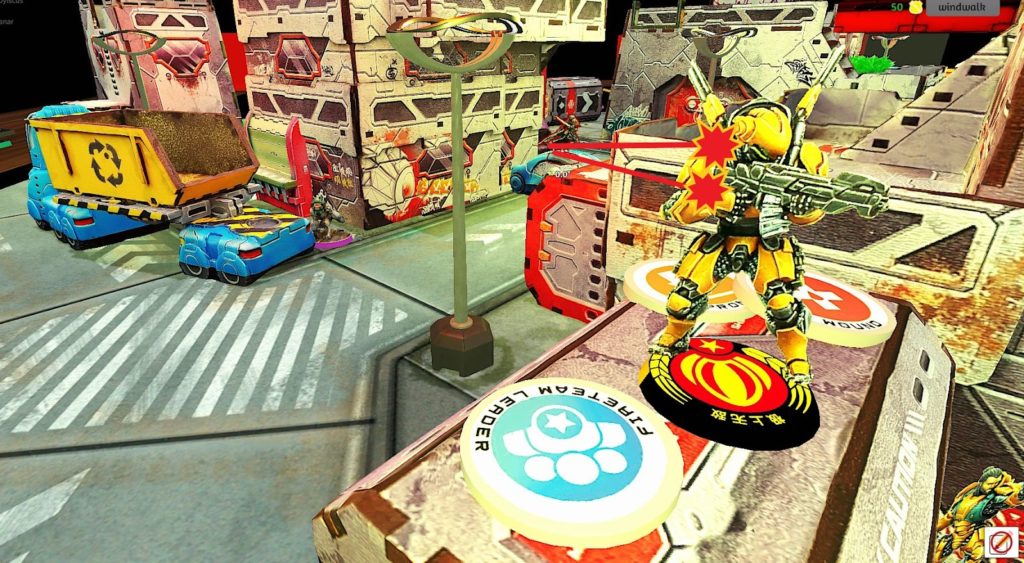
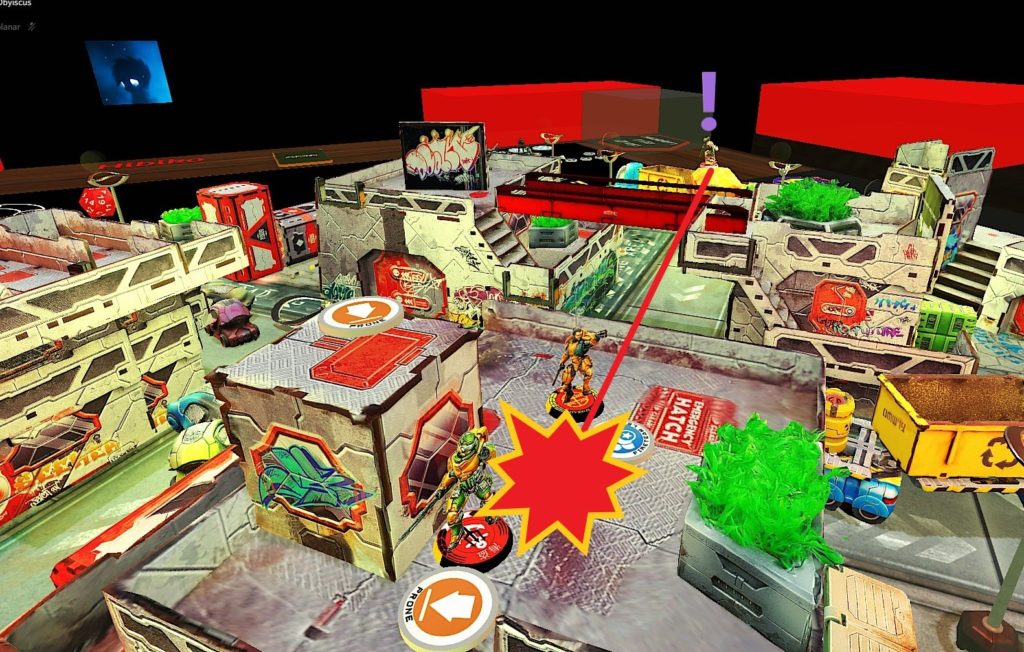
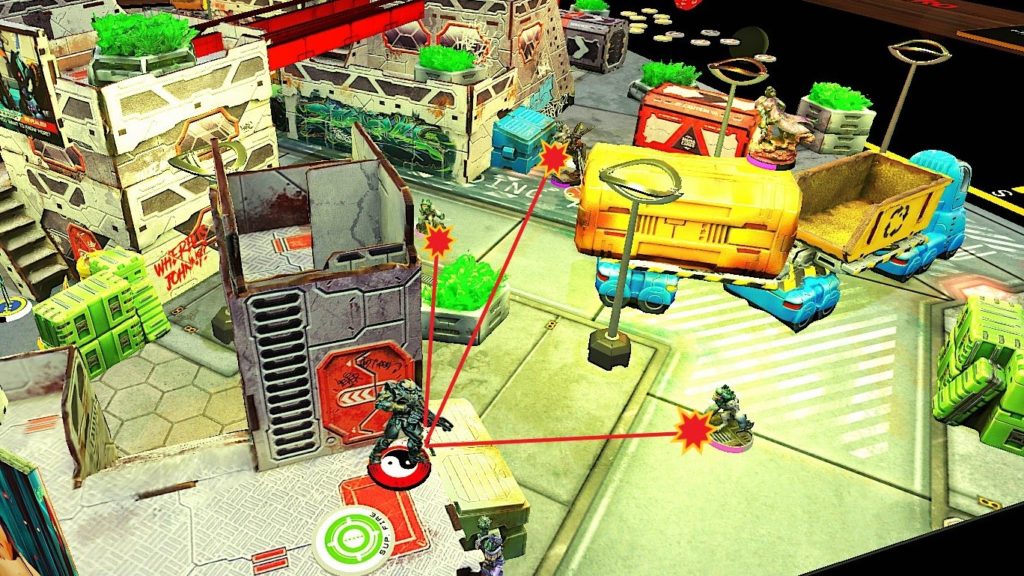
Seeing an opportunity the Hac Tao reveals and advances up the right flank using his own order and the two NCO orders to strike and kill the Gwailos HMG. The Hac Tao then proceeded to the edge of the building preparing to strike at the enemy DZ or to hold the line against the hiding Taighas.
The Shang-Ji and core team began to advance up using the Shang-Ji’s tactical awareness orders. Fearing a possible Noctifier position, the team advanced carefully to avoid clumping and limit the number of visible models. I was worried about the Malignos, but because I forgot a sensor bot there was nothing I could really do. I hoped that my tinbot would protect me enough that I could use the Haido to take the Malignos out if it revealed.
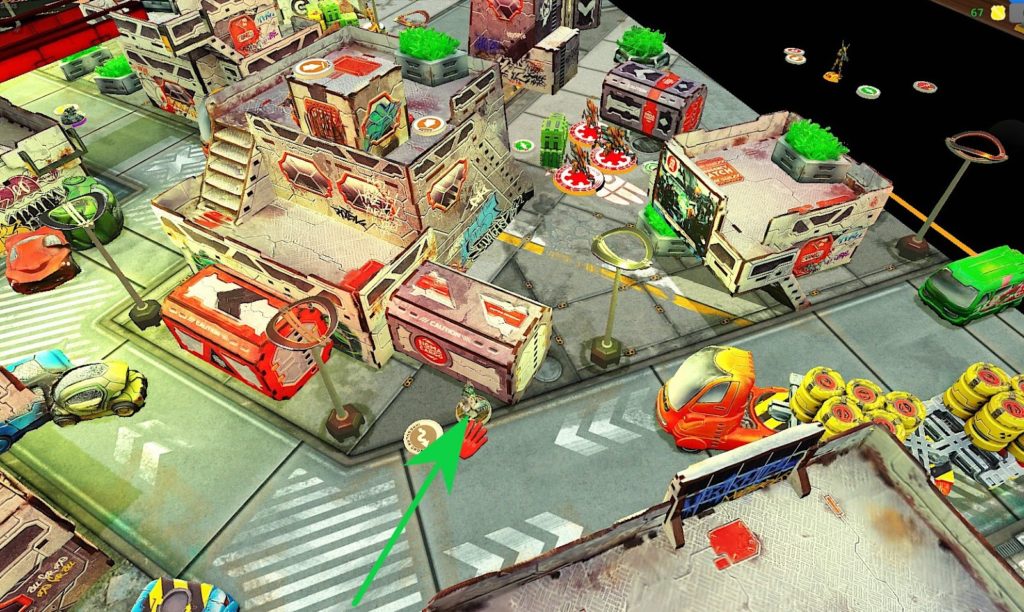
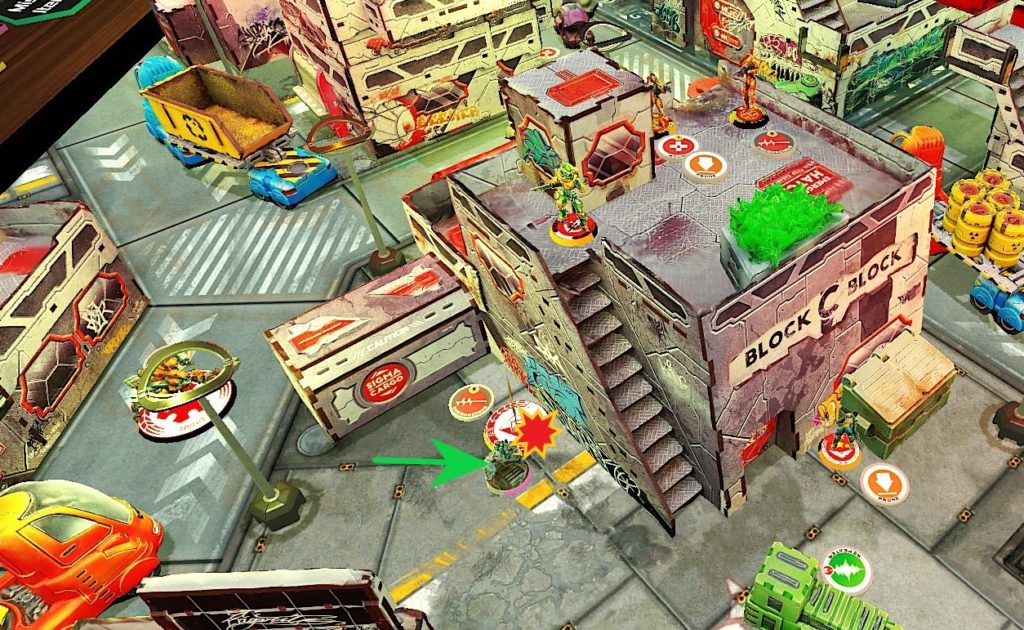
There weren’t too many opportunities to strike, so I moved the HMG up to take out his one vulnerable Nox (preventing Sheskin from getting a 5-man bonus for the entire game). I then set-up the fireteam to defend. To get the HMG and HRL in ARO positions without risking a free shot from a missile I dodged the HRL into position using his 4 inch dodge.
I then moved the Lu Duan into a good position to suppress any enemy that decided to make a run at my Lt. I then suppressed the Lu Duan and Hac Tao (suppressing the Hac Tao locked down the 3 Taiga on my right flank). I later learned that my opponent’s noctifier was in position right by my Hac Tao but chose not to take the free shot (which was probably the right call as he would have only been hitting on 3s (-6 from mim, -3 from cover).

Bottom of 1 – Shasvastii: Picking apart the core
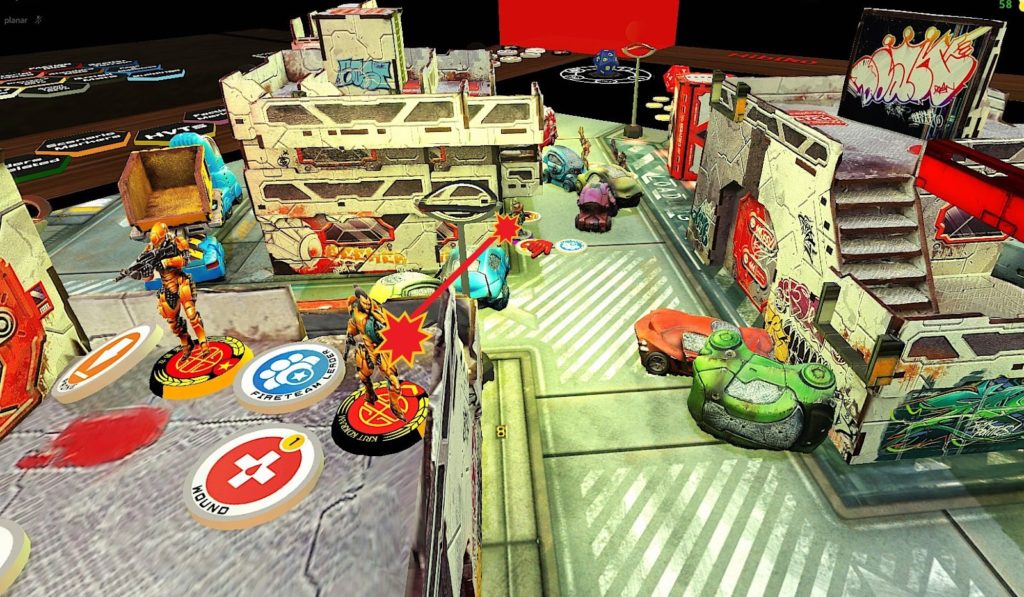
Only one Taigha (one on my left) activated, as the other would either be shot by linked Shang-Ji or suppressing Hact Tao. Sheskin then began to try and take the fights against the Shang-Ji. As will soon be apparent it almost felt like fighting N3 Sheskin (but also highlighted the benefits of armour in N4). In the first fight against the HRL Sheskin crit and stripped 1 wound off of the Shang-Ji (armour held strong and passed 2 of 3 wounds). Unfortunately the HRL failed his guts and fell back. Fortunately the camo marker hiding the Mentor Lt was caught in the HRL blast and died.

Sheskin then turned her attention to the Shang-Ji AP HMG. The HMG rolled well, but again Sheskin Crit. The Shang-Ji passed all of his saves, but failed his guts roll and went prone. I was happy that the Shang-Ji had survived, but had wanted them to stem the tide of Sheskin a bit longer (I had also helped that 2 on 16s would beat 5 on 15s at least once).

Looking to take out the HRL one of the Taigha on my left flank began advancing up (planning to stay out of LoF until he could engage). He moved up and dodged, but triggered the AP HMG to also dodge. The Shang-Ji passed his dodge and moved back along the crate (extending the distance between him and Sheskin). The Taigha failed his dodge.
Sheskin activated and shot at the now standing AP HMG, and again crit! This time the Shang-Ji took a wound and fell prone. Unfortunately, Sheskin was cunning and was able to vault onto a car and see the AP HMG Shang-Ji out of cover…and killed the Shan-Ji (if the Shang-Ji had cover he would have been crit again).
With his last orders the Taigha moved up in to cc with the Shang-Ji HRL (not berserking). 1 die on 21 vs 2 on 19s…and the Tiagha won and knocked teh HRL unconscious.
Turn 2
Top of 2 – Invincible Army: Delays and surprises
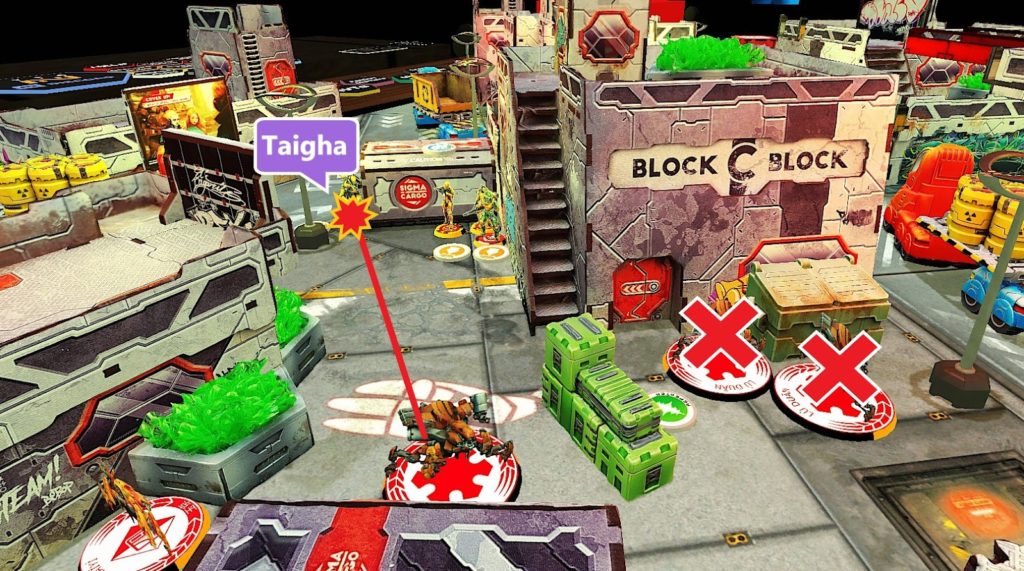
Knowing that my opponent would be in loss of lieutenant from the Mentor’s death I went into the turn expecting that I’d be able to regroup and ideally take out sheskin along the long central firelane…fate it would seem had other plans. I started by moving the Lu Duan over to kill the taigha threatening my core team.
I then activated the core team to move it towards the long fire lane. I activated with the Zuyong paramedic as leader to shoot the unconscious HRL. However, when I activated the Malignos revealed and attempted to hack my Haidao. I reset with the team and luckily survived. I broke the fireteam and used teh Haidao to kill the Malignos with trinity. I then reformed the team and activated them to heal the HRL. One of the medkits hit its target and he failed the ph roll.
The team decided to keep moving as planned and begane climbing up the building. Using his NCO orders Krit tried to take some long shots down the long fire land at an exposed Nox. In the end nothing happened.
As they were moving along the roof the team tried to stay down, but on the order Krit joined them the Noctifier revealed and shot, catching Krit and the Haido under the blast. Fortunately the Noctifier missed and Krit dodged prone and out of line of fire (the Haidao was already prone).
To wrap up the turn the Lu Duan reentered suppression to provide some backfield defence.
Bottom of 2 – Shasvastii: Bidding time
In the Shasvastii turn the Taigha on my left flank used his orders to advance up towards my remaining forces, and one Tiagha advanced in the face of the Hac Tao. The Taigha facing the Hac Tao crit his dodge (in hindsight we forgot to factor in the the -3 from suppression) but didn’t use his irregular fearing pressing his luck.
With that my opponent chose to end his turn wanting to save his command tokens (the Haiduk didn’t want to move, he didn’t want to break the fireteam, and we realized that the Noctifier literally couldn’t hit the Hac Tao (0 range, -3 from suppression, -3 from cover, -6 form mim).
Turn 3
Top of 3 – Invincible Army: Last ditch efforts
I knew that things were dire and that I had to try and take out Sheskin who posed a major combat and zone securing threat, and I expected was also his lieutenant. I decided to see if Krit could do it using the NCO orders. After a couple rounds of shooting both Sheskin and Krit took a wound (Sheskin may have crit again). I then shot at Sheskin with the full health Zuyong, and Sheskin Crit again. Luckily the Zuyong on lost one wound. At this point I probably should have kept trying to kill Sheskin but chose to try to solve the problem with the Lu Duan.
At this point I made a critical error. Rather than shooting the Taigha with the Lu Duan like I had with the last one I decided to try and move past it while in Holo state..forgetting that the Taigha had a chail-colt. I moved around the Taigha, Ihe chain-colted all 3 echos, and I failed the dodge to avoid death and lost the Lu Duan.
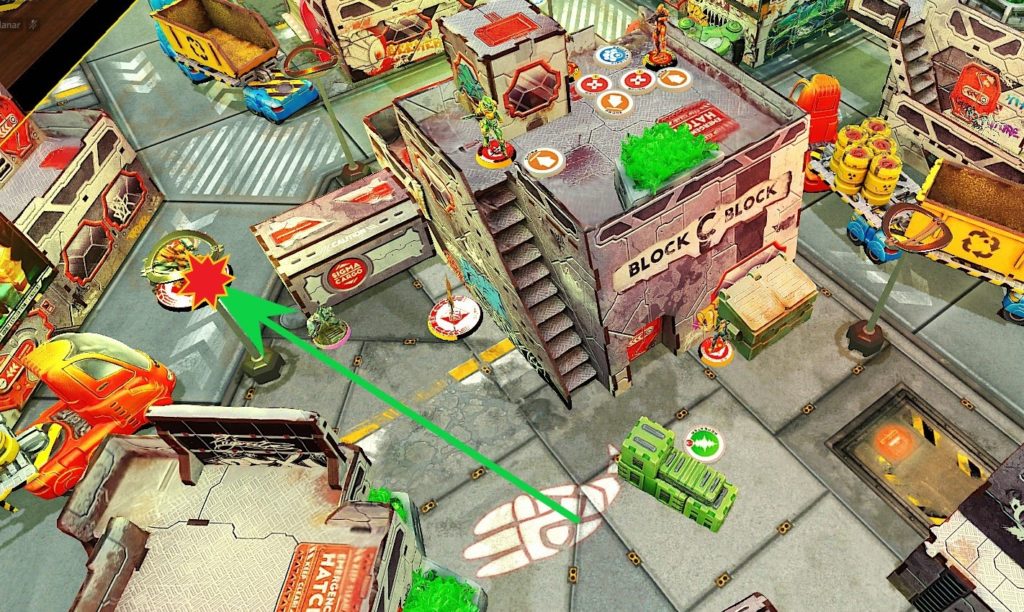
I then moved the Daoying up and took some shots at the Taigha. Unfortunately after a number of tries all I did was get the Taigha closer.
Feeling desperate I tried shooting Sheskin with the Zuyong (since she was cheaper than Krit if I lost her), and Sheskin won again (possibly cirt again) and the Zuyong went down. I had thought about using the Hac Tao more, but was worried about how to deal with the Noctifier. I should have moved teh Hac Tao forward into the enemy DZ and hit the Noctifier with my nanopulsar (having never played a Hac Tao before I forgot he had one).
Bottom of 3 – Shasvastii: Pushing through
The turn began with the running of the Taighas, in which the Hac Tao gunned down 2 of 3 (one activated a 2nd time and tried to chain-colt the Hac Tao but failed to cause a wound).
The forward Taigha on my left flank moved up into the Flashbot, and after spending all the orders in its group finally killed it (the flashbot held out a few orders).
Finally, Sheskin and the team advanced down the centre lane unopposed. Realizing that I handedly held the central zone my opponent chose to take my close zone and his close zone.
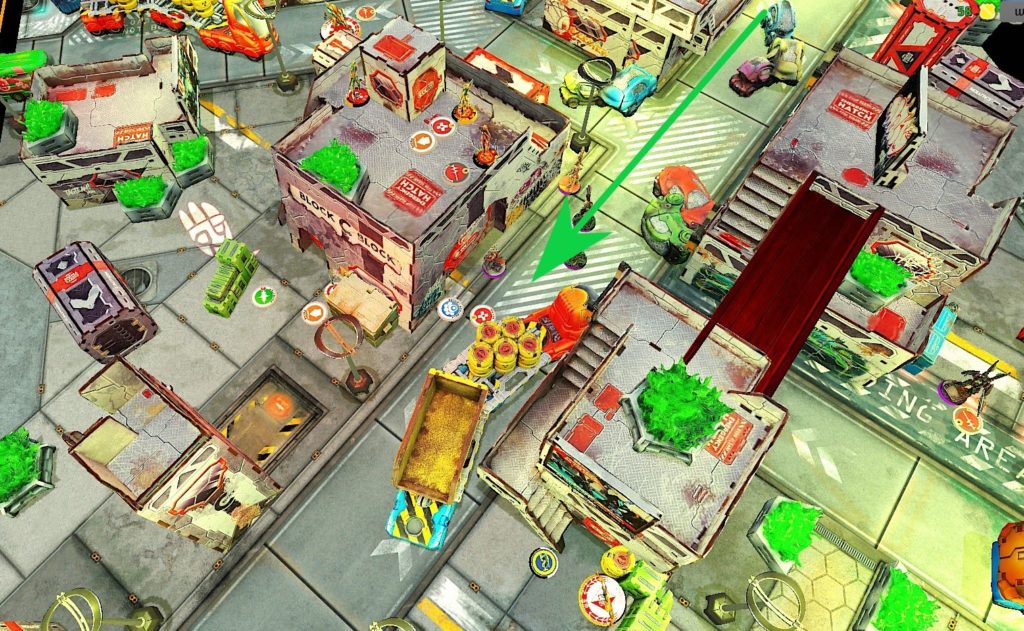
Sheskin ran around the dumpster my Daoying was hiding behind, moved into cc and killed her. Thanks to protheion Sheskin ended up gaining a wound despite eating a boarding shotgun on the way in (again I made the error of not opposing the cc forgetting about protheion).
Finally, Sheskin and her team moved up within 8 of my HVT to prevent me from getting secure HVT with the Hac Tao, and moved the Haiduk up into his near zone.
Final Score
Shasvastii Victory (5-3)
Post-Game Analysis
In many ways Invincible Army is the poster-child of the limited insertion list. Without too much effort you can easily have 14 usable order between tactical awareness and nco+Lt +1 order. My lists was in no ways optimized (I think it would have been better to not take the Hac Tao and upgrade some other things into Zhensha, but I recently bought the Hact Tao HMG so wanted to try it).
Despite things going badly at times I never felt like I didn’t have enough orders despite only having 10 guys, my issue was more a lack of attack vectors (which is why a zhensha would have been nice). I think that some limited insertion is a valid way to play in N4 (definitely more than in N3). One of the main reasons is the value of tougher high armour guys, meaning that while you have less guys, they are harder to actually put down. Obviously not all armies can play the limited insertion game well, you really need either tactical awareness, lieutenant +1 order and NCO or Strategos (ideally a combination). Having things like counter intelligence is also super helpful to limit that order stripping if you go first.
In the end I made some crucial tactical errors in the game, and likely should have used teh HAc Tao more aggressively (I didn’t want to move him up for fear of Taigha, but in active turn I could have easily dealt with them). If I had used him in my second turn once the HRL plan failed I think I could have flanked around and dealt with Sheskin, or atleast eliminated her orders (and thanks to my opponent throwing away his turn 2 I likely would have been able to do the same in turn 3 as well.
Pingback: Mission 035 Report: Limited Insertion – Bromad Academy