Jhokalups – Field Operation Action Report – 32
Jhokalups – Field Operation Action Report – 32
Jurisdictional Command of Tunguska vs Steel Phalanx
250/ITS X – Quadrant Control
In our escalation league, the 250 point match was quadrant control. This time I faced off against SprocketGX. The last time we played was in FOAR – 18, where we played Foreign Company vs Caledonian Highlander Army using the ITS X – Frostbyte mission.
This time around we were both on new factions, and at a different point level. It was also going to be interesting, since FOAR – 18 was back in April, so it has been a few months since we last played. After we picked our table and got everything settled we went to our WIP roll.
Wip Roll
Jurisdictional Command of Tunguska – 20
Steel Phalanx – 12
Decision: SprocketGX
Deployment: Jhokalups
Initiative:SprocketGX
1st Turn: SprocketGX
1st Deploy:SprocketGX
Steel Phalanx List:
 9
9  1
1Jurisdictional Command of Tunguska List:
Jurisdictional Command of Tunguska
─────────────────────────────────────────────────
9 1
KRIZA BORAC Lieutenant HMG / Heavy Pistol, CC Weapon. (2 | 54)
HECKLER Combi Rifle, Jammer, 1 FastPanda / Pistol, Knife. (0 | 23)
HECKLER Combi Rifle, Jammer, 1 FastPanda / Pistol, Knife. (0 | 23)
SPECTOR (AD: Combat Jump) Boarding Shotgun, Nanopulser, Drop Bears / Pistol, E/M2 CC Weapon. (0 | 33)
MARY PROBLEMS Hacker (Forward Deployment L1) Submachine Gun + Zapper, Pitcher / Pistol, Knife. (0.5 | 30)
METEOR ZOND Combi Rifle / Electric Pulse. (1 | 21)
PERSEUS (Super-Jump) Breaker Combi Rifle, Nanopulser, Smoke Grenades / 2 Pistols, DA CC Weapon. (0 | 34)
TRANSDUCTOR ZOND Flash Pulse, Sniffer / Electric Pulse. (0 | 8)
TRANSDUCTOR ZOND Flash Pulse, Sniffer / Electric Pulse. (0 | 8)
SECURITATE Paramedic (MediKit) Combi Rifle / Pistol, Knife. (0 | 15)
Losing the roll and Sprocket choosing to have initiative, I elected to have a side that I thought would let me get more cover while just crossing into the far side zones. I also had the side with the slightly more secure deployment zone. Remembering from my last game how Steel Phalanx has access to Diomedes, and how that guy can be a huge jerk.

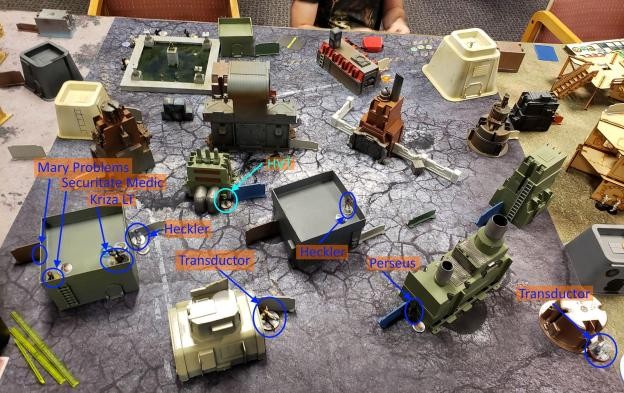
Deployment:
The Myrmidon Link with Machaon was deployed near the fountain. The three Thorakites were covering left, mid-left and mid-right. A warcor took overwatch on the left and Achilles deployed near the mid-left Thorakites.

I had my Kriza and Securitate prone on a building on my left. My hecklers were mid-left and mid-right, in position to score my zones. Perseus guarded the back right. My transductors covered the center back and the back right. Mary Problems got deployed on my far left.
Top of 1: SprocketGX Steel Phalanx
First thing that happens is that Achilles charges up the board with his Lt, Data Tracker and a couple recular orders, he winds up out of sight on my far right, just over (under?) the midline. Diomedes makes an appearance and positions himself to threaten my Kriza, Securitate and Mary. The Myrmidon Enomotarchos comes forward on the left to cover the gap on that side. The Thorakites also make some advances.
Bottom of 1: Jhokalups Tunguska
First things first, I want to deal with Diomedes, so I drop Spector in behind where Diomedes is and out of sight. He then walks over and shotguns Diomedes just outside of 8, and Diomedes lives. So I have Mary Problems come around the corner and shock Diomedes off the table. I then have my Meteor Zond walk in on the other side of the board, hiding on the other side of the building Achilles is by. Spector walks back up, to what I think is across the center line, and throws down a mine. I then proceed to spend 4 orders attempting to have Mary put Oblivion on Achilles.

Now, if we compare this to Icebreaker on Achilles:

I probably would have been better off trying to just Immobilize Achilles and move on.
Anyways, after spending all those orders I spent an order having my Kriza walk forward, only to find out that Achilles couldn’t have seen him. Kriza does take out Machaon and break the Enomotarchos though, so that’s good. I then use the Krizas Data Tracker order to go into suppressive fire. My thought here was that if any of the Myrmidons come around the corner, or if Achilles comes up to get close, I would rather have the extra burst. And maybe put a little bit of pressure on my opponent.
When I am done we measure zones, and find that Sprocket controls 3, because Spector is not across the midline, nor did I get to advance Perseus up into the zone. Either option would have put me in a better spot to score than I was.
Score at End of 1: 3 – 1 LeadFaction Favor
Top of 2: SprocketGX Steel Phalanx
First, a Warcor solves the problem of Suppressive Fire with a Flash Pulse from out of Range. I could have let it hit me, but the chances of being stunned, even if low, were not something I wanted. So I broke suppressive to shoot back. Then Achilles goes on a little bit of a killing spree, taking out a Transductor and the Meteor Zond, before he gets Isolated by a Heckler with a Jammer. Achilles then goes to ground in the middle of my zone. That done he passes turn.
Bottom of 2: Jhokalups Tunguska
I have Spector attempt to solve the riddle of clearing out some Myrmidons, I move him and throw a drop bear, which fails. I have him move again to the edge of the building, throw another drop bear and fail. Then decide to try and Nanopulser down a Myrmidon and go to no wound incap for my trouble. I do take out that Myrmidon, but then lose Spector to the second around the corner who successfully face tanks the mine I had placed earlier. I have the Kriza start using his orders to long jump down from the building, and then make a long and shooting walk over to hide behind a building that I thought was across the line. While there I have the Kriza shoot at Achilles and manage to do a wound to him. That done, I end my turn and we measure zones.
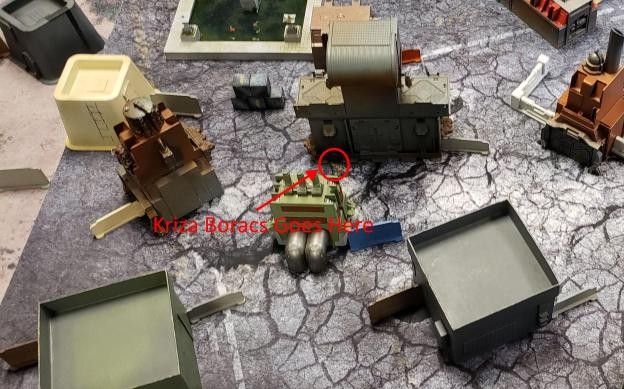
Turns out that the spot I had put my Kriza in was just on my side of the centerline. So once again, Sprocket controls 3 zones to my 1.
Score at End of 2: 6 – 2 LeadFaction Favor
Top of 3: SprocketGX Steel Phalanx
A very angry Achilles forfeits his impetuous order. In loss of lieutenant Sprocket has the FO Thorakites comes forward and successfully Forward Observes my Kriza from his back arc, completing the classified objective. Achilles then proceeds to kill the Kriza. Some more Thorakites advance and Sprocket passes turn.
Bottom of 3: Jhokalups Tunguska
In loss of lieutenant, I have Perseus throw smoke to safely advance into the zone with Achilles. Then Pursues takes out the two Thorakites in the far zone. I don’t have enough orders left to try and pick up the Kriza. So I end my turn.
I had elected to use my Classified as an intellecom card, and was able to use it to snag the zone that Achilles was in. With me having more zones than Sprocket I scored two points this turn. Making the game a:
Final Score: 7 – 4 Steel Phalanx Minor Victory
Lessons Learned:
Writing this report has shown me a lot of things I missed, and the poor decisions I made. Recently there has been a change in my work schedule that makes Thursday a very long day for me. I was mentally exhausted going into this game. That night, in talking about the game, I lamented my Kriza placement at the end of turn two. And sure, it was not ideal, the Kriza didn’t get across the zone, and was in a spot where he got targeted from out of line of fire.
Looking back I am positive that what lost me the game was the four orders trying to Isolate Achilles. Sure, having Steel Phalanx in loss of lieutenant would be good pressure, but even Isolated, Achilles as the data tracker gets two orders. If he frenzies, he can get three, so that’s not really a good choice. Had I immobilized Achilles, I would have had orders to better develop my Spector positioning. Or even better, put Persues into the Zone with Achilles to dominate it instead of letting Sprocket have it.
Another thing I missed was a mis-play with Spector. On his third, and possibly second, drop bear, there was not a good reason to throw them. Placing the drop bears would have had the same, if not similar effect that I was going for, with the added benefit of no dice roll. The mine would have changed the exchange with the Myrmidons and let Raul be in a good place to cross over and dominate the far zone.
I am glad that I am writing these reports. They are mostly for me, but publishing them does a little bit to keep me honest, or at least somewhat timely with doing them. Looking back at the games and thinking over my decisions I find things that were missed. Or choices that I made that were sub-optimal. By identifying these things, hopefully I can incorporate them into my play, and maybe beat it into a more instinctual level. So that even if I am tired, I don’t miss silly things.
Until next time.