Jhokalups – Field Operation Action Report – 12
Jhokalups – Field Operation Action Report – 12
Bakunin vs Caledonian Highlander Army
300 ITS X – Firefight
Playing against Sprocketgx again. Bakunin face smashing force against CHA. My goals for this mission are:
- Protect my Data Tracker
- Protect my Lieutenant
- Do not provoke unnecessary AROs.
Wip Roll
Bakunin – 5
Caledonian Highlander Army – 19
Decision: Bakunin
Deployment: Bakunin
Initiative: CHA
1st Turn: CHA
1st Deploy: CHA
Caledonian Highlander Army List:

 5
5  5
5  4 7
4 7Bakunin List:
9 1 1 4 1 1We played Firefight on a cool board with a lot of catwalks and a lot of ways up and down. Sprocket debated on having me go first even though he was deploying first. In the end he decided to go first. And so deployment began.
Deployment:
Sprocket set up first. He had his Highlander Galwegians spread out across the table, ready to provide smoke. There was a core of volunteers with a grey hiding in total cover. Wallace was prone up on a cat walk and there were camo markers all over the place. McMurrough was Sprocket’s reserve model and was deployed forward on my right side.

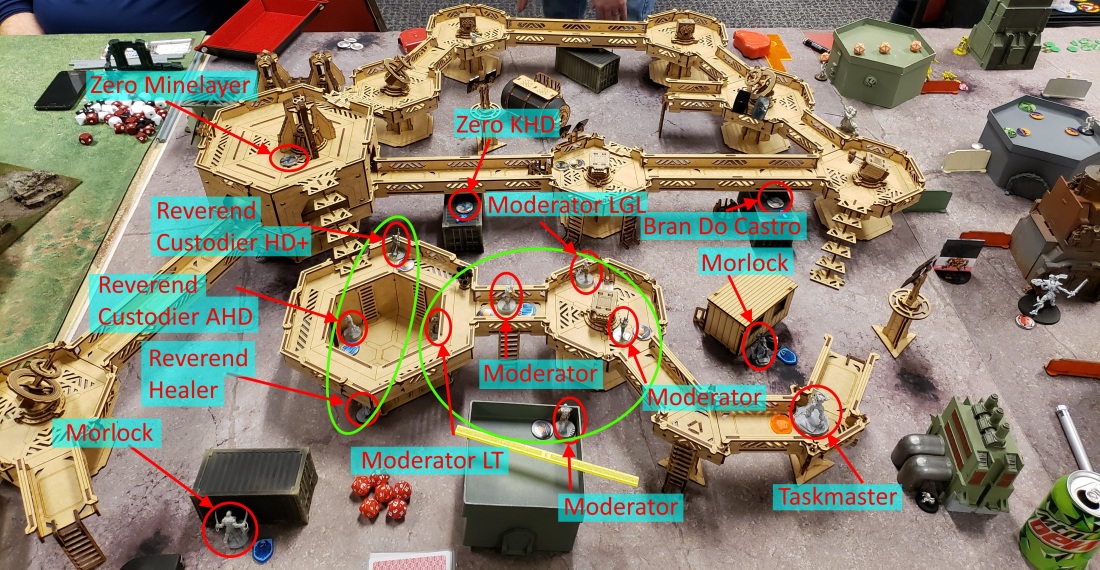
I had my moderator link spread out across the catwalks with the light grenade launcher as far forward as possible. The lieutenant was hiding inside a silo of the catwalks. I spread the Reverend haris around that same silo, HD+ on top, Assault hacker in the silo, and the healer behind. My Morlocks were split, one on the far left, one on the far right. And then I dropped my Taskmaster in an overwatch position on my right as my reserve.
Top of 1: CHA
To start things off, Sprocket’s impetuous troops started advancing up to provide some smoke cover for his link team. The Taskmaster had good lines to all if the smoke troops. Unfortunately for me, the Highlanders and McMurrough passed more Smoke rolls and more armor rolls than the Taskmaster did at shooting them. After getting a smoke screen set-up and picking up an Auto MedKit, McMurrough decided to go after my moderator link team. After jumping up and saying hello, McMurrough got hugged by a crazy koala, and took a bunch of shots. After placing a chain rifle over several moderators and knocking one out, McMurrough fell unconscious.
Next the Volunteer link started marching around behind smoke in order to bring the AP HMG to bear on my Taskmaster. The AP HMG then laid the taskmaster low. With that done, the Volunteers retreated to safety.
Bottom of 1: Bakunin
With my Moderator link down, but not out, I knew I wanted to fix that. I had one Morlock advance up to the left and throw out smoke to protect himself. The other also went forward to protect itself. After that the left Morlock advanced more to throw smoke out in front of a ladder that led to the downed Moderator. A couple orders more had my Doctor up top, and two command tokens later the link was back up. I started using the link to speculative fire the grenades at an SAS marker and some of the highlanders. With some bad rolls on my part and good rolls on Sprocket’s all my targets lived. I choose not to bring on my Meteor Zond this turn. Instead I slowly started crawling my healer over towards the Taskmaster. My minelayer Zero acquired something from a Panoplie. And with that done I ended my turn.
Top of 2: CHA
Highlights from this turn, a Scot with a Molotok took out a Morlock and then proceeded to die to a moderator and a Reverend Custodier. The AP HMG Grey got taken out from a Zero while climbing a ladder. The Volunteer paramedic brought him back, but it took several orders.
Bottom of 2: Bakunin
On this turn I revealed Bran and attempted to raid the panoplie, it was successful. I brought the meteor zond in by Sprockets HVT and completed my classified. The Reverend healer also successfully took out my own taskmaster with a misplaced medpack. A couple more speculative fires failed to take out anything. A T2 Sniper cataran revealed to take a shot at Bran, I attempted to use my moderator link to take it out, which resulted in the link collapsing. With that done I passed turn.
Top of 3: CHA
Sprocket brings the Volunteer link up top into an overwatch position, then takes out my Zero KHD, Bran, and the meteor zond. He was also able to raid another panoplie. A highlander trades himself for making a moderator and Custodier unconscious.
Bottom of 3: Bakunin
For my last turn, my main focus was to try and pick up some army kills and bring back some troops. My morlock failed to set up the perfect smoke screen and got knocked unconscious. The Healer was able to bring back the custodier and a moderator. Some spec fire and a surprise shot from my last zero failed to take anything out. With that we called the game.
Final Score: 8 – 1 CHA Total Victory
Lessons Learned:
- If I am going to get spec fire to work, I need to put more effort into making sure I have targets that are in a targeted state.
- My hacking power wasn’t as useful in this list, I might have been able to shoot out some pitchers and then use the extended hacking area to put spotlight onto some targets. It might have been more reliable than what I was trying.
- The Taskmaster acting as a bully was pretty nice. He was doing great until the linked AP HMG was brought to face him. I will have to think about how to deal with that in the future.