Different Points Value Battle Report
By Jordan B – Obyiscus
Overview
- Mission: Looting and Sabotage
- Forces: Tohaa vs Morat Aggression Force (200)
- Deploy First: Morats
- First Turn: Morats
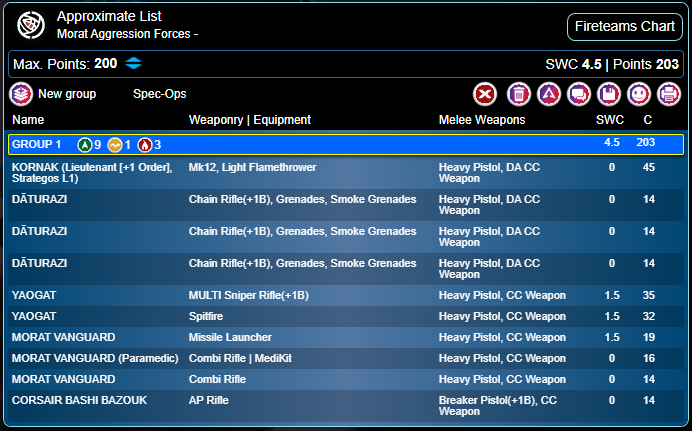
Lists:

Deployment
Morat Aggression Force Deployment:
The Morats deployed with the Core team located centrally. The Spitfire and Missile were on top of a central building with the paramedic, prepared to aro and move up along the central walkways. The sniper was positioned on the ground watching a long lane that also acted as a straight line to the Morat AC2.
On the Morat left flank my opponent deployed two of his Daturazi and Kornak, ready for the Daturazi to impetuous up before linking up with Kornak.
Building the list afterwards I think my opponent forgot to adjust his pt in the app and inadvertently brought too many SWC.
Tohaa Deployment:
I began by deploying my defensive triad centrally with my Sukeul K1 sniper deployed watching most of the field, including starting in view of two members of the core team. She was supported by a Kamael and the chain of command Kaeltar. The Sukeul was given a mate.
My Draal was deployed forward with his two Makauls hanging back but within range to make a fireteam. The Draal was given a bomb and mate and had a shots horizontally across the map to defend the approach towards the AC2.
The third triad was deployed hidden on my left watching against dropping Rasyat, or Corsairs looking to walk on. Finally my Chaksa deployed begid the AC2 also watching for Rasyat and ready to jump up to flame enemies looking to attack the AC2.
Turn 1
Top of 1 – Morat Aggression Force: Kornak Rush
My opponent began by advancing up the two Daturazi on my right flank before linking up with Kornak. Using smoke the Harris advanced up to engage my Sukeul K1 Sniper from a closer range. Kornak knocked out the Sukeul, but it took a few orders thanks to the symbiomate.
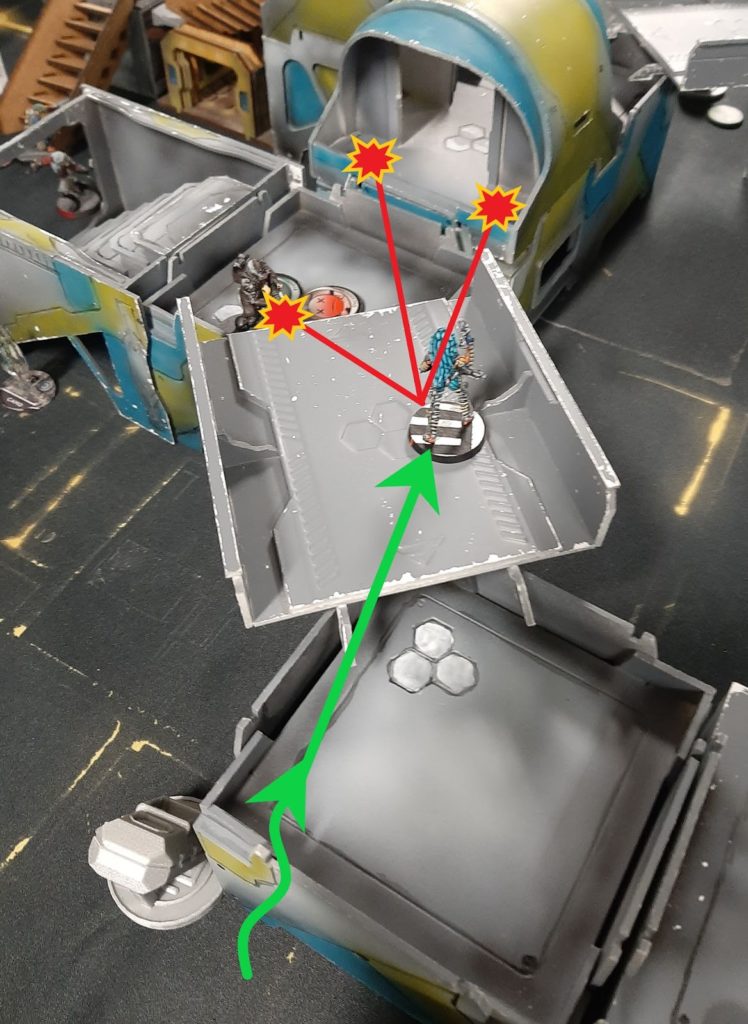
Kornak and friends looked to advance further towards my deployment zone, but came into sight of the Draal, providing cross map coverage. My opponent decided to take a risk and brought his Corsair on behind my Draal, in line of fire of one of my Makaul. The Draal used it’s symbiobomb to hit one of the holoechoes while my Makaul hit another…both were misses. The Corsair activated again and shot my Draal, successfully stripping the mate as the Makaul’s contender ripped the drop troop apart.
With the Corsair failing to remove the Draal, Kornak and his Daturazi tried to cross the gap. However, the Draal was ready and fired on Kornak. Two hits, two failed saves, and Kornak was gone. The two Daturazi continued to push on the Tohaa deployment, taking out the Kamael FO before falling back.
Bottom of 1 – Tohaa: Clearing the Threat
With two Daturazi hanging out on the right of my deployment zone I knew I had to deal with them before moving out. I got greedy and tried to clear them with the Kaeltar that was the only remaining member of the sniper fireteam. He leapt over the wall to face the two Daturazi, engaging one. He lay both shotgun templates across the Daturazi as he was struck down by one. Unfortunately, one Daturazi dodged the templates, while the other tanked both saves.
Having failed I began to move my triad with my other Sukeul and Kaeltar over. As they approached, the Sukeul unleashed their Symbiobomb and tried to endgame the two Daturazi eliminating both.
I finally began advancing my Draal team. As the Makauls moved up to take up defensive positions the Draal retrieved a DA ccw from the Panoply, before failing to perform Net-undermine.
Turn 2
Top of 2 – Morat Aggression Force: The Second Wave
My opponent pushed back, advancing his core team to deal with the approaching threat of the Draal and 2 Makauls. He correctly realized that given another turn, the Makauls and Draal could easily remove the AC2 through the use of Eclipse Smoke, DA ccws and a D-Charge.
The core team moved up, with the Sniper and Spitfire each removing a Makaul (who sadly whiffed on their Eclipse Smoke throws). Leaving the Sniper behind, the rest of the team moved up and pushed towards my AC2. The Draal held out as long as he could, dodging and placing mines to delay the enemy’s advance. The enemy team ended on top of some buildings just outside of my DZ.
Bottom of 2 – Tohaa: Jump Around!
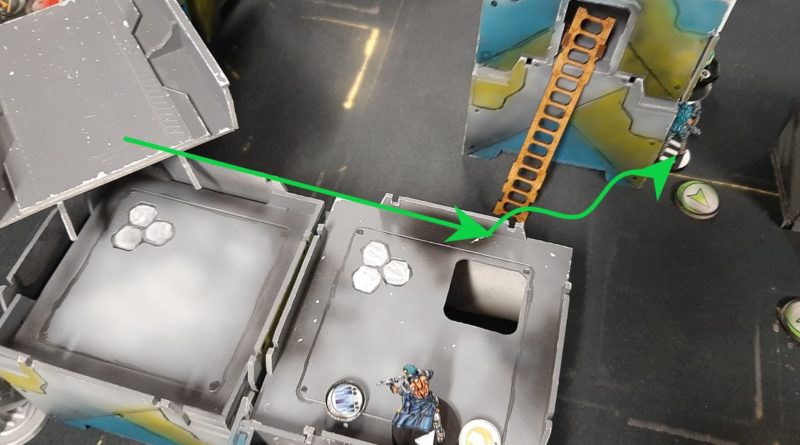
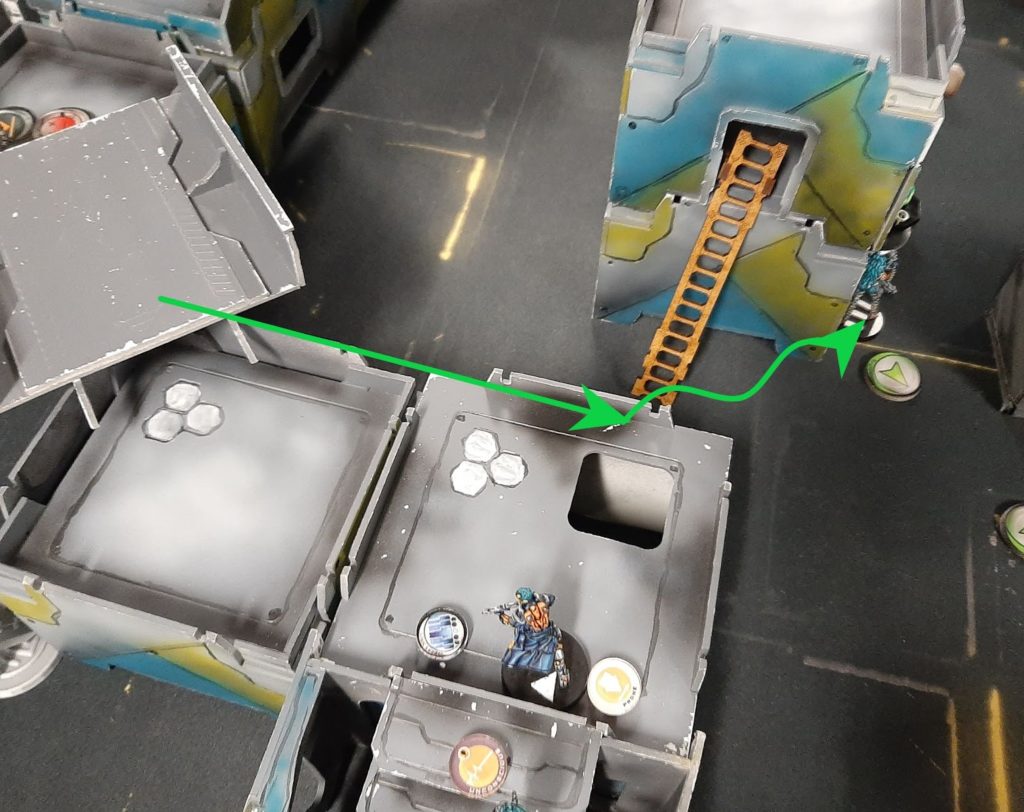
This was the turn where the Low Gravity bonus really came into handy. After my Chaksa sacrificed his life to clear the enemy Missile Launcher, my Sukeul Lt jumped on top of the building and began advancing on the remaining team members. With a couple orders, and her team scrambling to keep up, the Sukeul eliminated the remaining Vanguard and the Yaogat Spitfire.
Recognizing that I didn’t have the orders to make a push on this turn I decided to take the cautious approach and set-up for the next turn. I repositioned my team with the Makaul watching the approach towards the AC2, hoping to delay an enemy assault. Meanwhile my LT jumped forward to hide on the side of a midfield building. On the same side of the building was the second Panoply, and I figured at the very least I could win off Net-Undermine and more Panoplies in the next turn. Finally, I walked my Corsair on to secure my opponent’s HVT to put classified pressure on my opponent and get an extra order the next turn.
Turn 3
Top of 3 – Morat Aggression Force: Apply Pressure
My opponent evaluated his situation and realized he didn’t have the orders to get a reliable strike on my AC2. Instead he tried to prevent me from winning on the smaller secondaries . He first grabbed an item with his Daturazi, tying the grabs. He the moved over to an unconscious Makaul and completed his Extreme Prejudice classified. Finally, he moved two units up to secure my HVT, preventing me from simply getting that classified.
Bottom of 3 – Tohaa: Safe Shots to Cement the Win
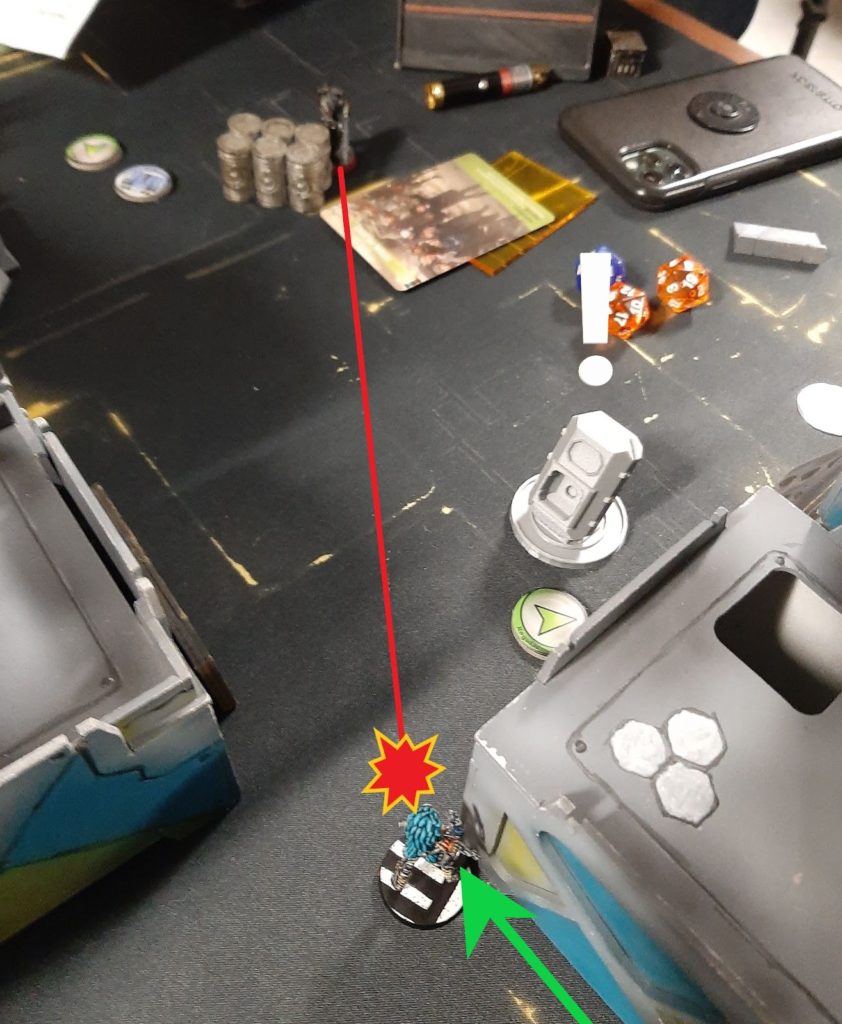
The turn was all my LT. She immediately moved up, grabbing something from the Panoply, and after failing one time completed the Net-Undermine classified. The Sukeul moved up to get to within one move of the enemy AC2. Unfortunately because of the failed Net-Undermine I didn’t have the orders to do a safe move dodge to get into range. This meant that the Sukeul had to face down the enemy Yaogat Sniper.
They faced off, the Sukeul failed to dodge the shot. Two saves, I just had to pass one…I failed both (one by one). With that the LT fell and the game was over.
Final Score:
Tohaa Victory (5-4)
Post-Game Analysis
One thing my opponent and I quickly realized playing at only 200pts was that we both felt that we had very few orders. The entire game I was really pressed to squeeze every little bit out of every order. Going second I largely felt like I had to use my few orders to clear up and respond to the attack run my opponent had made the turn before.
Whereas in larger pt games I often find I have a second group to respond to the enemy’s push, with only 200pts I felt under a lot more pressure as second player.
This limit was heightened by the mission. In general I find L&S an order intensive mission, at least for forces that don’t have a demolition expert that starts up the board or drops in (thankfully my enemy didn’t bring a Rasyat), so having only one combat group made getting to the enemy’s AC2 very difficult. I found it forced me to focus a lot more on staging for an assault the next turn, rather than making an all out assault in one turn.