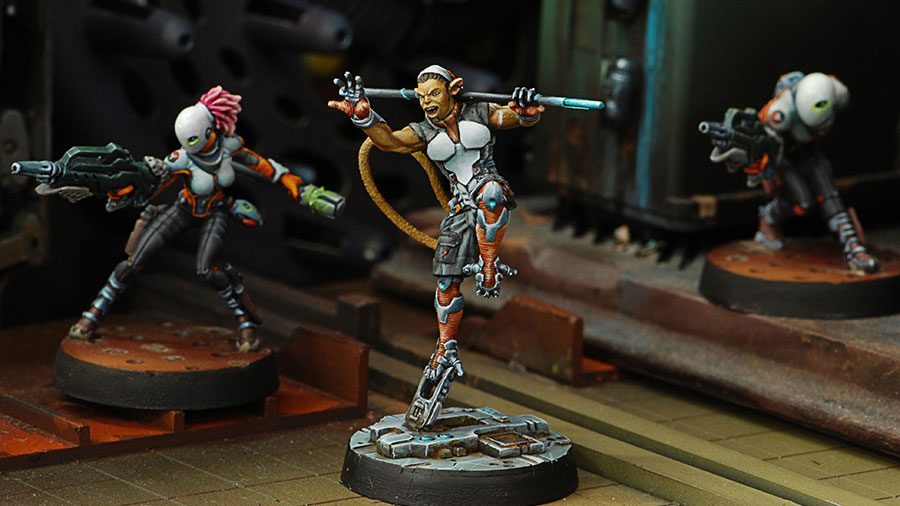
Bran Do Versus Saito
Hello,
Wanted to write about my experience for Limited Insertion. I’m a new player, having just started in June when the Kurage crisis came out and wanted to try Bakunin and the Riot Grrl Pain Train.
[img]https://assets.infinitythegame.net/infinityarmy/img/_logosweb/503/logo_503.png[/img][b] Operation Making a Tight Fit[/b]
[img]https://assets.infinitythegame.net/infinityarmy/img/_logosweb/503/logo_7.png[/img] [b]RIOT GRRL[/b] Spitfire / Pistol, Knife. (2 | [b]34[/b])
[img]https://assets.infinitythegame.net/infinityarmy/img/_logosweb/503/logo_7.png[/img] [b]RIOT GRRL[/b] Missile Launcher / Pistol, Knife. (2 | [b]33[/b])
[img]https://assets.infinitythegame.net/infinityarmy/img/_logosweb/503/logo_7.png[/img] [b]RIOT GRRL[/b] Missile Launcher / Pistol, Knife. (2 | [b]33[/b])
[img]https://assets.infinitythegame.net/infinityarmy/img/_logosweb/503/logo_7.png[/img] [b]RIOT GRRL[/b] Boarding Shotgun, Stun Grenades + TinBot B (Deflector L2) / Pistol, Knife. (0 | [b]30[/b])
[img]https://assets.infinitythegame.net/infinityarmy/img/_logosweb/503/logo_7.png[/img] [b]RIOT GRRL (Specialist Operative)[/b] Combi Rifle, Blitzen, Stun Grenades / Pistol, Knife. (0 | [b]30[/b])[img]https://assets.infinitythegame.net/infinityarmy/img/_logosweb/503/logo_23.png[/img] [b]KUSANAGI Lieutenant[/b] MULTI Rifle + Light Flamethrower, E/M Grenades / Pistol, Shock CCW. (+1 | [b]44[/b])
[img]https://assets.infinitythegame.net/infinityarmy/img/_logosweb/503/logo_3.png[/img] [b]REVEREND CUSTODIER Hacker (Hacking Device Plus)[/b] Combi Rifle + Pitcher / Pistol, Knife. (0.5 | [b]34[/b])[img]https://assets.infinitythegame.net/infinityarmy/img/_logosweb/503/logo_24.png[/img] [b]BRAN DO CASTRO[/b] Boarding Shotgun / Pistol, DA CCW. (0 | [b]33[/b])
[img]https://assets.infinitythegame.net/infinityarmy/img/_logosweb/503/logo_13.png[/img] [b]DAKTARI[/b] Combi Rifle / Pistol, Knife. (0 | [b]14[/b])
[img]https://assets.infinitythegame.net/infinityarmy/img/_logosweb/503/logo_1.png[/img] [b]MODERATOR[/b] Spitfire / Pistol, Electric Pulse. (0.5 | [b]15[/b])
[img]https://assets.infinitythegame.net/infinityarmy/img/logos/orden_regular.png[/img]10 [b]| 7 SWC | 300 Points |[/b] Open in Infinity Army
[img]https://assets.infinitythegame.net/infinityarmy/img/_logosweb/903/logo_903.png[/img][b] Japanese Secessionist Army[/b]
[img]https://assets.infinitythegame.net/infinityarmy/img/_logosweb/903/logo_10.png[/img] [b]O-YOROI Lieutenant[/b] AP HMG + Heavy Flamethrower, CrazyKoalas / EXP CCW. (3 | [b]86[/b])
[img]https://assets.infinitythegame.net/infinityarmy/img/_logosweb/903/logo_28.png[/img] [b]SAITO TOGAN (Specialist Operative)[/b] Combi Rifle, Smoke Grenades / Pistol, EXP CCW, Knife. (0 | [b]40[/b])[img]https://assets.infinitythegame.net/infinityarmy/img/_logosweb/903/logo_2.png[/img] [b]KEMPEI (Chain of Command)[/b] Boarding Shotgun / Pistol, CCW, Electric Pulse. (0 | [b]21[/b])
[img]https://assets.infinitythegame.net/infinityarmy/img/_logosweb/903/logo_1.png[/img] [b]KEISOTSU[/b] Missile Launcher / Pistol, Knife. (1.5 | [b]14[/b])
[img]https://assets.infinitythegame.net/infinityarmy/img/_logosweb/903/logo_1.png[/img] [b]KEISOTSU (Forward Observer)[/b] Combi Rifle / Pistol, Knife. (0 | [b]10[/b])
[img]https://assets.infinitythegame.net/infinityarmy/img/_logosweb/903/logo_1.png[/img] [b]KEISOTSU (Forward Observer)[/b] Combi Rifle / Pistol, Knife. (0 | [b]10[/b])
[img]https://assets.infinitythegame.net/infinityarmy/img/_logosweb/903/logo_17.png[/img] [b]YURIKO ODA[/b] Combi Rifle, Panzerfaust, D-Charges, Antipersonnel Mines / Pistol, CCW. (0 | [b]24[/b])[img]https://assets.infinitythegame.net/infinityarmy/img/_logosweb/903/logo_11.png[/img] [b]NINJA Hacker (Killer Hacking Device)[/b] Tactical Bow / Pistol, DA CCW, Knife. (0 | [b]29[/b])
[img]https://assets.infinitythegame.net/infinityarmy/img/_logosweb/903/logo_11.png[/img] [b]NINJA Hacker (Assault Hacking Device)[/b] Combi Rifle / Pistol, Shock CCW, Knife. (0.5 | [b]40[/b])
[img]https://assets.infinitythegame.net/infinityarmy/img/_logosweb/903/logo_3.png[/img] [b]RYŪKEN (Forward Deployment L2, ODD)[/b] Submachine Gun, Antipersonnel Mines, D-Charges / 2 Breaker Pistols, Knife. (0.5 | [b]24[/b])
[img]https://assets.infinitythegame.net/infinityarmy/img/logos/orden_regular.png[/img]10 [b]| 5.5 SWC | 298 Points |[/b] Open in Infinity Army
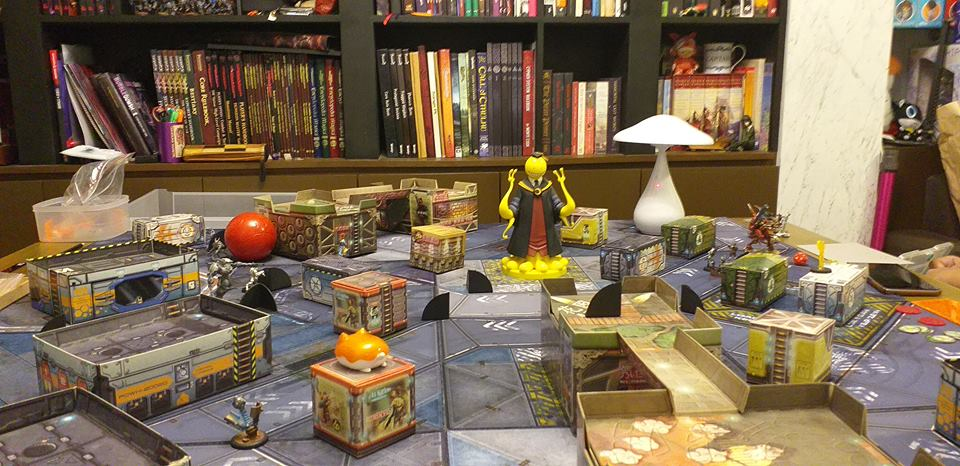
We ran it on this table:
Unfortunately we totally forgot to take pictures during the game to properly document what happened but I had the left side (with the big red ball) while my opponent had the right side of the table. My opponent won the lieutenant roll and chose to go first.
He deployed his Keisostu link on the crates, his Ryuken 9 behind the big yellow statue to cover that flank and the O-Yoroi behind the middle building to cover the opposite flank. The ninjas also covered the half of the table that had the O-Yoroi.
I had my Daktari crouching against the red ball, the lone Moderator nearby on the building and the Riot Grrl link in the middle of the two buildings on the left surrounding the Custodier. Kusanagi was on the opposite flank (behind the building pictured on the bottom left).
As for our reserves; my opponent deployed Saito Togan in TO Camo behind the building with the red ball while I deployed Bran Do defensively in front of Saito (though that proved to be a mistake on my part).
We had Deadly Dance as our mission and during the first turn I wound up needing to occupy the sector that had the big yellow statue while my opponent needed to claim the sector with the cat on top of the square structure with ads.
Turn 1
Top of 1 – JSA
Saito walks towards my deployment zone. Unfortunately, this is where I goofed up as I deployed Bran Do too close. I should have deployed him within engage distance of the Daktari instead. That mistake costs me as Saito was able to kill the Daktari and then climb up the building to take down the Moderator and earn a Coup de Grace hidden mission objective. My opponent, afraid of the Custodier, then tries to brave the Riot Grrl link to kill her but she manages to dodge his shot and the one Riot Grrl facing Saito’s way manages to stun him with a grenade.
He uses his remaining orders to bring the O-Yoroi and the koalas forward to the sector he needs to control and burning Kusanagi’s ODD off with the flamethrower and trigger NWI.
Bottom of 1 – Bakunin
I started by moving the Grrls. The lead moves closer towards the O-Yoroi without breaking cover to intentionally trigger the koalas while a second Riot Grrl moves up a set of ladders to confront Saito. I use dodge as the second half of my order and succeed against the mine. The ladder is on Saito’s blind side and he fails his roll to turn. The movement unfortunately makes the Riot Grrl moving towards Saito break away from the link.
I stun Saito with another grenade and then move Bran Do in, who crits. He fails the DA CCW roll and is killed outright which is unfortunate because I also had the Coup de Grace hidden objective. With Saito no longer threatening my Custodier, I move her to line up a pitcher shot towards the O-Yoroi. I succeed but then spectacularly fail all my remaining orders in trying to deal with the TAG.
Turn 1 ends with JSA dominating his sector with the TAG, which gives him a huge lead since I didn’t get to dominate my sector and he managed to get his classified objective.
Turn 2
Top of 2 – JSA
My opponent brings a ninja out and sacrifices her in order to shoot the repeater. The Riot Grrl leader manages to kill her but the repeater also goes down.
The TAG manages to kill Bran Do and the Riot Grrl leader. AROs eventually see it dropping to combi rifle fire, however. Unfortunately with the link broken the Keisotsu link manages to pick off the Riot Grrls one by one and after the end of the turn I’m only left with Riot Grrl, the Custodier, and Kusanagi and decide to concede the game.
Notes
- I really should’ve deployed Bran Do closer to the units I was supposed to be protecting. It’s a bad habit of mind to put my camo marker too close to an infiltrating marker. That said, I really appreciate Bran Do’s mobility and want to see how he does as a first turn face puncher.
- Using the Riot Grrl link with hyperdynamics was a good way to clear the Koalas. I played too conservatively though. I should’ve just ignored Saito and brought the missile launcher to bear against the O-Yoroi or killed Saito with the link and then gone for the O-Yoroi. I feel like this is a holdover from Vanilla Nomads where I’m used to having to finesse things so having all that tanky firepower in one five-man link still feels alien to me.
- Also just some pretty unlucky rolls on my part with the reset always going through.
I hope you enjoyed this short report.
-Mark Daniel aka Desanges

