Jhokalups – Field Operation Action Report – 14
Jhokalups – Field Operation Action Report – 14
Bakunin vs Varuna
300 / ITS X – Unmasking
Finally playing again! Against Xammy! It’s been almost a month since I was last able to play. Time to knock some rust off and play some Bakunin.
Wip Roll
Bakunin 4
Varuna 5
Decision: Xammy
Deployment: Jhokalups
Initiative: Jhokalups
1st Turn: Xammy
1st Deploy: Xammy
Varuna List:
Bakunin List:
We have a VIRD aggression force facing a Praxis detachment led by the Reverend Superior Kusanagi. Each group is trying to find the enemy spy in a quiet suburb.
Deployment:
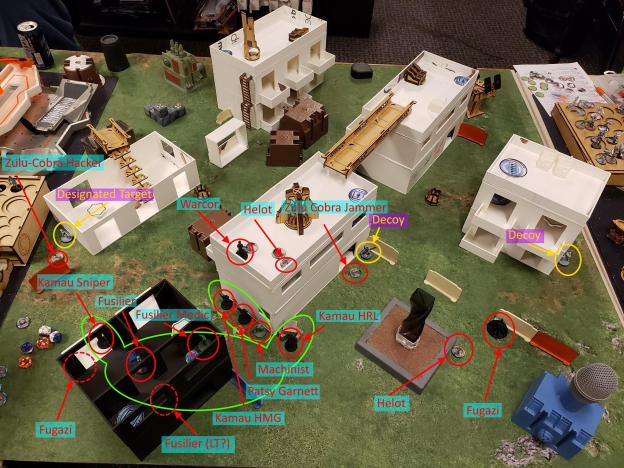
VIRD took advantage of a local apartment to deploy their mixed Fusilier/Kamau link split accepts floors. The multi-sniper was on over watch for the main road and the have l heavy rocket watched the back alley. Patsy and her group huddled behind a large apartment while the Fugazi and majority of camo markers deployed on the ground. There was a camo marker and Warcor on the roof of the large apartment.
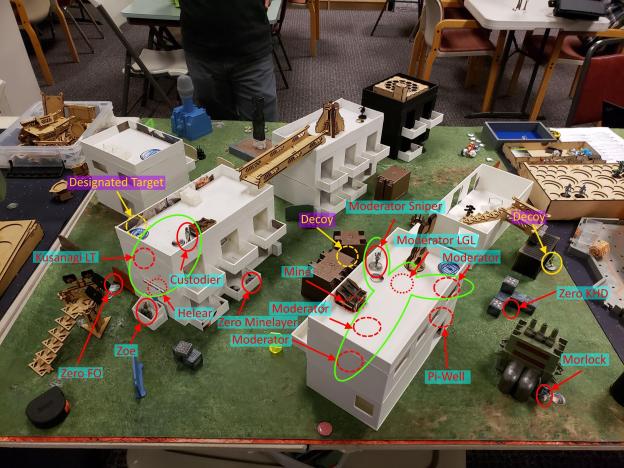
Taking a similar tactic, Kusanagi and her Reverends split across the floors of a large apartment. A core of moderators hid in another apartment with the multi-sniper ready to pop up on the roof. Zoe hid in a dumpster while πWell was in the apartment with the moderators. The zeros split the suburb into thirds and each took one to cover. The Morlock deployed on the right to provide a smoke screen for the Moderators.
Top of 1: VIRD
For their reserve VIRD revealed a TO camo marker and dropped it down. To start things off the TO marker advanced up the field and when it reached the console on my left it revealed itself to be a Crocmam Killer Hacker. The KHD Crocman flipped the console, revealing my right HVT to be a target decoy. The crocman then went and flipped the middle console reveal in my left HVT to be the designated target. Having identified the Designated Target, VIRD made that the high priority. A camo marker advanced quickly up the field, walking past a Reverend Healer and a Zero Camo Marker. The designated target tried to reveal the camo marker, but failed. After creeping into total cover the Camo marker revealed to be a Jammer Zero Cobra and Assault pistoled my designated target into unconsciousness. The zero Cobra then crossed back across the alley before trying to jam the Reverend Healer, who’s advanced BTS helped avoid the interference. The Crocman reverted to a marker and VIRD passed turn.
Bottom of 1: Bakunin
The Praxis detachment was in a rough spot, our Designated target was down and VIRD had captured two of the consoles. I knew that I would need to deal with the middle road before I could get anywhere. The Morlock advanced up and free from any fire ducked behind a building. πWell advanced inside a building to be in good repeater position. A zero took out the Jammer Cobra, so that the Reverends we’re free to activate. The Reverend team activated and the Custodier put up some white noise between the Moderators, πWell and the Kamau MSV sniper. After that the moderator sniper popped up, ready to cause some trouble. A Helot revealed itself to fire a pair of rockets at the moderator. An unfortunate face to face saw the Moderator unconscious and the link broken. Zoe activated and enhanced πWells aiming capability. Then πWell tried to unseat the Helot. On the 4th face to face the Helot failed guts and went prone. The Reverend link activated, looking to clear out the back alley, revive the designated target and maybe capture some consoles. Unfortunately with a lack of orders all Kusanagi was able to do was take out a different Helot. And πWell hid from the Kamau sniper.
Score at End of 1: 4 – 0 VIRD Favor
Top of 2: VIRD
The VIRD commander wanted to use this turn to start clearing more Bakunin troops. The Fusilier mixed link started descending the building, it wasn’t until the third order when everyone was out that the VIRD commander realized that activate, the standard version (not the ITS skill) is a short skill that could be used by the whole fire team, or at least all members on the same floor. After getting the Fusilier team ground level the multi-sniper Kamau attempted to remove Kusanagi and the FO Zero. Kusanagi did take a wound, but successfully failed/succeeded guts to Dodge out of sight. Next up Patsy and her Kamau HMG came up the main road and took out πWell while getting into a building. After successfully clearing the back alley, Pasty and her group advanced up, after walking the Kamau in front of πWell the Kamau proceeded to fill the little robot full of holes. Finally the Croc Man walked around putting mines on everything before re-entering marker state behind the left console.
Bottom of 2: Bakunin
Alright, Kusanagi and her force are not in the best position. We can recover, hopefully. I start off by trying to clear off that obnoxious rooftop Helot. I reform the moderator link and have the LGL walk forward to a position to be able to shoot at the Helot. A couple exchanges later and nothing is happening. So I come up with a new plan, well, more like two plans, or a plan that was executed in the wrong order. I walk my meteor zond on next to the VIRD HVT on the right, partially forgetting that there is a camo marker there. I elect to do it anyways. A Zulu Cobra with a breaker rifle reveals and shoots my Zond unconscious, not great. I use my Morlock to create a smoke screen for my Zero KHD to get up to a console and flip it. I decide to be too conservative and set up two overlapping clouds, which leaves not enough orders in its group to get to the button. That done, I have Kusanagi and the custodier advance upon the top of their building to take out the Helot and warcor. Then set up a white noise screen to allow Kusanagi to advance over the bridge and take out the Zulu Cobra KHD. Unfortunately the Custodier gets isolated as part of that order and I pass turn.
Score at End of 2: 4 – 0 VIRD Favor
Top of 3: VIRD
WIth the commanding position that Xammy is in there is really only one thing left to do. The Kamau HRL jumps into the elevator and rides it up to see Kusanagi. After a quick exchange, Kusanagi goes down. Since she was my lieutenant and starting the third turn in loss of lieutenant would make it nearly impossible to accomplish anything we call the game here.

Final Score: 7 – 0 VIRD Total Victory
Lessons Learned:
- Lieutenant orders are a thing, Kusanagi could have been in cover for that last shot, improving her odds of survival by 20%.
- I need to have a plan for when dice don’t go my way, I spent a lot of orders on a Helot that I could have used to accomplish something else, like clearing out the back alley with Kusanagi.
- The HVT I chose as my Designated Target was probably the least secure. I should have used my middle HVT as the designated target.
- My placement of the Meteor Zond was poor. I could have used my Hacker to enhance the landing and dropped it into my opponents deployment zone.
- Dropping my Meteor Zond into a different spot would have opened up a Combi Rifle and a repeater option, instead of it dying pointlessly.