Over Infiltrate; Undermine
By Melanie (MJGrey)
Overview
- Mission: Capture and Protect
- Forces: Bakunin (Melanie/MJGrey) vs. JSA (Erin/IceCream)
- Deploy First: JSA
- First Turn: JSA
Melanie’s Bakunin List
A Hop, Skip, and a Die Away
GROUP 1
8
GROUP 2
RIOT GRRL Missile Launcher / Pistol, CC Weapon. (1.5 | 32)
TSYKLON Feuerbach, Pitcher / PARA CC Weapon(-6). (1 | 36)
MODERATOR (Lieutenant) Combi Rifle / Pistol, PARA CC Weapon(-6). (0 | 9)
AVICENNA Combi Rifle, Flash Pulse / Pistol, CC Weapon. (0 | 27)
1
1
METEOR ZOND Boarding Shotgun, Flash Pulse / PARA CC Weapon(-3). (0.5 | 21)
PROWLER Spitfire, Nanopulser, D-Charges / Pistol, CC Weapon. (1.5 | 39)
ZERO Boarding Shotgun, Shock Mines / Pistol, CC Weapon. (0 | 19)
MORLOCK Chain Rifle, Smoke Grenades / Assault Pistol, AP CC Weapon. (0 | 6)
6 SWC | 299 Points | Open in Infinity Army
When designing this list, I tried to keep both the ITS and Bromad missions as my first priority. Picking units, I split them into several teams within the actual combat groups. I had a Riot Grrl/Avicenna Haris to move up the board and function as my attack team, and a Moderator core with a Riot Grrl and Tsyklon to watch my deployment zone and act as ARO pieces. In the second combat group, I had what I considered my ‘away team.’ The Prowler and Zeroes would all try to over-infiltrate to give me a chance to hamper Erin and pick off some troops while waiting to see who the best flag carrier would be. The Meteor Zond could drop in where I needed it or somewhere to act as a distraction, while the Morlock could provide some smoke to help the Haris’s advance. Last, I had a lone Moderator in group 2 to generate an extra order and act as a decoy for my lieutenant.
Erin’s JSA List
Shinobu and Kuroshi are dating
GROUP 1GROUP 2
SHINOBU Combi Rifle, Nanopulser, Smoke Grenades / Pistol, Monofilament CC Weapon. (0.5 | 44)
KUROSHI RIDER (Lieutenant) Combi Rifle, Light Shotgun, D-Charges / Breaker Pistol, AP + Shock CC Weapon. (0 | 29)
KEISOTSU Missile Launcher / Pistol, CC Weapon. (1.5 | 14)
KEMPEI (Multispectral Visor L2) Shock Marksman Rifle ( ) / Pistol, CC Weapon, PARA CC Weapon(-3). (1 | 22)
YOJIMBO Contender(+1B), Nanopulser, Smoke Grenades, Crazykoala / Pistol, DA CC Weapon. (0 | 18)
ONIWABAN Submachine Gun, Nanopulser / Pistol, Monofilament CC Weapon, E/M CC Weapon. (0 | 34)
RYŪKEN (Forward Deployment [+8″]) Submachine Gun, Shock Mines, D-Charges / Breaker Pistol(+1B), CC Weapon. (0.5 | 26)
HÙSÒNG Yaókòng Heavy Machine Gun / PARA CC Weapon(-3). (1 | 24)
CHAĪYÌ Yaókòng Flash Pulse / PARA CC Weapon(-3). (0 | 7)
PANGGULING (Deactivator, Repeater) ( ) / PARA CC Weapon(-3). (0 | 8)
6 SWC | 300 Points | Open in Infinity Army
The Table
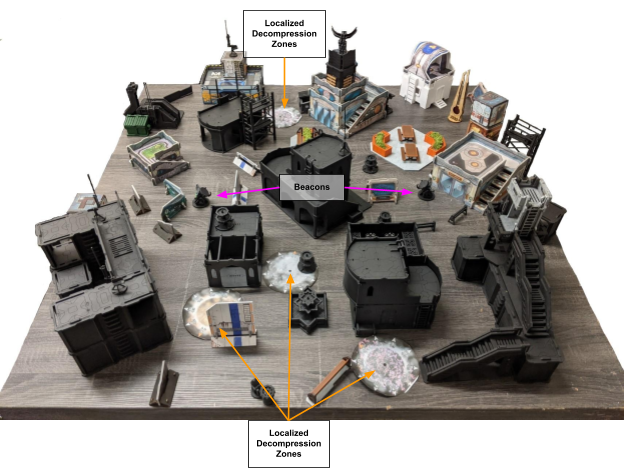
Deployment
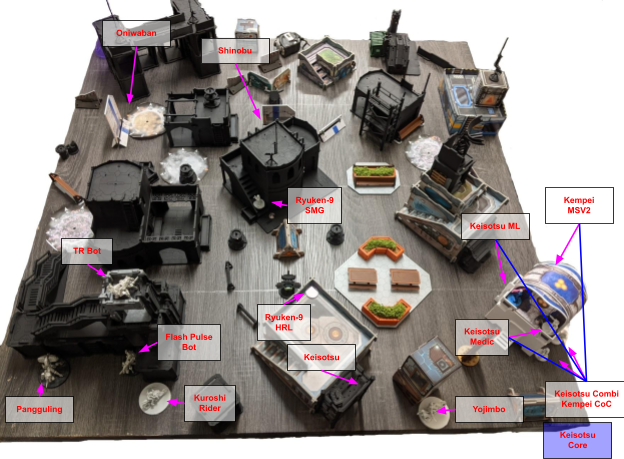
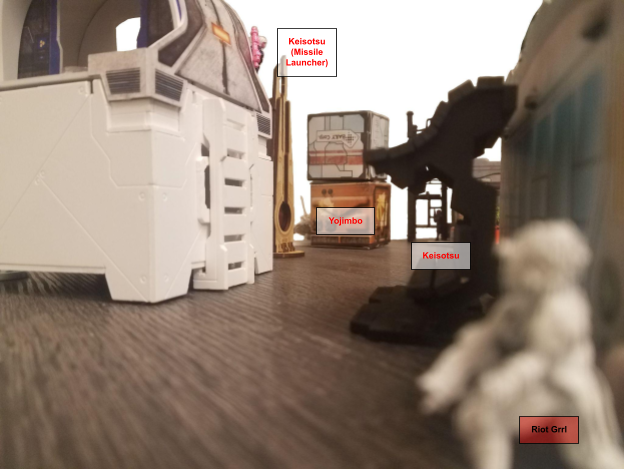
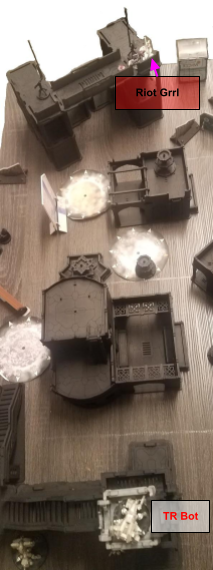
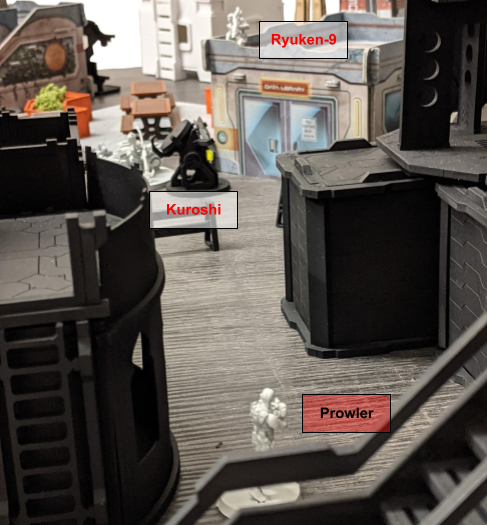
Looking at Erin’s deployment after the game, a few things became really clear. The Oniwaban and Shinobu are killer in close range, so it makes sense they were infiltrated to be near the sniper tower and beacon. In both places they could do a lot of damage. The Keisotsu core gave a bunch of bonuses to a missile launcher that could watch most of the board and a Kempei with MSV2 that could cover the firelane on the right. I didn’t know what it was at the time, but the Ryuken-9 with the heavy rocket launcher was also in a great spot to blast anything that tried to move across the board. The motorcycles were positioned toward the back where they wouldn’t immediately be sniped, and with their impetuous and fast move it wouldn’t really penalize them. Lastly, the TR Bot perched in the sniper tower was in a really strong position to give me a bad day.
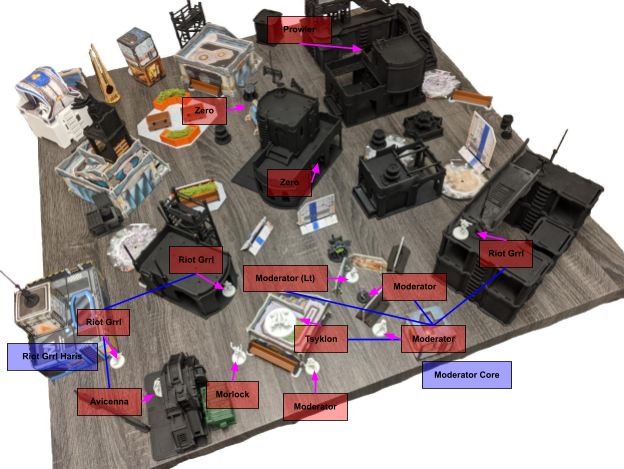
The first thing I placed was the Moderator core. I knew I wanted them to be able to protect the deployment zone and be close to the beacon in case I needed back-up defense. Sitting the Riot Grrl with a Missile Launcher on the structure in my bottom right gave me a great vantage point to watch the center and my right side of the board. The Tsyklon could cover the firelane toward the center, and my Riot Grrl haris was going to move up my left so they could cover the fact the Tyklon’s Feuerbach was more geared toward long range. I passed the infiltration rolls for both my Prowler and my Zero! Knowing JSA was geared more toward close combat, I used the Zero as bait near the beacon so anything that came to fight it would be right in the Prowler’s good range band. If I had failed the rolls, I was going to place the Prowler on the far left to use its spitfire to try to push against the core watching the firelane (or at least lock it down). The Zero would have come in at the far right, hoping that if I put it back in camouflage it could move up against the TR Bot.I held my second Zero in reserve, and decided to not try to infiltrate it. Instead, I put it in the midfield to act as a little bit of a deterrent and be able to move it into place where I needed it. Lastly, I had a Meteor Zond ready to drop in when I had the opportunity.
Turn 1
Top of Turn 1 – And so it begins… – JSA (Erin)
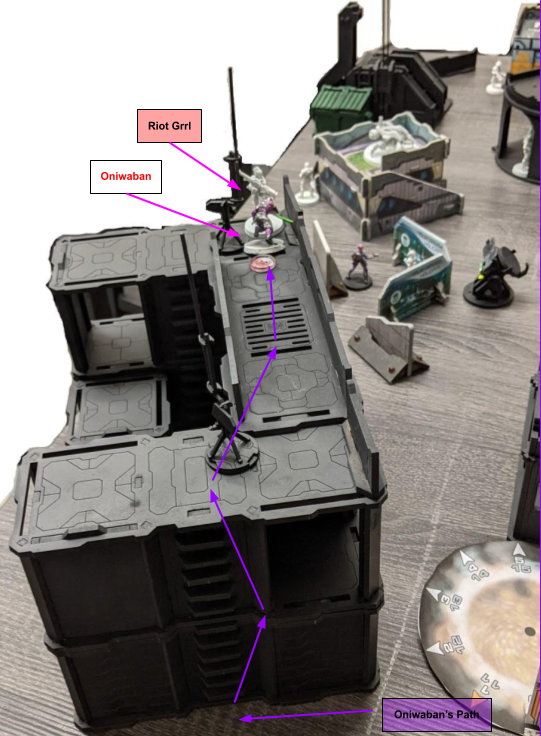
Going second, the first thing I had to do was use a command token to remove 2 orders from Erin’s pool. Unfortunately for her, she had to cancel her impetuous orders because of my ARO pieces. Undeterred, she revealed she had a camouflage marker that had infiltrated my side of the board! It climbed up the tower to try to assassinate my Riot Grrl, but luckily, she was able to discover it was an Oniwaban before he managed to get to her. She pulled out her pistol and took him down right as he entered close combat with her and right before she was cut in half.
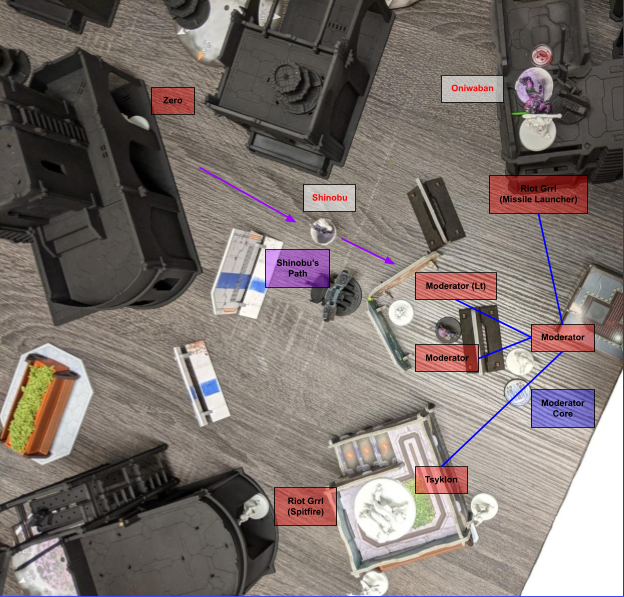
Safe from one of the infiltrators, a second appeared! Shinobu jumped from the shadows and ran straight at the heart of my Moderator core. Erin didn’t know it, but her Shinobu was aimed directly at the Moderator that was my lieutenant! Luckily, I used my Riot Grrl (Missile Launcher) and Tsyklon to reveal her and my Zero and Riot Grrl (Spitfire) to gun her down.
On the other side of the central building, the Ryuken-9 pushed forward and killed my Riot Grrl (Spitfire) before moving just a bit more and taking out my Tsyklon. A major portion of my attacking force (the spitfire) and my defense (the Tsyklon) were dismantled. To finish the turn, the Ryuken-9 flipped into suppressive fire.

Bottom of Turn 1 – Let’s get moving! – Bakunin (Melanie)
With Erin’s initial attacks fended off, it was time to move forward and start working on the objective. My Riot Grrl (Spitfire) was down, but I still had another Riot Grrl and Avicenna to push forward. I also had a Morlock to provide smoke and hopefully trade up in points. With that thought in mind, I decided to clear out the Ryuken-9 with the Morlock’s chain rifle. It was successful, and somehow my scrappy elf survived the return fire from the suppressive fire mode.
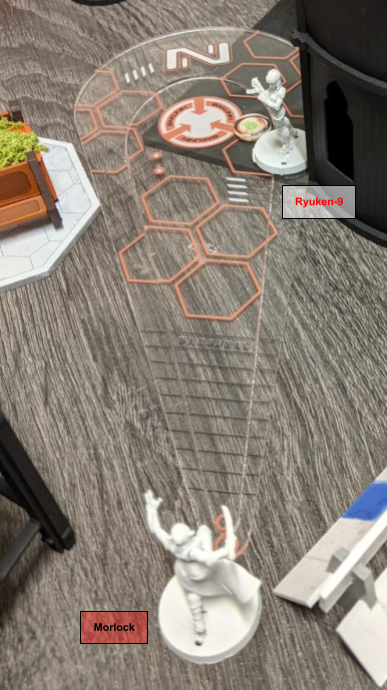
With the threat in the middle of the board taken care of, I needed to find a way to cover my attacker’s advance. My Morlock threw a few clouds of smoke to prevent the Total Reaction bot perched in the sniper tower from seeing the left firelane. What was left of my Riot Grrl-Avicenna haris could now move forward! Unfortunately, my poor Morlock took a rocket to the face from the camo marker in Erin’s deployment zone, which turned out to be a Ryuken-9 with a Heavy Rocket Launcher.
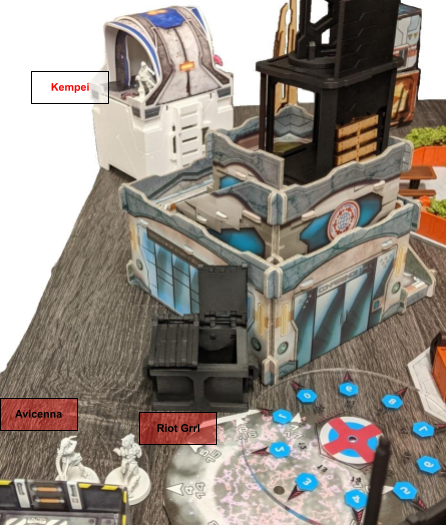
With their advance covered, what was left of my Riot Grrl-Avicenna haris could start making their way up the left side of the board. Unfortunately, there was a Kempei in a core link with MSV2 covering the lane. After really considering what else I could move up, I decided to use a coordinated order to try to take the Kempei down. It was a risky move because Avicenna only had a combi-rifle (and the Riot Grrl had a boarding shotgun!) but it seemed to be the only way to push forward. Luckily, it managed to work, and the Kempei went down!
No longer in a fireteam, the Riot Grrl advanced to the corner of the building ahead. I needed to take out the Keisotsu with a missile launcher, both to let me keep advancing and also to clear out some of Erin’s control of the mid board. Unfortunately, Yojimbo and another Keisotsu would have line of fire if she peeked her head out. I decided that with Avicenna with a clear line to heal the Riot Grrl, I could take the risk of taking the shot. The Riot Grrl ducked out, managed to take out the missile launcher, and survived all the shots she received back while only suffering one wound.
I was basically out of orders and didn’t really have much else I could do, so I switched Avicenna into Suppressive Fire and ended my turn.

Turn 2
Top of Turn 2 – The Bikers Ride Out! – JSA (Erin)
Unfortunately for Erin, she had to cancel her biker’s impetuous orders again because the Riot Grrl with the missile launcher would have started firing on them if they moved forward. To solve that problem, her Total Reaction Bot fired a series of shots across the board and my poor Riot Grrl went down.
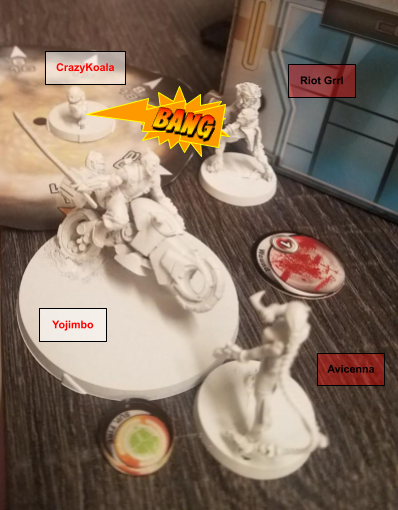
Her biker’s path now cleared, Yojimbo moved forward, and in the words of Erin, I was ‘going to hate her for what she did next.’ She was right, because Yojimbo threw a CrazyKoala and Smoke, and took down the Riot Grrl and Avicenna that made up what was left of my attack team.
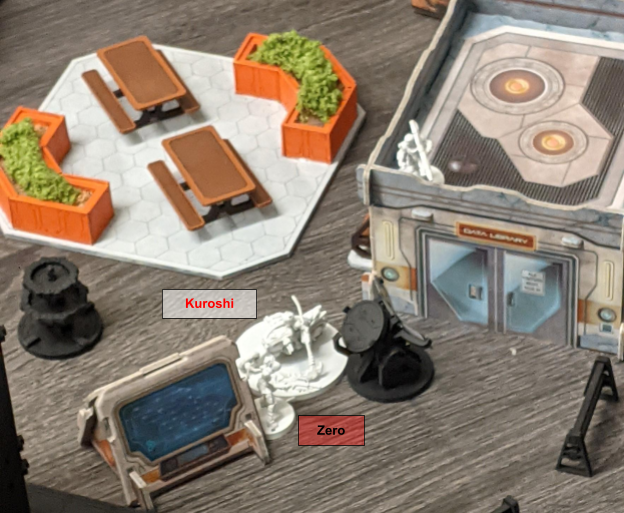
Back in the center of the board, Kuroshi moved up, and I popped my Zero out of camouflage to (unsuccessfully) shotgun her. A lone Keisotsu took a pot-shot at the Zero, and failed. Kuroshi finished the turn by dodging into melee with the Zero.
Bottom of Turn 2 – Bakunin Bites Back! – Bakunin (Melanie)
With my main attack squad down at this point, it was time to spring some of the surprises I had in store.
A wild Prowler appeared! It snuck under the total reaction bot, and then killed the Ryuken-9 still holding down the center with his heavy rocket launcher. I decided the potential to shoot my own Zero was worth the attempt of firing at the Kuroshi. My Zero ended up shrugging off one shot, and the Kuroshi was taken down. It was super effective!
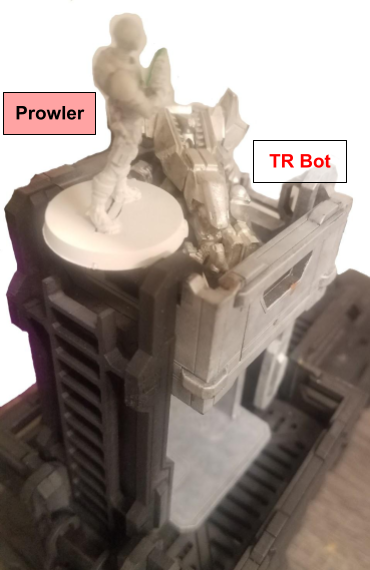
Now it was time to take out that pesky Total Reaction bot. I used a command token to switch the Prowler to group 1, where I still had orders. The Prowler climbed the sniper tower the bot was perched in, and blew it up with a D-Charge. (We moderately cheated with the movement here, but the intent wasn’t to have a completely unassailable sniper tower).
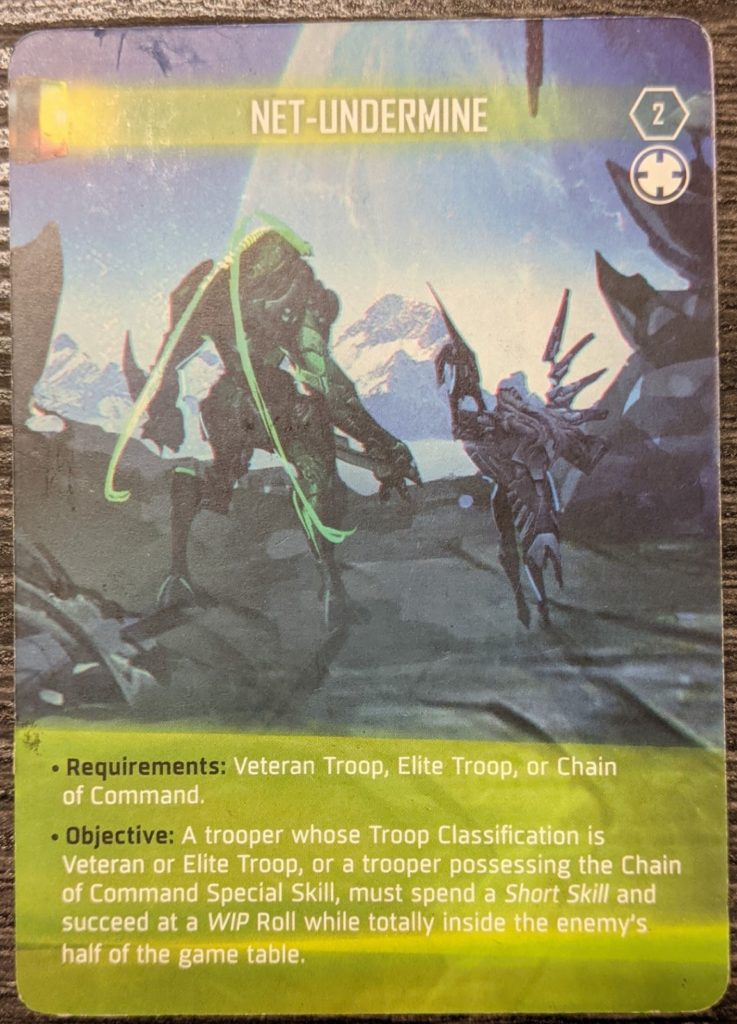
I only had one order left for the Prowler, so I attempted a WIP roll and completed my Net-Undermine classified objective. I was now winning 1-0!
To finish off the turn, I needed something to stop Yojimbo from rushing my beacon and claiming points. I dropped my Meteor Zond as the perfect distraction, and ended the turn.
Turn 3
Top of Turn 3 – The Last Samurai – JSA (Erin)
With a chance to finally use her impetuous order, Erin had Yojimbo charge the Meteor Zond (just like I wanted!). The Zond was quickly chopped to pieces in close combat, well worth the points to slow down Erin’s advance..
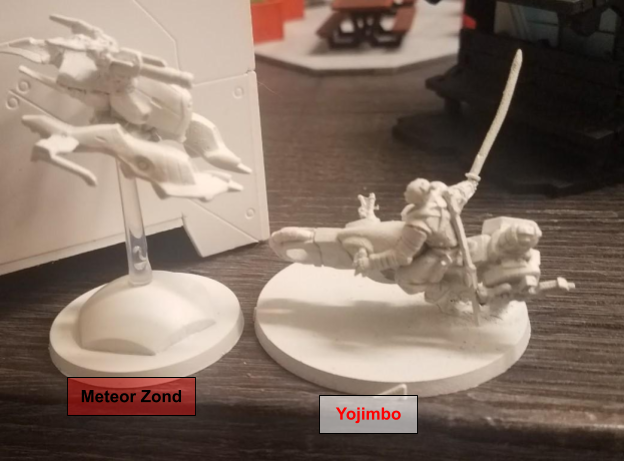
While I had wasted some movement and one of her orders, Erin still had enough to start moving toward the beacon. Yojimbo took off to try to capture the flag, but my Prowler landed a lucky spitfire shot from across the map and he went unconscious.
Since she didn’t have any units left that could make it across the table to the beacon, Erin decided she had to try to take some long shots to complete her Classified Objective and force a tie. The objective was to revive a unit with a Doctor/Paramedic, so the Keisotsu Paramedic shot the downed Kempei next to him and accidentally did some medical malpractice that ended with him dead.
She still had one last hail Mary to try. the Keisotsu tried to hit the downed Ryuken-9 in the mid-board, but couldn’t land his shots. Out of orders and with zero points, JSA lost the game.
Post Game Analysis
The game ended 1-0, and I eked out the victory using my classified objective. This was a really fun game and was very close throughout the whole thing. I got lucky with a few shots (looking at you, Prowler vs. Yojimbo), and Erin got unlucky with a few (both the Oniwaban and Shinobu getting taken down before doing any damage), but overall it seemed like both of our strategies worked well.
Over-infiltrating played a big role in both of our plans, and it clearly changed the flow of the game. With one or two rolls different, Erin could have cut down my lieutenant on turn 1 with her Shinobu and the game basically would have ended right there. The Oniwaban was in a great place to take out whatever was in the sniper tower on my side of the board, and my Riot Grrl just got lucky to not be killed. Of my infiltrators, the Zero was perfect bait to deter the Ryuken-9 with the heavy missile launcher and lure the Kuroshi into the Prowler’s sights. The Prowler itself was instrumental in my winning the game, and things would have been completely different had it failed its roll. I feel like it’s definitely worth attempting the over-infiltration roll, at least in some circumstances. I’m curious as to how well I would have (or rather wouldn’t have…) done had my rolls failed. I’ll definitely be taking some risks with over-infiltration in the future, and I feel like pairing it with hidden deployment makes it extremely nasty.
About halfway through the game we both came to the conclusion that the sniper towers in our deployment zones were a little too strong, and we should probably slightly change the way we set up tables in the future. Both of us ended up with really strong defensive positions, with my Riot Grrl with a missile launcher and Erin’s TR Bot really changing the flow of how things played out. Both of us had to work around them, forcing Erin to redirect a bunch of her effort into handling my Riot Grrl, while I had to use smoke and dedicate several orders toward taking out her TR Bot. My Tsyklon did serve as a deterrent, but it was nowhere near as powerful as the Riot Grrl. It did cost 0.5 SWC less than another Riot Grrl missile launcher, though, and that let me take a Meteor Zond which helped a bunch. The Riot Grrl’s MSV1 also really helped to reduce the utility of Erin’s smoke and Mimetism.
I definitely could have used and deployed my Riot Grrl Haris a little better, and while taking out Shinobu with the spitfire was useful, having it to take on the Keisotsu core would have really helped. My Zero in the center didn’t really do much except put a little bit of pressure on Shinobu, but that could have been handled with all of the other things in the area. The Haris did let me try a coordinated order for the first time, which worked well.
On a similar note, I’m still getting used to using command tokens, and I feel like they served me really well in this game. In addition to the coordinated order, I got to remove two orders from Erin’s pool on turn one (which is always a good thing). I also couldn’t have accomplished as much as I did with the Prowler if it had stayed in Group 2 without any orders.
One thing I’m a little disappointed about was that neither of us managed to actually accomplish the mission objectives for any points. Part of it was because both of us had strong defensive pieces in place to watch the beacons, which I feel was a solid strategic choice, but it does feel a little off to win a game without actually doing the mission at all. We’ll just have to work to capture the flag harder next time!