Trying Something New Battle Report
By Obyiscus
Overview
- Mission: Last Resort – BAMS
- Forces: Caledonian Highlander Army vs White Banner (300)
- Deploy First: White Banner
- First Turn: White Banner
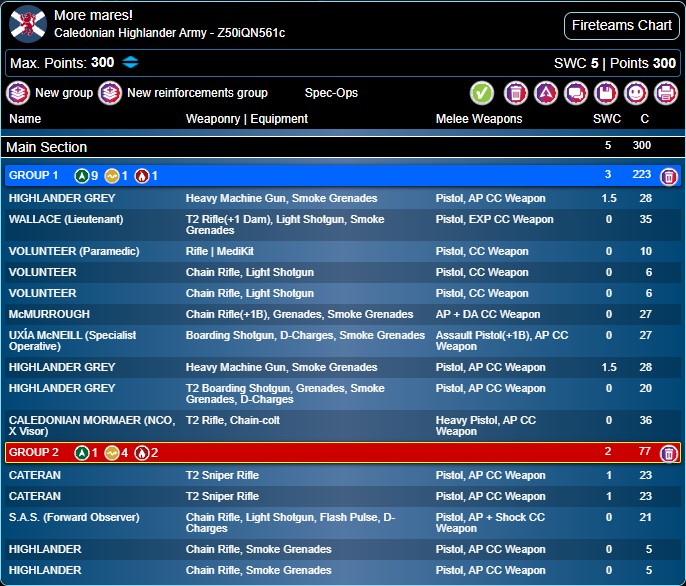
Caledonian Highlander Army (More mares!):
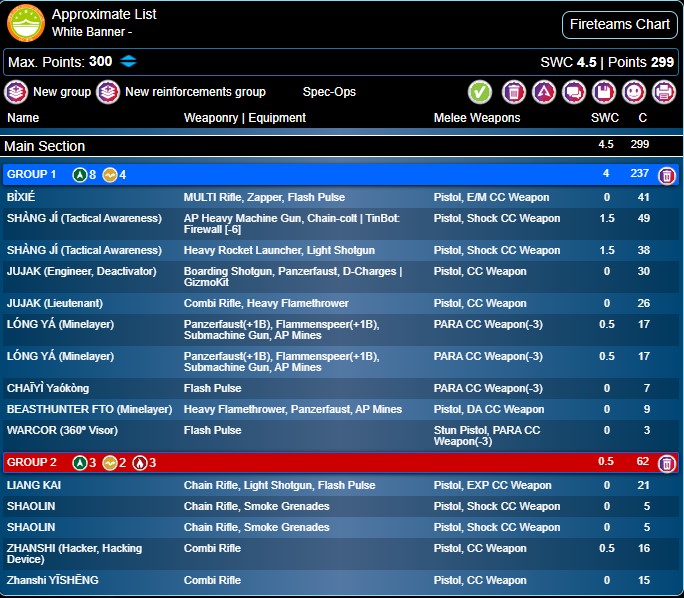
White Banner (Approximate List):
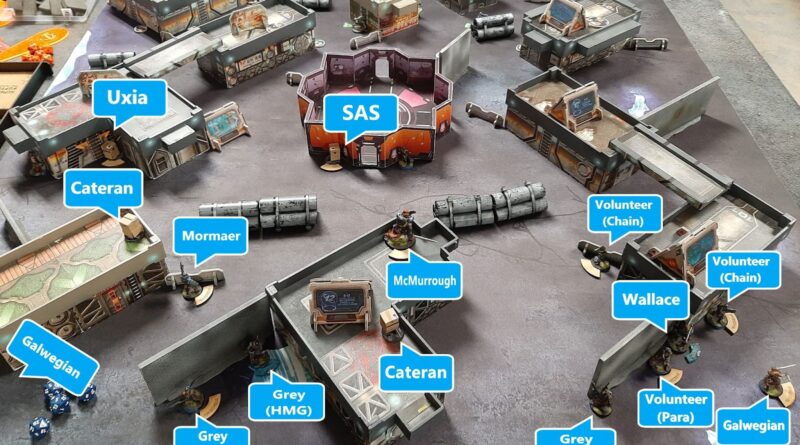
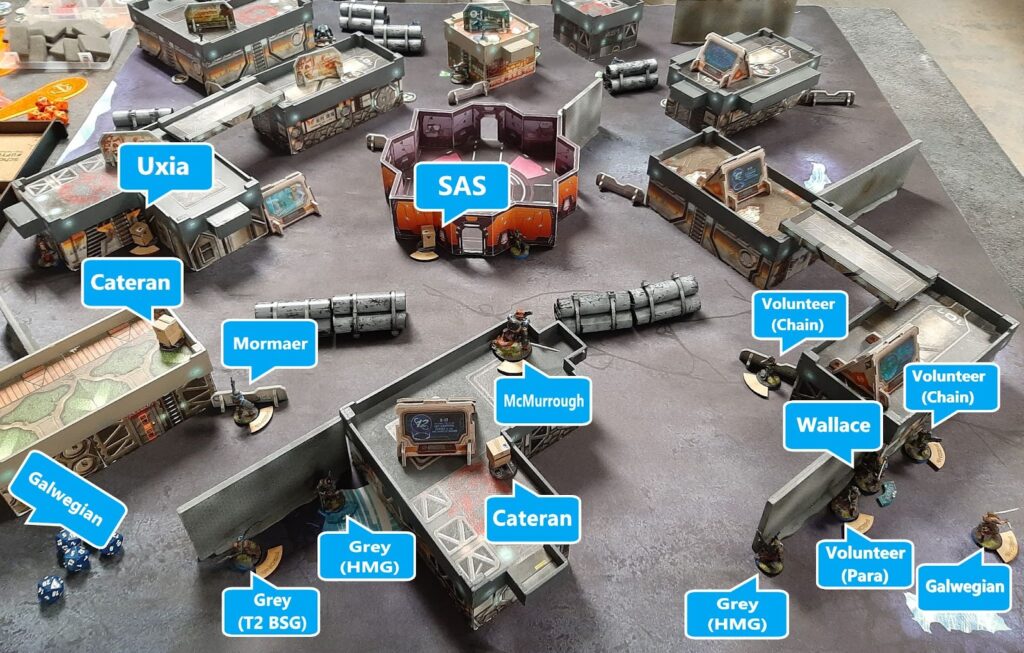
Deployment
Caledonian Deployment
I chose to spread my Impersonators across the map (with my real target on the far right and visible to both snipers should he be kidnapped). I chose the higher level of impersonation because there wasn’t even a question of trying to hide with my own lower impersonation model.
I deployed my two Caterans with a decent line to watch and slow an advance. I never expect them to win a fight, but ideally they kill a few orders and occasionally they win and kill something. One was deployed watching a Monk to try and slow the monk harris’s advance. My Core linked Grey HMG was also set-up to watch a bit of a line, but not anything really past the midfield (with the rest of the core team hiding behind walls). McMurrough was placed centrally on top of a building ready to pounce forward and do the mission when needed (I made him my Special Master).
On my left flank I deployed the Mormaer harris, hoping to use the slightly more crowded flank to push up and damage my opponent’s heavy infantry (Dmg 15 AP T2 is very effective for wiping HI cores). Uxia and the SAS were deployed centrally, ready to move forward and either kill or try and reveal HVTs. I put a Galwegian on each flank for additional smoke support.
White Banner Deployment
My opponent’s list was largely built around a very expensive core team which he deployed in the center of his deployment zone. He then put a long ya and mine on either side of the table, with the right flank further supported by a flashbot, and beasthunter. He then hid his hacker and doctor on the roof of the building in the right of his deployment zone. He deployed his monk harris centrally, with Liang Kai (his Special Master) ready to move up and start revealing my HVTs. Two of his HVTs were deployed behind the large objective room (the one more to his left flank was the DT), and the third behind some barrels on his right flank.
Turn 1
Top of 1 – White Banner: Forward to the Foe
My opponent started by pushing his Monk harris into the central building, trying to get to my HVT hiding on the other side. Thankfully the overlapping AROs from Camo markers and the HMG (as well as a bad smoke) prevented Liang Kai from getting to the HVT.
He pushed forward with his HI team under sniper fire and HMG fire. At times he tried to eliminate threats with a Long Ya. As the smoke cleared the results were one cateran dropping prone after tanking a save. A Long Ya tanking a few saves and losing all of its ammo, Shang Jesus taking a wound after failing to defeat a Grey HMG (after losing a couple fights Shang Jesus finally took a wound).
Remembering that he had smoke, my opponent smoked out Shang Jesus and repositioned his team to try and better survive my turn, while putting the HRL overwatching the battlefield on the roof. Before finishing Shang-Jesus revealed a fake HVT.
Bottom of 1 – Caledonia: Advance and Neutralize
The goal of my turn was to cause as much damage as possible to my opponent’s HI core, and set-up to prevent Liang Kai from moving out. I wasn’t concerned about doing the mission in the first turn as I figured McMurrough would be able to handle it well himself if the larger threats were removed.
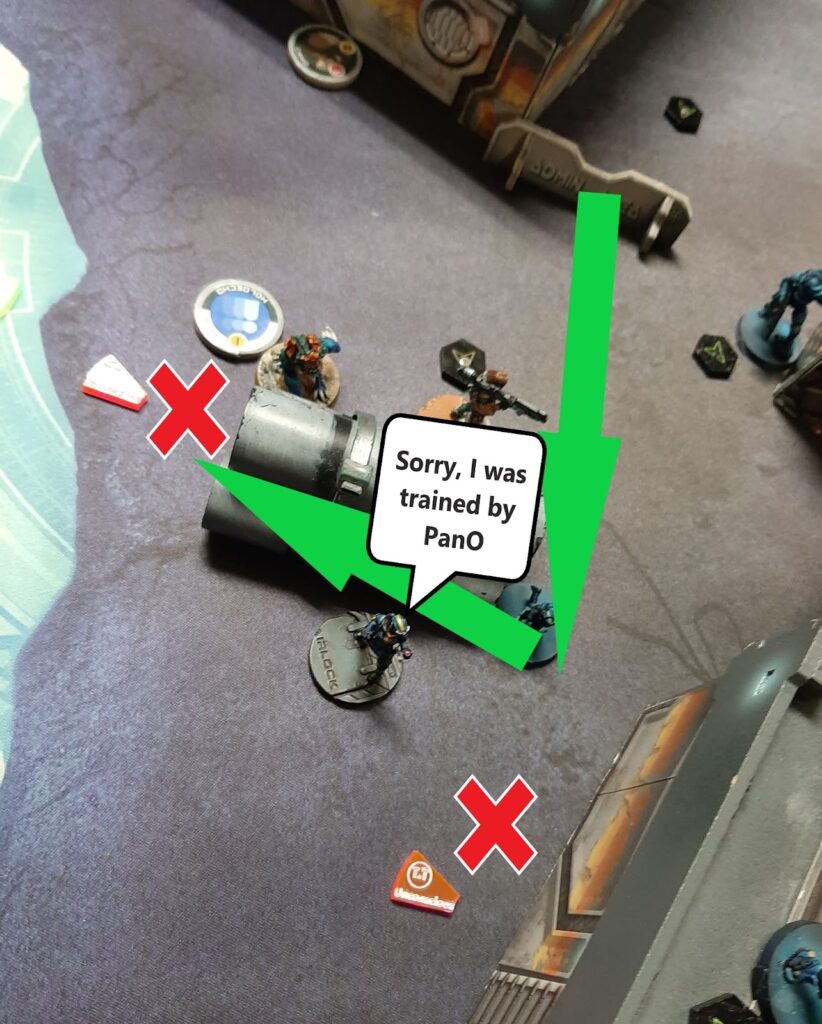
I began by moving my harris team, having the mormaer fight the HRL Shang-Ji. I won the fight, but my opponent’s armour continued to hold strong. My opponent failed his guts check and fell back behind the wall on the building and out of line of sight. I then used my Caterans to eliminate the Long Yas. One fell, but again the other passed its saves. After a few orders I ran out of orders before the second Long Ya fell.
I then sent the harris team in, using the walls to avoid being seen. The Mormaer, leading the team, started fighting the various HI behind the wall. Unfortunately, an early unlucky shot did a wound to the Mormaer. I chose to stay dogged and proceeded to down Bixie, Shang Jesus, and Shang-Ji Engineer. All 3 were left unconscious.
Turn 2
Top of 2 – White Banner: A Hope and a Prayer
With minimal resources my opponent went into damage control. His monks were largely locked down, so he used their orders to smoke out the lines that I had to his doctor and her path to his downed troops. He used the bulk of the rest of his orders to climb the doctor down and over to first the engineer, and then Bixie. He first tried to heal the Engineer…failed, rerolled…failed again, rerolled with his last command token…failed. Next the Doctor moved to Bixie…and he failed again. With his remaining order his remaining Shan-Ji moved to defend against an advance and went on suppression.
Bottom of 2 – Caledonia: Closing it out
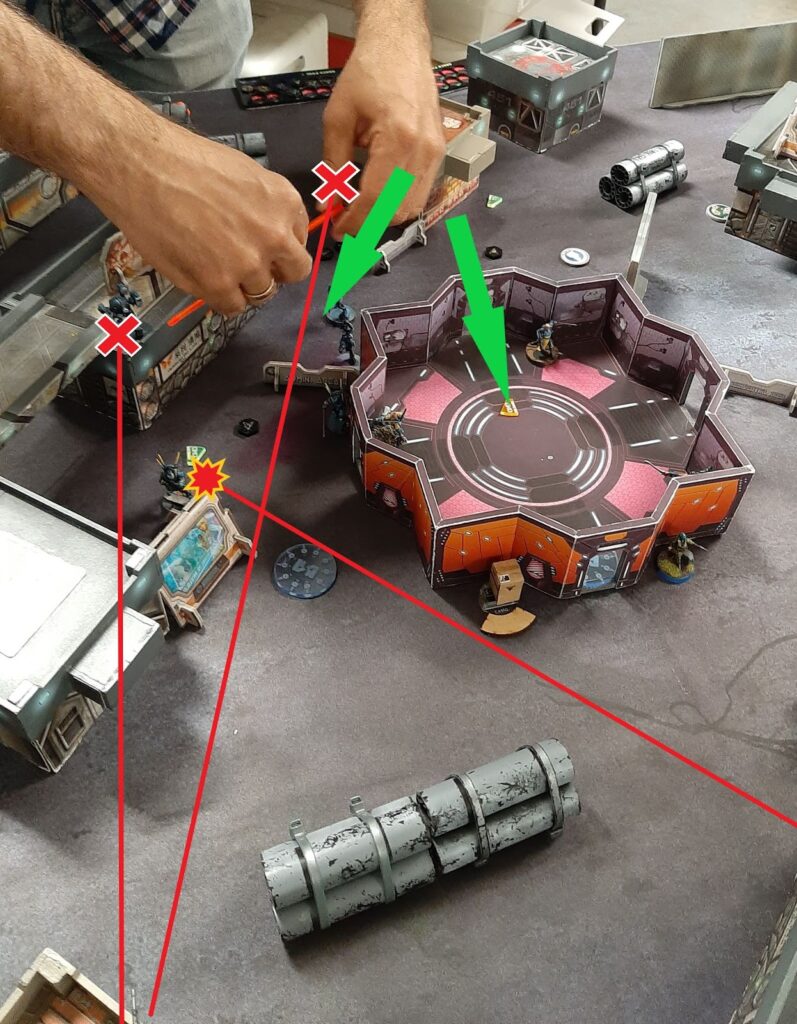
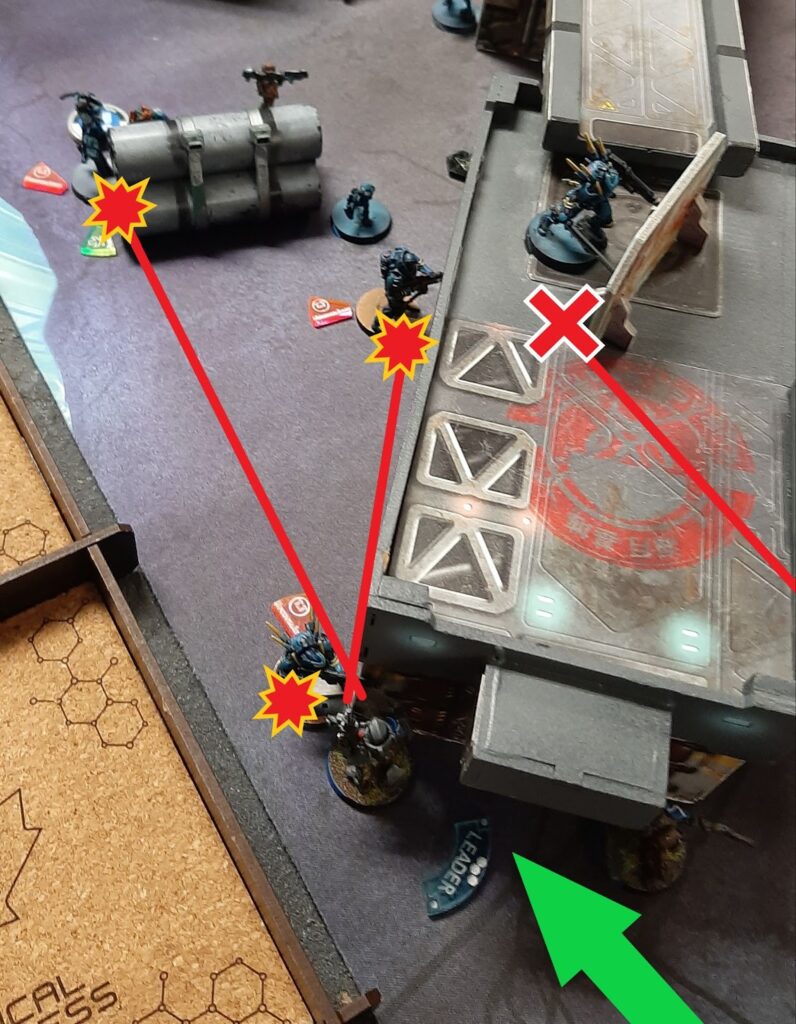
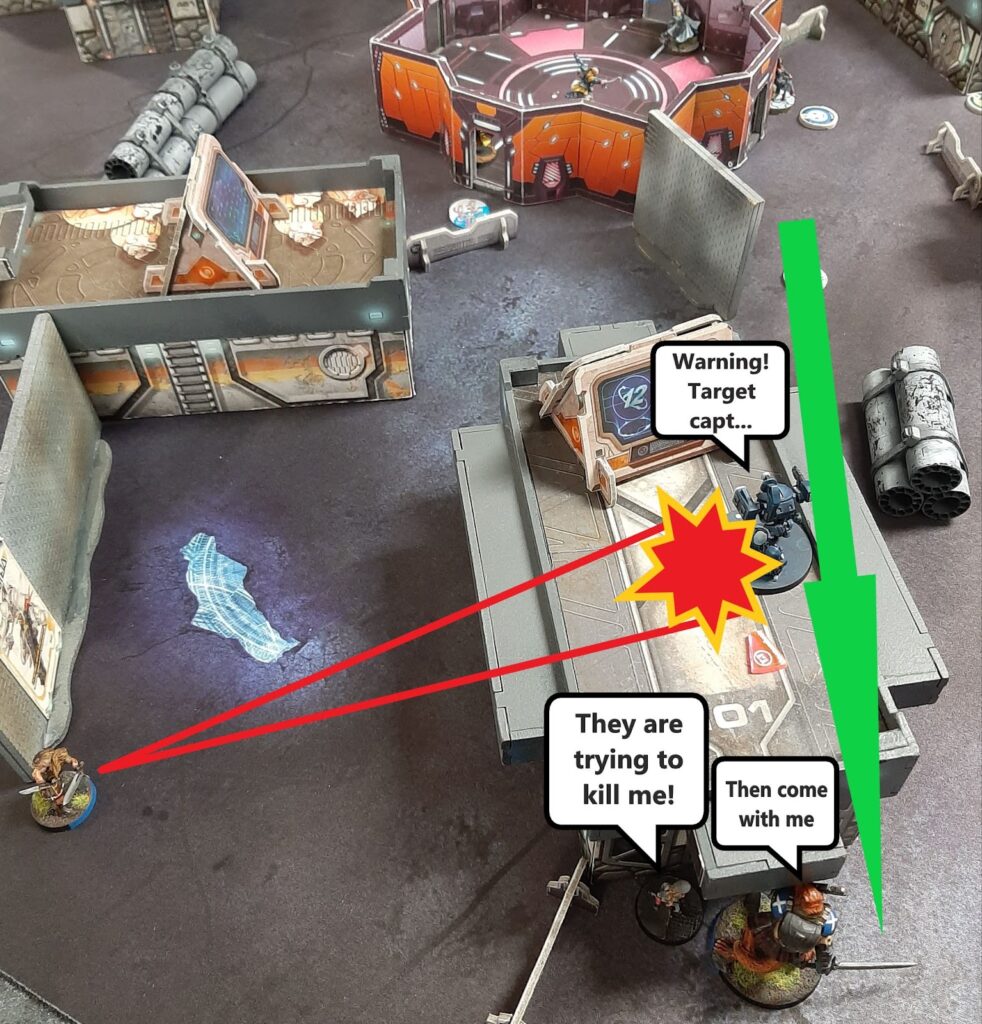
I began my turn by having Uxia climb up the building the Shang-Ji HRL was on and assassinate him. My Grey BSG then eliminated the remaining Shang-Ji. Recognizing that there may not be a 3rd turn McMurrough began his run. He moved along the right of the objective room avoiding Liang Kai and his monks. He found the two HVTs hiding behind the wall (ignoring the flashpulse bot). As he moved in he worked on revealing both HVTs, identifying the correct one and a false one. He moved into the real one and stuck her with his special para sword and began dragging her away.
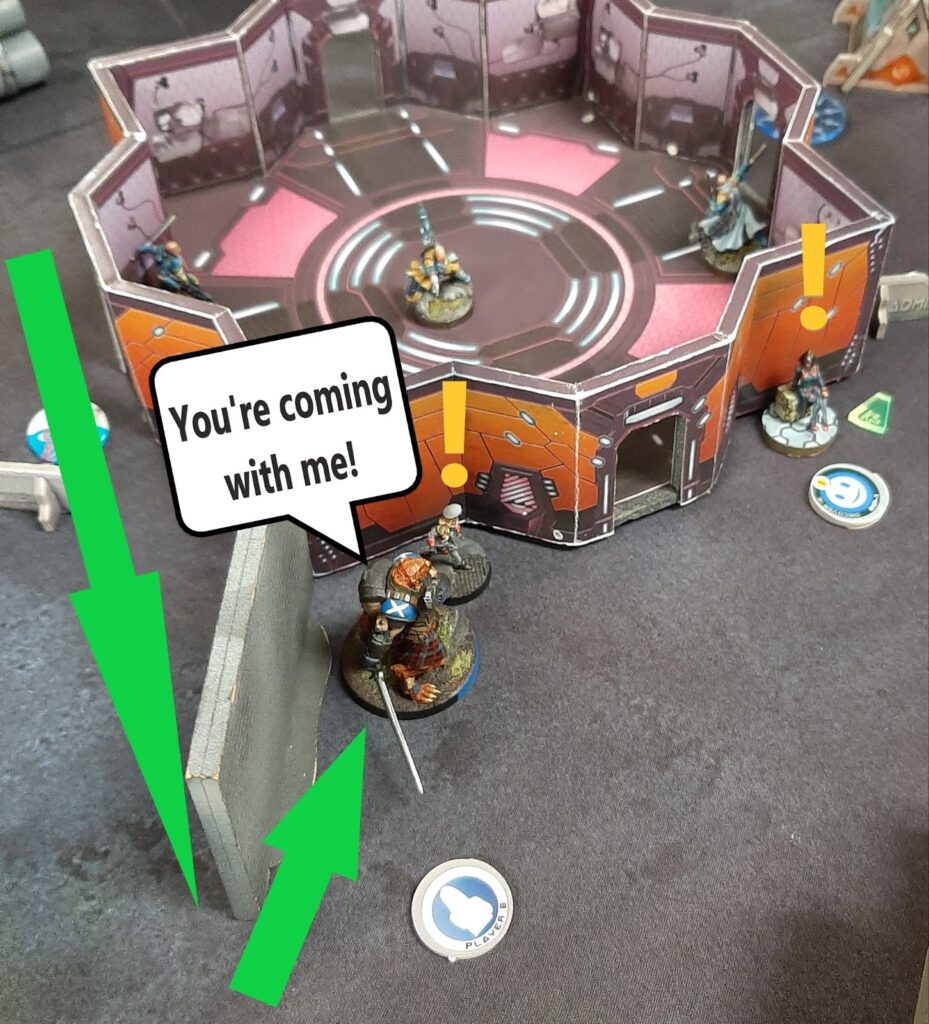
As he retreated to hide behind the building that the remaining Long Ya was on. As he moved there to hide, the Long Ya hiding on the roof dodged up to try and kill the HVT before they could be captured. With that the Galwegian that had been biding his time on my right flank darted forward and chain rifled down the Long Ya.
Turn 3
We called the game after round 2, because of time and my opponent decided his forces were too decimated to continue.
Final Score
Caledonian Highlander Army Victory (8-3)
Post-Game Analysis
This was my first experience playing a BAMS mission. Unfortunately, none of the rules changes came into play in our game so I can’t really comment on how I found them to work in practice. I can however reflect on the mission. Overall my opponent and I had a great time with the mission. It really felt like an interesting take on Unmasking but without the bad feels that can arise in Unmasking caused by guided missiles, or worse, Endgame.
In particular the ability to shoot your own designated target to avoid them from being kidnapped was very interesting, and led to an amusing moment near the end of the game. The only difficulty we had was working out how LoF worked for a model being CivEvaced or CasEvaced. With CivEvac now having the model teleport to where the escorting model ends it move, does that mean that LOS is measured to the escorting model, or is there only LoS at the start and end where the escorted model is placed. There is likely an answer in a detailed reading of the rules, but it could be valuable to add a note to the mission clarifying (or maybe a BAMS FAQ).
Pingback: Mission 059: Try Something New Report! – Bromad Academy