We’re Not So Different You and I
HI Ho, Solo! Battle Report by Jordan B – Obyiscus
Overview
- Mission: Biotechvore
- Forces: Starmada vs Tunguska (200pts)
- Deploy First: Starmada
- First Turn: Starmada
- Starmada Classifieds: In Extremis Recover, Follow-Up, Telemetry
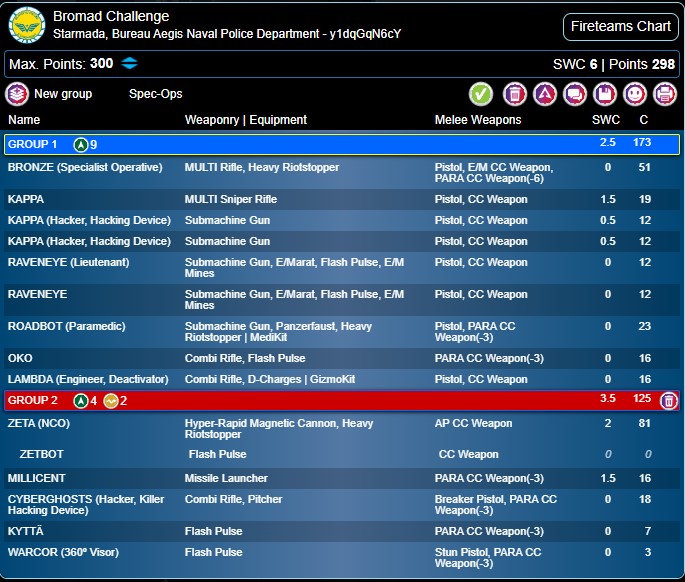
Lists

Deployment
Starmada Deployment
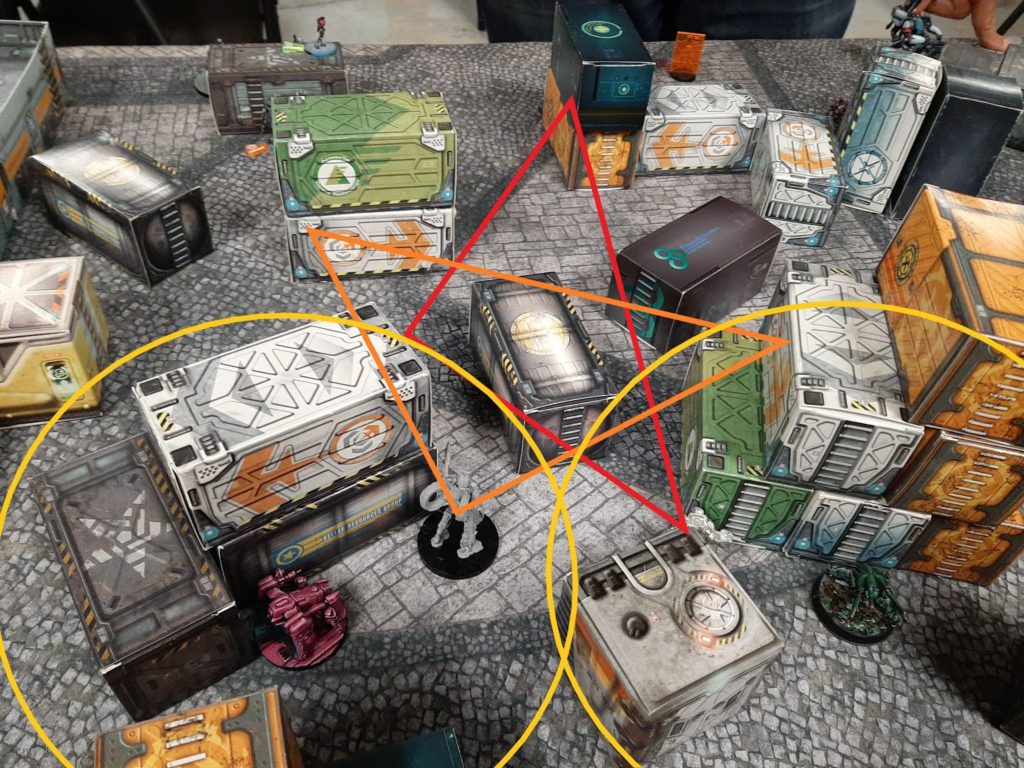
Unfortunately I forgot to take photos of deployment but it was essentially as follows. Firstly, the table was ‘Crate City’, we were doing inventory of terrain for a large upcoming local event and had just packed an entire bin of crates and thought “what if we just played with crates”. The result was a table with a solid amount of LOS blocking, some good winding pathways with interesting firing lanes, and good height variability. Importantly, with no parapets, being on high ground could easily find you without cover if someone else got on another crate…or was taller than crates.
I deployed with my Core fireteam bunkered on the right looking to move forward behind some taller terrain. I deployed my Cyberghost nearby with a flashbot, hoping to have a safe path of advance. My Millicent was camped on my right flank, looking to move up and take advantage of some longer diagonal firelanes.
On my left, I deployed my Bronze, Lambda Engineer (a mistake given I planned to put my TAG on the right) and my Roadbot/Oko duo. My Warcor was also nearby, with no intent of him ever moving.
My holdback was my Zeta which I deployed near my fireteam on the right. Foolishly I deployed him out of cover, not thinking about the counter deploy.
Tunguska Deployment
My opponent deployed his Bounty Hunter harris on my left flank, rolling mim-6 on the foot bounty hunter and grenades and a monofilament sword on his motorized bounty hunters. On my right flank he deployed his Securitate core with the Grenzer MSR standing watching down a lane to slow my approach. The rest hid, however, he chose to have some standing thinking they would be hidden well enough by the boxes (a mistake we discussed in our post-game debrief).
Mary Problems successfully rolled to forward deploy, and deployed on top of a central right crate behind another crate. The rest of his forces were deployed more or less centrally behind a large wall of boxes.
Finally, he counter deployed my Zeta with his Szalamandra staring right at me out of cover.
Turn 1
Top of 1 – Starmada: Pushing Out
My opponent striped two orders from my second group. I began my turn my using the Oko’s Tac Aware to move the Roadbot and Oko up my left flank. I then began working on the threat of the Szally who had my Zeta out of cover. I spent a coordinated order to coordinate my Millicent, Zeta, Flashbot and Cyberghost. The first order the Cyberghost and Flashbot moved up, taking advantage of the free movement, while the Zeta moved forward into cover and the Millicent scaled a nearby crate stack.
The Millicent was obliterated by the Grenzer, also drawing out the two Akrylat shots from the Bounty Hunter (which I was very thankful for). My Zeta and Millicent both shot at the Szally who chose to oppose the Zeta. In the end the Zeta’s shots bounced off the Szally’s armour, and the missile missed entirely. At the same time the Cyberghost took the opportunity to shoot out a pitcher, outside of Mary’s range (I didn’t want my hackers to be slowed dealing with her).
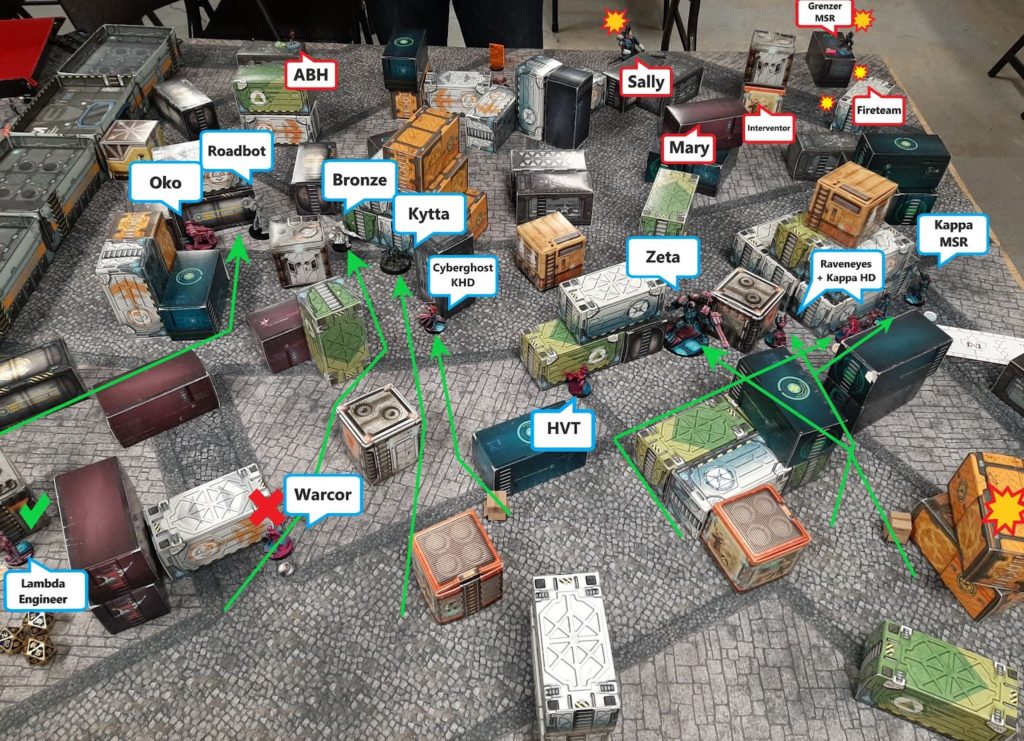
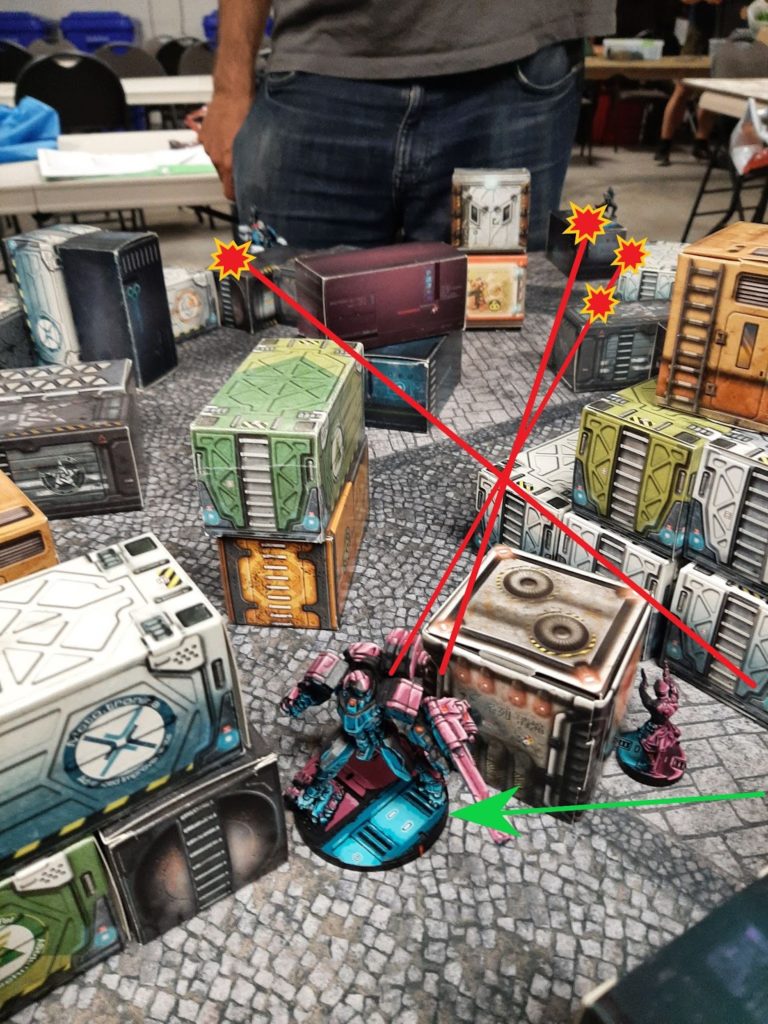
Using the Lt order thanks to NCO, the Zeta moved up some more (now in cover) and unloaded on the Szally, critting and doing two wounds. Forcing the Szally to fallback out of the Zeta’s sight. The Zeta continued forward and faced the Grenzer, who thanks to the Zeta’s height was out of cover. Thanks to another Crit the Grenzer went down, and the Zeta quickie followed up by vaulting a crate to see the two Securitates, splitting burst and gunning them down.
Looking to clear the Szally for good, and get my fireteam to safety, the team advanced forward toward my right flank. The MSR eventually got into position and was able to finish off the Szally with my last couple of orders.
Meanwhile, on my left flank the Bronze had advanced, forcing back the flashbot who could do nothing to effect the Total Immune HI. With the way cleared the Oko and Roadbot moved up, taking up defensive positions for the enemy counter/attempt to escape the Biozone. I used two of my remaining command tokens to convert the warcor’s order and coordinate the Zeta, Flashbot and Cyberghost in order to get the Bot and Ghost to safety and the Zeta better positioned.
Thanks to putting my HVT right on the line of the Biotechvore zone I accurately had gauged where the zone ended. This left just my warcor and engineer behind. The Warcor fell unconscious, but the Engineer passed their save.
Bottom of 1 – Tunguska: Pushing Back
My opponent hadn’t lost many models, but had lost their two main fighters, and now had to face my entrenched troops in order to get out of the zone to safety. Using NCO and some orders he tried to take out my fireteam (who had lined up behind a wall) using his remaining Grenzer. He advanced to within 8 and took the fight with my sniper (who switched to his pistol). The Kappa won the first fight, but the Grenzer’s armour held. The second fight again went in the Kappa’s favour and this time the Grenzer went down. Post-game we discussed things he could have done differently and this moment was one that stood out to me. Rather than hanging back and trying to down the sniper before advancing, I think it would have been better for him if he had pushed forward, and then on that second order pushed up to lay a double LFT down the entirety of my fireteam.
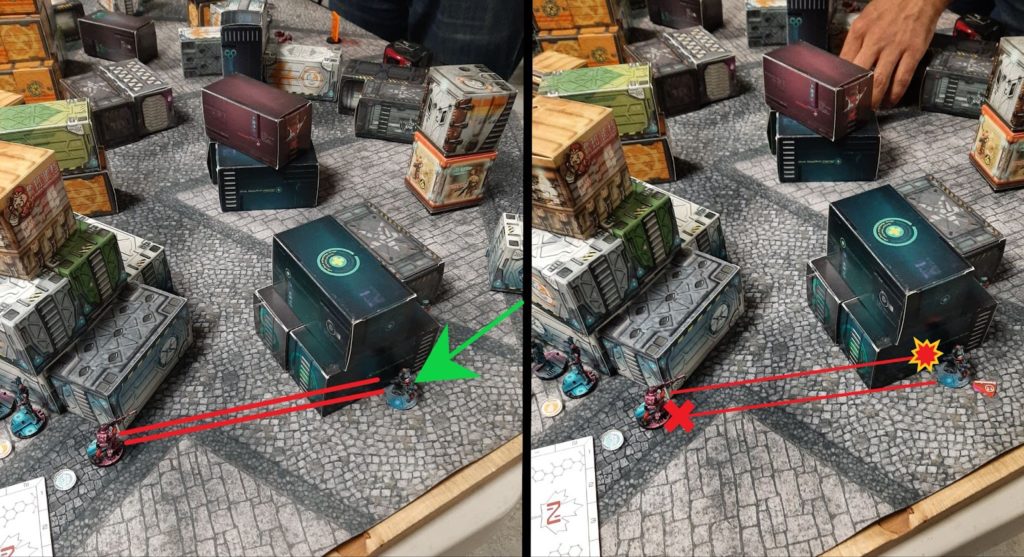
My opponent’s next gambit was to use Mary to try and hack my Zeta. He moved Mary off her perch to get a good lane for a pitcher. In doing so she revealed herself to my Roadbot. Mary got the pitcher down, but the Roadbot landed a hit with his panzerfaust and Mary went down.
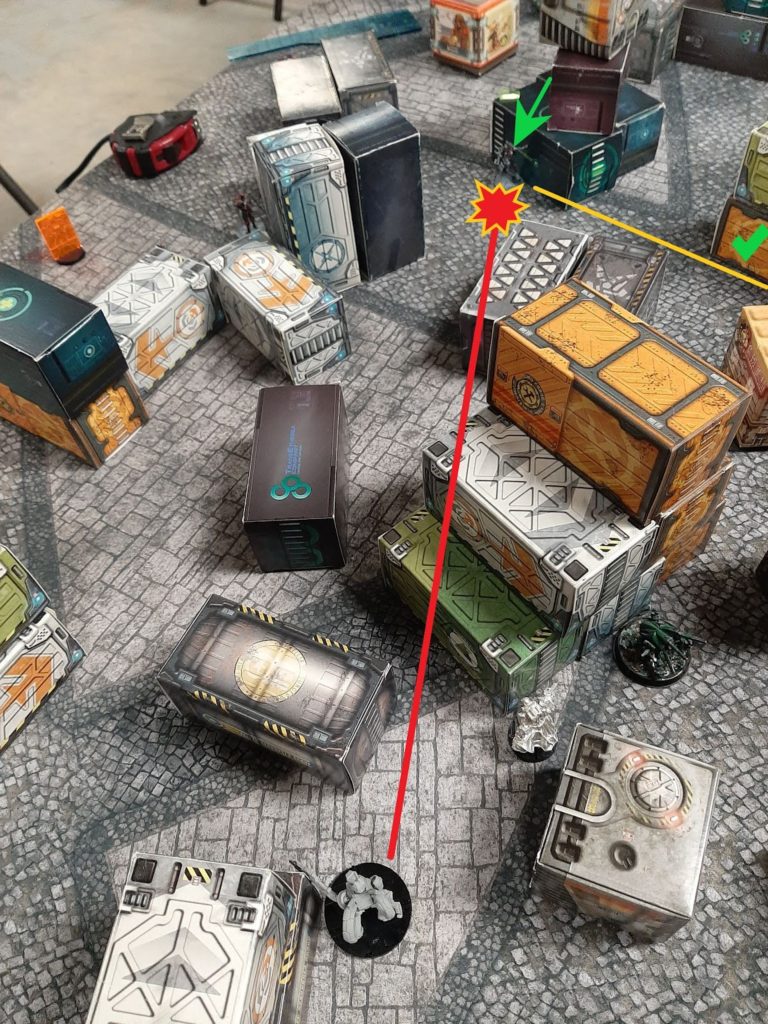
He then tried to push out with his bounty hunters. The first bike died to a double action round from the Bronze. The Foot bounty hunter then scored a wound on the Bronze with his SMG (forcing the Bronze to guts back). Finally, his second bike moved up to try and get some kills with her double chain colts. The Flashbot went down, but the Bronze tanked both of his saves. In the proceed the Bike went unconscious, and my Kappa hackers successfully targetted them scoring me Telemetry.

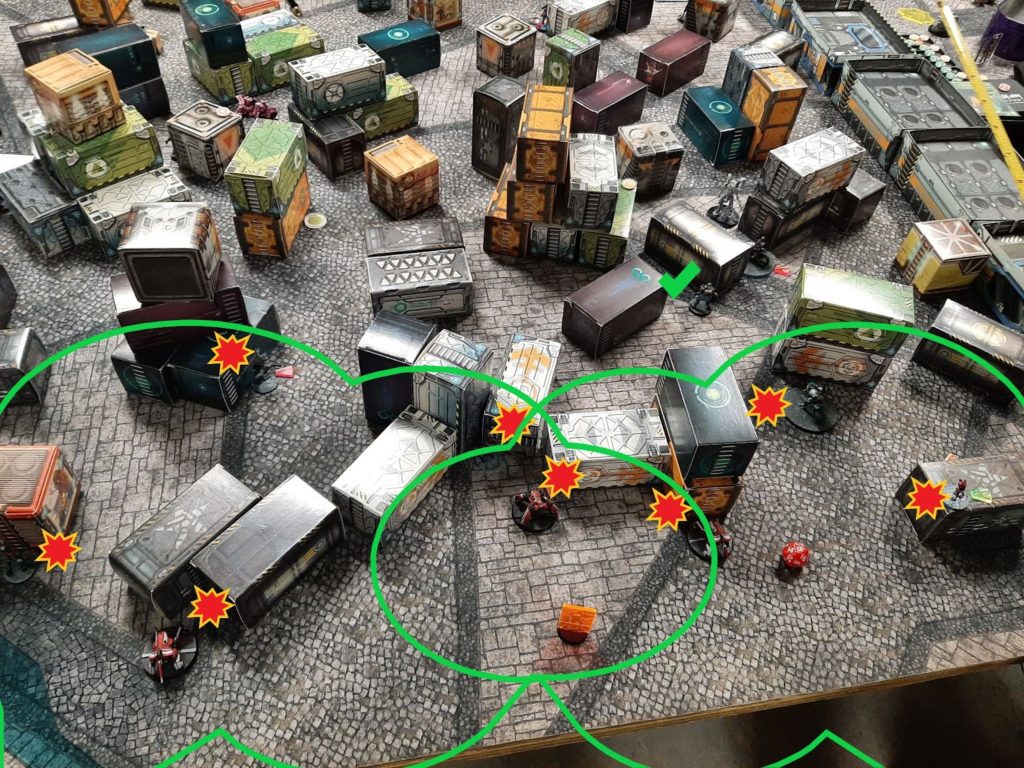
Finally, my opponent used his Interventor to carbonite my Zeta, through Mary’s pitcher. As my opponent’s turn ended only the unconscious motorized bounty hunter had escaped the zone. As The biotechvore zone was particularly brutal, sparing only the foot bounty hunter, even cutting through the BTS 9 of the Interventor Lt.
Turn 2
Top of 2 – Starmada: Objective Secured
At this point my opponent decided to just talk through my turn. It was easy for me to get the In Extremis Recover using the tac-aware on the Oko to step on the neck of the unconscious biker. My Bronze then dashed across the map to Follow-Up on the enemy HVT.
Final Score
Starmada Victory (10-0)
Post-Game Analysis
This game ended up being brutal, as Biotechvore can be. Our lists were very similar and going first and being able to leverage the active power of the HRMC was big. Coupled with the Zeta being able to get lines via vaulting and climbing lead to a punishing first turn. The movement efficiency of a number of other units (especially the Roadbot duo) really let me leverage more orders into offense while still moving the vast majority of my troops out of the Biotechvore zone.
I really wish the game had gone longer so I could have tried leveraging the Bronze more. As is being able to push up turn one and deal clear Flashbots without fear of stuns was very helpful, and his durability meant that I felt fairly safe putting him out to slow the SMG wielding bounty hunters. Ideally I would have dealt with the Szalamandra an order sooner so he could have suppressed. We only ended up talking out my second turn, but he would have easily been able to trudge over to the enemy HVT to score follow-up. And had my opponent survived more, having the Heavy Riotstopper on a durable TI platform would have let me push up on something like his TAG and risk a single wound to immobilize the enemy TAG.