
Growing Pains!
Reinforcements Battle Report by Jordan B – Obyiscus
Overview
- Mission: Evacuation
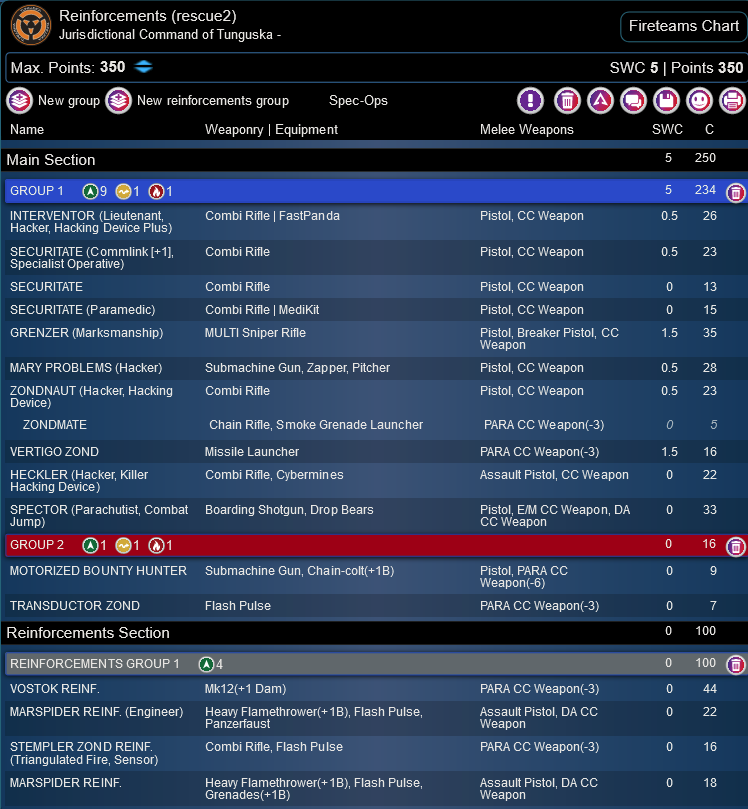
- Forces: Shock Army of Acontecimento vs Tunguska (350pts – 250/100)
- Deploy First: Tunguska
- First Turn: Tunguska

Deployment
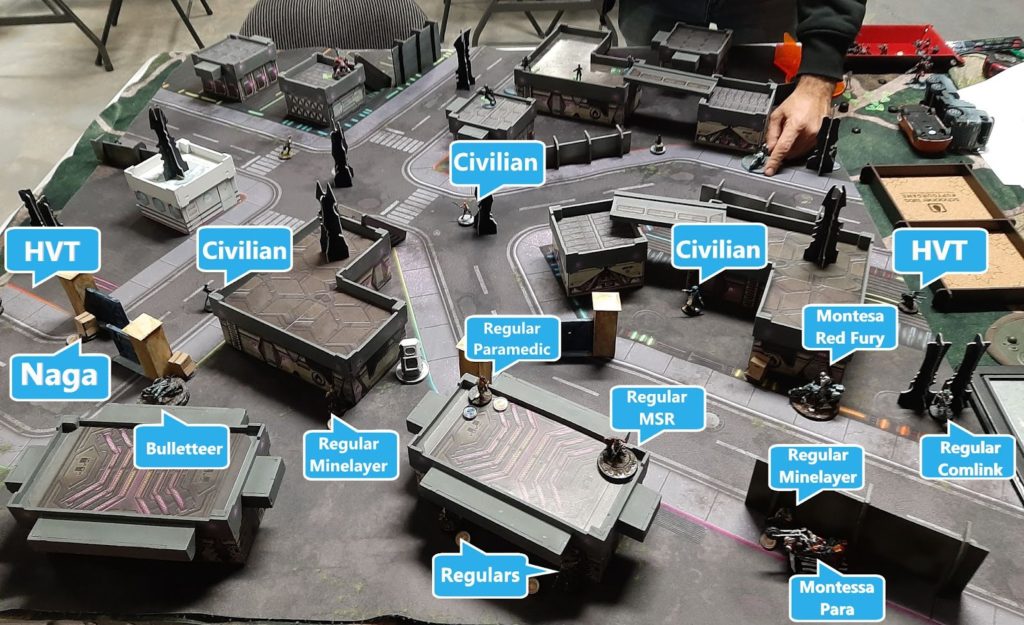
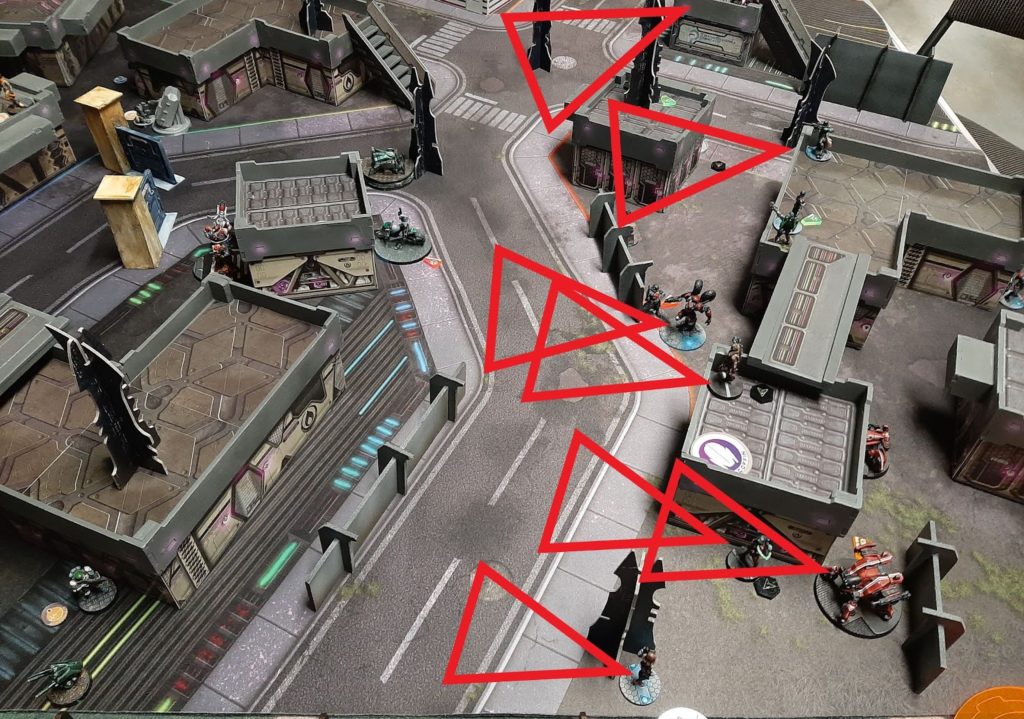
Tunguska Deployment
My opponent deployed his forces spread across his back line with the Grenzer in a commanding position supported by his fire team. On his left he deployed his MBH ready to move up and grab a civilian, supported by a Heckler deployed up the board. Mary was deployed on the central building behind a spire (that was knocked off in the picture). His flashbot and missile bot took up his right flank providing some aro from the flashbot to delay an attempt on his right HVT. Both of us deployed our HVTs on the side of the table as far as possible from the evac consoles.
Finally he deployed his holdback, his Zondnautica, centrally ready to run up and grab civilians and bring them back to his console.

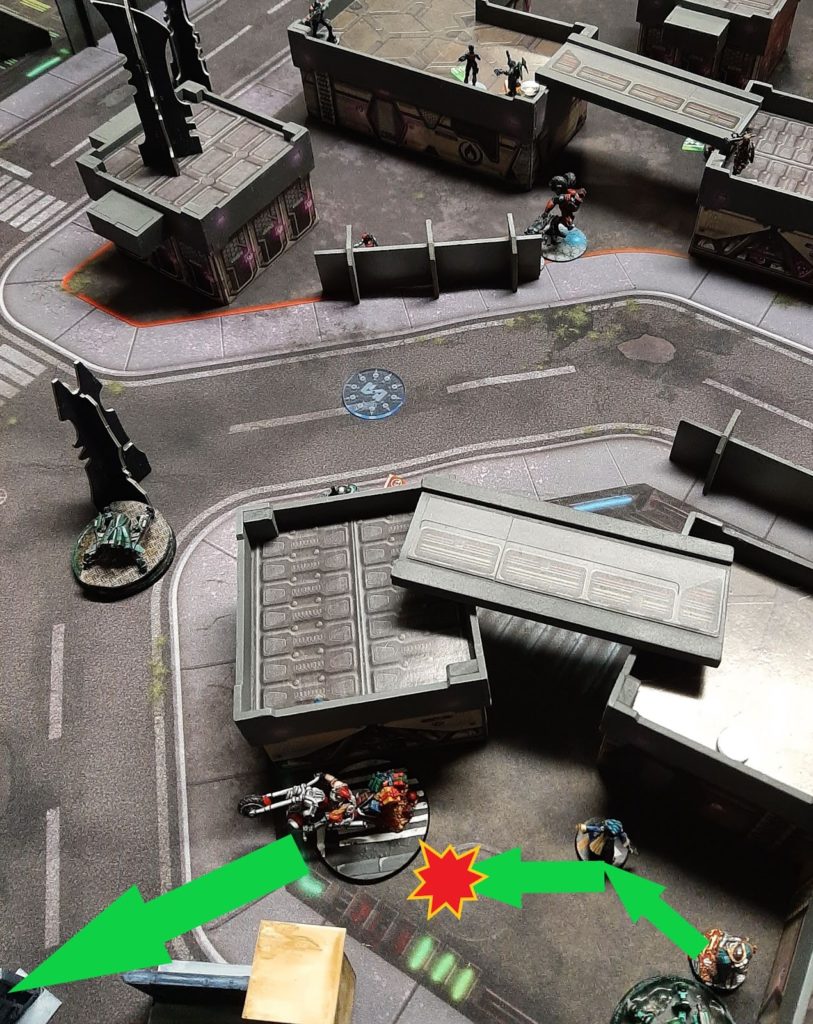
Shock Army Deployment
I countered by deploying my regular fireteam in a commanding position, forgetting that the grenzer ignored all of the bonuses sapper gave to my sniper. I deployed my montessas on the right ready to move up and start grabbing civilians, and my Naga on the left to grab the near left civilian.
Finally I deployed my held back Buleteer staring down his Zondnautica hoping to delay the bike and prevent it from grabbing too many civilians turn 1, especially the central one.
Turn 1
Top of 1 – Tunguska: Evacs Begin
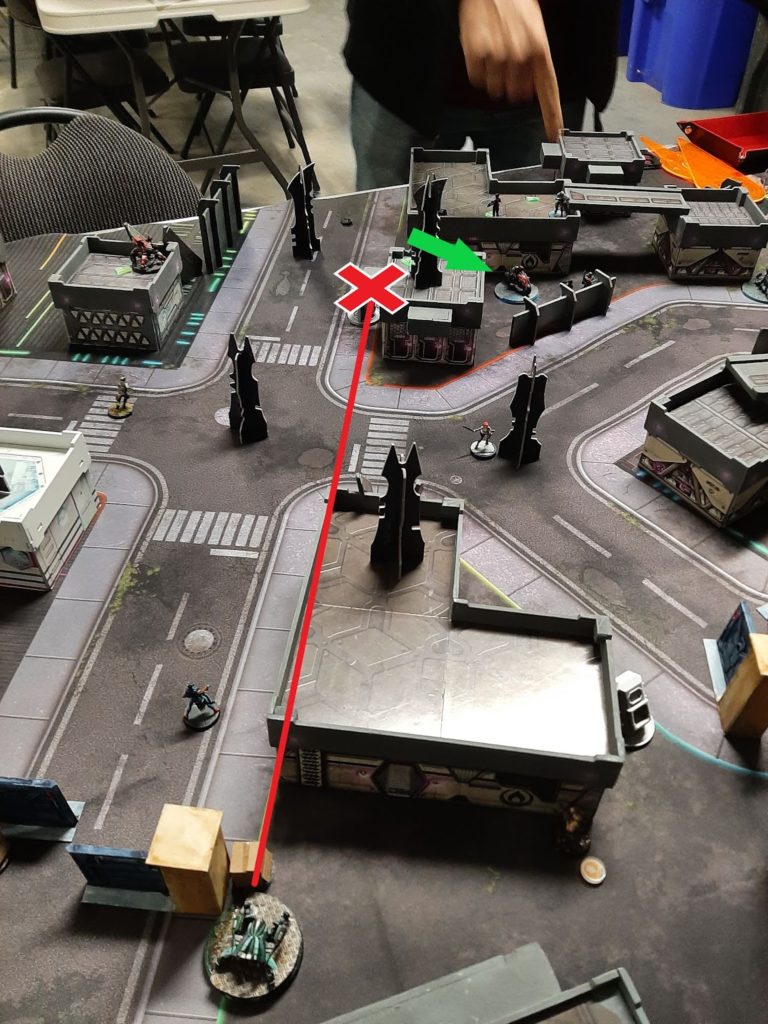
My opponent began by using the MBH’s irregular order to drive up and dodge into base contact with the near left flank civilian. The Grenzer then activated and took the head off of my Regular sniper, giving the MBH the freedom to grab the civilian and drag them towards the nearest evac point.
Meanwhile the Zondnautica activated and moved towards the MBH, tanking a hit from the Buleteer, before grabbing the civilian from the MBH and bringing them to the Evac console, launching them to safety.
Finally, Mary Problems launched a repeater onto a walkway outside my DZ to prevent the advance of my Montessa.
Bottom of 1 – Shock Army: Stoppable Force and the Immovable Object
Overall my turn was less than effective. My Naga was able to use his camo to avoid being shot by the Grenzer, grabbed the nearby civilian and took them to my evac console and successfully evacuated them.
With that completed I realized I couldn’t do anything without clearing the Grenzer and repeater. Luckily the repeater was positioned such that one of my regulars could take it out from the ground without being shot.
I then moved my bulleteer up to try and face the Grenzer, while skirting out of Mary’s ZoC. The On the way the Bulleteer took shots at the Zondnautica, who once again tanked the hits and failed guts to get to safety. The Bulleteer then faced off against the Grenzer. The grenzer rolled a miss and a 1…the Bulleteer missed all 4 shots and fell unconscious.
Turn 2
Top of 2 – Tunguska: Objective Secured
With no real AROs to oppose him (my plan had been to put the bulleteer on suppression, which may have been better than trying to fight the Grenzer) my opponent spent his turn driving around with the Zondnautica, grabbing and evacing his other near civilian, as well as the central one. He did not kill any of my units, recognizing that doing so would only help me by bringing in my Reinforcements.
Top of 2 – Shock Army: Cutoff the Head
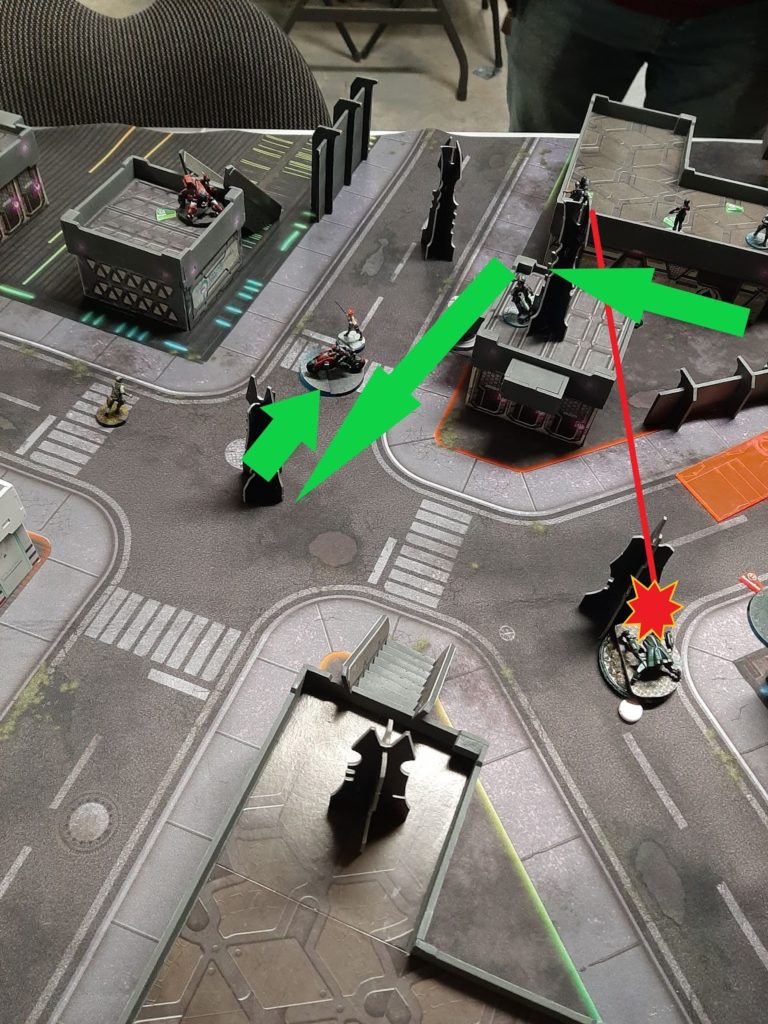
Recognizing the desperate situation I was in I moved Kirpal Singh into group 1 and brought him in beside the enemy HVT on my right flank. I made an error with the new classified that I had chosen, not realizing it removed the HVT, and decided not to do it (in hindsight I should have just taken the guaranteed point). Kirpal Singh then went on his assassination run. He began by killing the enemy, Lt before turning the corner and taking out a Securitate. He continued along my opponent’s DZ eliminating the Heckler that had revealed and another Securitate that had jumped to standing on the nearby building.
Singh continued along, scaling the building and taking a fight with the Securitate paramedic that was watching the ladder. Singh won, but the Paramedic survived. Singh then moved to fire at the grenzer and paramedic. Kirpal fell to fire from the paramedic, who in turn tanked the template hits that also hit the Grenzer. The Grenzer’s armour, however, stayed strong and ignored the shot completely. Once again the Grenzer had survived to lock my forces down. In his final actions Singh was spotlit by the Zondnautica, giving my opponent his classified.
I tried to move my Montessa Red Fury up to deal with his Grenzer, but once again this failed and I lost my last ranged weapon outside of my reinforcements.
Turn 3
Top of 3 – Tunguska: Set to Defend
With his LT dead, but up on points, my opponent realized that all he had to do was defend. He brought in his reinforcements, setting them up to delay any advance even further. He then stood his missile up, and moved his remaining troops to watch any movement out of my DZ (and even into my DZ).
Top of 3 – Shock Army: Final Gambit
At this point I realized that it was all but over. I brought my reinforcements in and tried to clear the way with my Bolt spitfire, who like those before him fell to the Grenzer. It tried to heal the bulleteer, but it failed it’s gizmokit role. Finally, I decided to try and at least score one more point. My brave blade op ran out and civ evaced the remaining civilian. He then move moved towards the evac console and my Montessa paramedic, dying in the process. The Montessa then scooped up the civilian and drove to the console, and pressed the button. He rolled an 18. Fire came in from a linked panzerfust, the Grenzer, and the Missile bot. Miraculously, the Montessa survived. He pressed the button again…a 19. He again survived the incoming missile. With my last order her pressed the button…and rolled a 20.
Final Score:
Tunguska Victory (4-1)
Post-Game Analysis
This game was my first game of both reinforcements and evacuation in preparation for a tournament the following weekend. From it I had a few big takeaways. Firstly, SAA needs to bring a big gun to put down ARO pieces like Grenzer because they lack other tricks to get past these pieces. Generally this means bringing a TAG, which I was initially finding difficult in 250pts. The second big takeaway I had was that Evacuation needs alot of orders, and that while my 100pt reinforcement package was very order efficient it realistically would often not arrive until round 3 leaving me with essentially 10 orders or less to do things until then.
As a result of this I decided to rework how I approached reinforcements, particularly for PanO.
Return of the Shock Army
I ended up sticking with SAA for my event and brought this list:
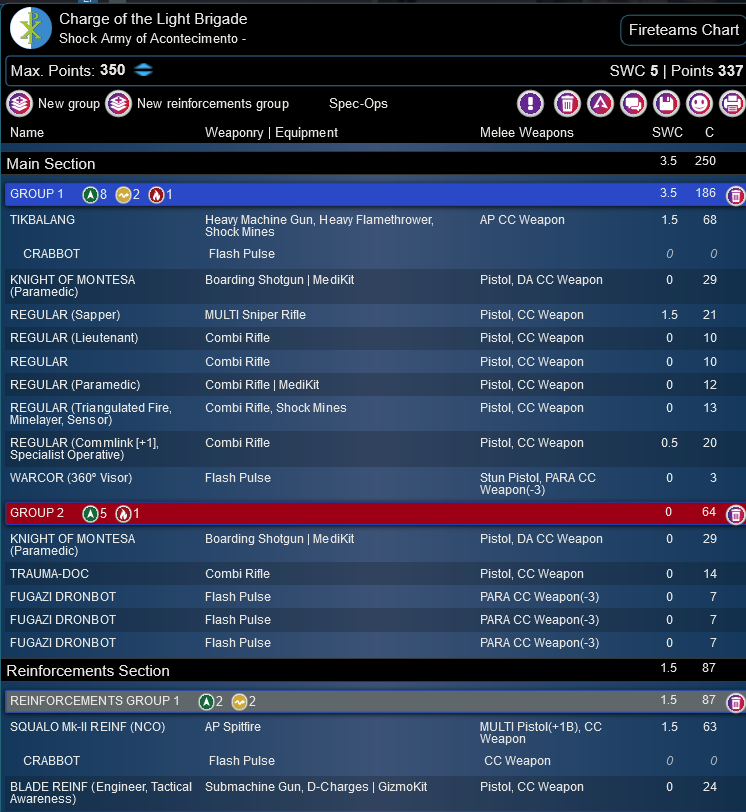
The key changes to how I built the list were as follows:
- I added a TAG: The Tikbalang was able to duo with one of the Montessas and help it up the board to grab civilians/HVTs and then run back on its own to evacuate them.
- I reduced my Reinforcements to 2 models: The Squalo Mk-II and Blade ops Eng are a very efficient package that brings effectively 5 orders (2 reg, 2 tac aware, nco) and the ability to punch hard, heal my tags, and do objectives.
- This team could come in and have 6 orders, thanks to the comlink, to do alot of work.
- I increased my initial orders: By only having 2 reinforcement models it allowed me to bring 14 other models. Turning to my N3 SAA I spammed out the cheap Fugazi and other cheaper orders
- I made both Montessa Paramedics: This allowed me to have a secondary pool devoted to a Montessa just driving around and doing objectives.
- I didn’t use all 100 pts of reinforcement: By only bringing 87 pts of reinforcements it meant they could come in sooner. Also by having the Tikbalang the points worked out that if my opponent took out the Tikbalang and another meaningful piece (i.e. Montessa or Sapper SnipeR) my reinforcements could come in.
- In all 3 of my games this happened turn 1, and I was then able to bring in my Reinforcements turn 2 and heal my downed troops/TAG (although in atleast one game we made the mistake of not realizing that unpossessing the TAG takes place before reinforcement calculations).
Pingback: Mission 057 Report: Reinforcements – Bromad Academy